By: Atif Shehzad | Updated: 2009-06-17 | Comments (16) | Related: More > Database Administration
Problem
I know that moving the log file of a production SQL Server database to separate physical drive is a best practice to optimize the I/O performance. Recently, we have added a physical drive to our SQL Server. Based on this change, I am planning on moving the SQL Server log file of my production database on this drive. I am curious about how it will optimize the performance. What are some of the considerations I should take into account and how can I move the SQL Server database log file to a separate physical location?
Solution
All SQL Server databases have at least one primary database file and one transaction log file. The transaction log file records every data change and DML transaction that was executed in the database. Writing to the transaction log file is sequential in nature as compared to the database files which are typically random I/O. As such, placing the log file on separate physical disk from database will allow the disk to work in sequential manner and perform optimally. To move to this configuration, it will be necessary to detach and attach the database. These steps can be accomplished with either T-SQL commands or the SQL Server management studio (SSMS). We will walk through an example of each technique in this tip
The following preliminary items should be reviewed prior to moving a transaction log file to a new location:
- Record the current location, size, etc. of the database files
- Record the current location, size, etc. of the transaction log file that is going to be moved
- Note the location, size, etc. of the future destination of the transaction log file
- Schedule a downtime to move the database when no users are connected to the application
- Validate the database is not in any replication scheme, on a snapshot schedule
or a member of a mirror
- If so, plan accordingly and build the scripts to address these configurations
- Ensure your are a member of the db_owner fixed role
In a nutshell, the three main steps involved in moving a log file to new location are:
- Detach the database
- Move log file to new location
- Attach the database by referencing the new location of the transaction log file
For demonstration purposes we will use the AdventureWorks database which is currently installed on the D:\ drive of my SQL Server. This database may be installed on another drive on your machine, but the main concept of the demonstration is to move the AdventureWorks transaction log file to another physical drive i.e. C:\.
Example - T-SQL Command
In this example, we will work through the steps to move a transaction log file to a new location via T-SQL commands. The first script will return the current locations, size, etc. of the database and transaction log files.
--Script #1: Capture database and transaction log file information

USE AdventureWorks
GO

sp_helpfile
GO
Below is sample output from the script showing that database has only two files. First is primary database file and second is the transaction log file. Although the file name, size, etc. may be different on your SQL Server, you will know the exact location of the files before the transaction log move begins. Note the location of the database file since it will be used during the database attach process.

Once you have the location information and have negotiated downtime with your users, now it is time to get exclusive access of the database in order to detach the database. If users are still connected to the database during the downtime, it is possible to remove them by using the With Rollback Immediate option or you can kill the connections via this tip.
--Script #2: Set database to single user mode and detach database

Use MASTER
GO

-- Set database to single user mode
ALTER DATABASE adventureWorks
SET SINGLE_USER
GO

-- Detach the database
sp_detach_db 'AdventureWorks'
GO
Now the database is detached. Once the detach process is completed, then you can copy and paste the new transaction log file then delete the old transaction log file via Windows Explorer. Once this is completed, we can attach the database with SQL Server database log file at new location with the following script:
--Script #3: Attach database with log file at new location

USE master
GO

-- Now Attach the database
sp_attach_DB 'AdventureWorks',
'D:\Program Files\Microsoft SQL Server\MSSQL\Data\AdventureWorks_Data.mdf',
'E:\Move LogFile here through T-SQL\AdventureWorks_Log.ldf'
GO
After the final attach command our transaction log file has been moved to new location and our database is operational with log file on new location. Verifying the new database transaction log location can be accomplished by re-running script #1 above.
Example - SQL Server Management Studio
In this example, we will complete the detach, move and attach process through SQL Server Management Studio (SSMS). Here is the general process
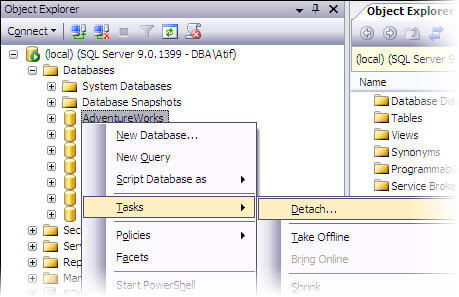
- Open SQL Server Management Studio
- Navigate to root | Databases | AdventureWorks database
- Right click on the AdventureWorks database
- Select the Tasks | Detach... option

The Detach Database form will load with the applicable information. Once the status is "Ready" then you can proceed with the detach process. If status the status is "Not Ready" then you will get a reason under the message column. Most of the time why the database is not ready is related to users connected to database. If this is the case, you can select the drop option provided to drop all existing users.

Once the detach process is completed, then you can copy and paste the new transaction log file then delete the old transaction log file via Windows Explorer. Once the move process is finished then the following general steps will attach the database via SQL Server Management Studio:
- Open SQL Server Management Studio
- Navigate to root | Databases
- Right click on the Databases folder
- Select the Attach... option
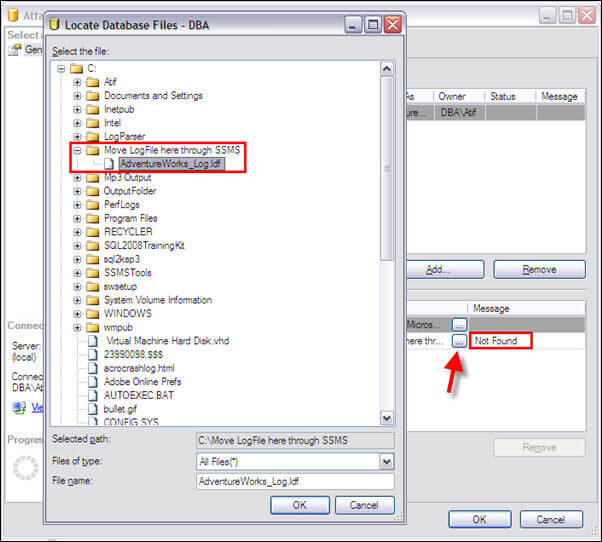
- Click the Add button to navigate to the database and transaction log files

You may notice an error message that the transaction log file was not found after the database file was selected, so browse to the directory with the transaction log file and click the OK button. At this point the attach should be completed and the database should be online with the new transaction log file location. To verify the database functionality and new file location, run script # 1 from above.
Next Steps
- Click here to read more about attach and detach process of SQL Server databases
- Click here to read more about setting the database to single user mode through SSMS
- Click here to read more about setting the database to single user mode by using Alter database command through T-SQL
- Click here to read more about primary data file and file groups architecture
About the author
 Atif Shehzad is a passionate SQL Server DBA, technical reviewer and article author.
This author pledges the content of this article is based on professional experience and not AI generated.
View all my tips
Article Last Updated: 2009-06-17


