By: Atif Shehzad | Updated: 2010-05-24 | Comments (11) | Related: 1 | 2 | 3 | 4 | > SQL Server Management Studio Configuration
Problem
In a previous tip we discussed how to register servers in SQL Server Management Studio. Now that I have my registered servers setup the way I like, I need to setup other computers the same way that are used to manage my SQL Servers. Instead of having to manually add the registered servers on each computer in this tip I show you how you can import and export registered servers between computers.
Solution
Fortunately SSMS provides an import and export option for registered database servers. Registered servers can easily be exported to a file and then imported to SSMS on the same or different machine. The export process allows you to export one server, one server group or all registered servers. There is not an option to pick multiple servers or multiple server groups. In this tip, I do show how you can manipulate the XML file that is created to customize the file.
Let's go through the export/import process of SQL Server registered servers using SSMS.
Prepare SQL Server registered server groups
First of all we need to create SQL Server registered servers to work with. As you may know a server instance can be registered even without verification of login credentials. So to simplify the process of creating registered servers, let's register servers with fake IPs for simulation. I have registered 9 servers in 4 server groups as shown below. Registered server groups for both SSMS 2008 and SSMS 2005 are presented below.
Export one registered server group
Starting with a simple scenario we will export a single server group.
- Right click on the server group required to export and choose the Export... option. Note: the right click menu may be slightly different in SSMS 2008 and SSMS 2005 as shown below.
- A frame will appear, reconfirm the required server group is selected, in my case DevelopmentServers.

Browse the path and give the export file a name. By default the check box is checked, so user names and passwords will not be included in the export file. If user names and passwords are included in the export, passwords will be encrypted. Also, when you connect you will still need to provide login credentials. When done clicked OK to generate the export file.
Export all registered servers group
Now to export all server groups. The same process is used as in the single server group export. This time right click on the root folder and select the export option. To select all servers select "Local Server Groups" folder and if you are using SSMS 2008 or select "Database Engine" folder if you are using SSMS 2005. Click OK to generate the export file.
Export selected registered servers groups
In order to export selected server groups or selected servers we need to edit the .regsrvr file generated from the export process. The other option is to delete servers groups after they have been imported into the target SSMS.
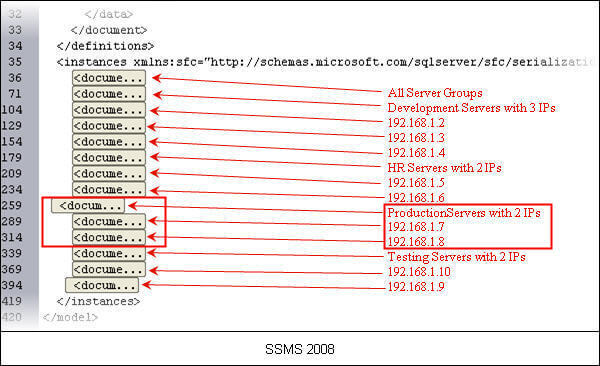
Before proceeding with the edit process of the generated export file, let's take a look at the internal structure of the export files generated using SSMS 2005 and SSMS 2008. Below I have presented a collapsed view of tags to clarify the structure in which server groups and servers are arranged


Our nine servers managed in the four server groups are stored in files in the above format. Here we can edit the file to remove either entire servers groups or any server inside the groups. For this example I am going to remove the server group 'ProductionServers'.
For SSMS 2008 I would remove the following marked tags and also the entry of ProductionServers.

For SSMS 2005 I would remove the whole server group as shown below.

At this point the file no longer contains production servers that were stored in the ProductionServers group and we can now import into the target SSMS.
Import Servers Groups
To import we use the same menu in SSMS that we used for the export, but select import instead. The import frame will appear as shown below. Just choose the file that you just created to import, along with the root folder either 'Local Server Groups' in SSMS 2008 or 'Database Engine' in SSMS 2005. You can also choose any other sub folder and then all groups and servers will be imported to the selected sub folder. Click OK to process the import.

Next Steps
- Once imported you can connect to any of the registered servers.
- Cross SSMS import-export between SSMS 2005 and SSMS 2008 has some issues. Read this article for further details.
- Use the export option to create a backup of your registered servers.
- Use any text or XML editor to modify the .regsrvr file.
- You can also follow the same steps above to export and import one registered server.
About the author
 Atif Shehzad is a passionate SQL Server DBA, technical reviewer and article author.
This author pledges the content of this article is based on professional experience and not AI generated.
View all my tips
Article Last Updated: 2010-05-24


