By: Tim Cullen | Updated: 2010-07-23 | Comments (3) | Related: > Master Data Services
Problem
I installed the database component of Master Data Services and configured it, now I have to configure the web application and set up the initial security. What are the steps to take for the web application configuration?
Solution
In a previous tip we discussed how to install Master Data Services and create and configure the database component. Now it's time to configure the web application. The Configuration Manager is the primary tool to use for configuration of the Master Data Services database, web application and web services components. The Configuration Manager opens directly after successful installation of Master Data Services. It can also be opened from the Start Menu under the "Microsoft SQL Server 2008 R2\Master Data Services" folder as shown below.

The setup of the application in the Configuration Manager is similar to setting up a virtual directory and application in Internet Information Services. The minimum IIS version supported for Master Data Services is 7.5

The first step is to choose a site in which the web application will be stored. The configuration application will query the sites available in IIS and present them in the Web Site dropdown list:

Once a web site is chosen you create a virtual directory. On this page you select a name for the site, any IP address bindings, a host header if necessary, and configure an Application Pool for the web application with a username and password for the application pool identity:

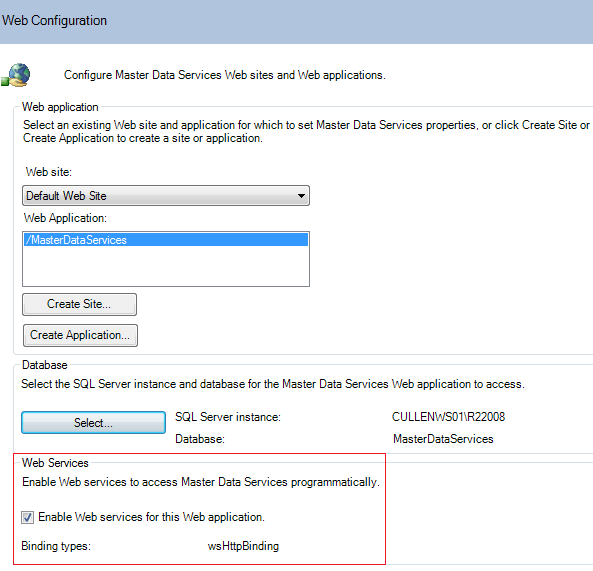
Lastly, if your company will create a customized application for interacting with Master Data Services you can enable the Web Services as shown at the bottom of the page:

At this point you've installed all of the components necessary for Master Data Services; however, you have to set up the permissions necessary to access it. Some planning will be necessary for security, particularly if your institution utilizes Active Directory. Creating groups and assigning the appropriate permissions decreases the level of administrative effort required (known as the AGDLP strategy). The only account that has access to the web application at this point is the account you specified during the initial installation. Log into the server as the administrator and navigate to the URL of the web application. Located at the bottom left of the page is a link named User and Group Permissions:

When you click on the User and Group Permissions link you are directed to the security page. At the top of the page there are two links: one named Manage Users and another named Manage Groups. The default selection is Manage Users:

When you click on the green add button you are directed to a page where you can add individual user accounts. Type in the user account and click the Check names button. More than one name can be entered with a semi-colon between each account. Once you have entered the user accounts click OK:

The Manage Groups page is very similar to the Manage Users page. This page allows you to enter multiple Active Directory or local groups. In either case you will be redirected to the main User and Group Permissions page. If you click on the arrow to the left of the user account there is a dropdown list with Edit and Delete options:

From here you can set specific permissions for areas like Models and Hierarchy Members. Security for these areas will be covered in a future tip:

Next Steps
- It is best to install Master Data Services locally under the context of the administration account created for Master Data Services
- Download a SQL Server Master Data Services Employee Sample Model from MSDN to become more familiar with the web application
- Learn about Internet Information Services from Microsoft's official IIS site
- Review the configuration steps in the Configuration Manager
- Read more information on Deployment considerations for Master Data Services
- Read more tips on Master Data Services
About the author
 Tim Cullen has been working in the IT industry since 2003 and currently works as a SQL Server Reports Developer.
This author pledges the content of this article is based on professional experience and not AI generated.
View all my tips
Article Last Updated: 2010-07-23


