By: Nitansh Agarwal | Updated: 2011-03-03 | Comments (4) | Related: 1 | 2 | 3 | 4 | > SQL Server Agent
Problem
For improved security Microsoft recommends the SQL Server Agent service account should not be a member of the local Administrators group. Being a member of the Administrator group, grants the account super-user privileges which therefore may expose you to more security vulnerabilities. By limiting access for the service accounts it will help you safeguard your system if individual services or processes are compromised.
Solution
As a best practice, SQL Server Agent service account rights should be kept as low as possible to prevent exposing your system to security risks. Making the SQL Server service account an administrator, at either a server level or a domain level, grants too many unneeded privileges and should never be done. Ideally, all the SQL Server services should run from a different account and each account should have exactly the privileges that it needs to do its job and no additional privileges.
During a new installation, SQL Server setup does not default the SQL Server engine service and SQL Server Agent service to any account. The account specification is a required step for these services. Using a local user or domain user that is not a Windows administrator is the best choice.
If the server that is running SQL Server is part of a domain and needs to access domain resources, such as file shares or uses linked server connections to other computers running SQL Server, a domain account should be used. If the server is not part of a domain, a local user that is not a Windows administrator is preferred.
The SQL Server Agent service account requires sysadmin privileges in the SQL Server instance that it is associated with. In this tip I have tried to put forth a solution by running SQL Server agent under group (SQLServer2005SQLAgentUser$ComputerName$MSSQLSERVER). This group has all the required privileges and is not part of the administrator group.
NOTE: When you install Microsoft SQL Server to run using a Microsoft Windows NT account, SQL Server sets various Windows user rights and permissions on certain files, folders, and registry keys for that account. If you later change the startup account for the SQL Server Agent service using SQL Server Configuration Manager, SQL Server automatically assigns all the required permissions and Windows user rights to the new account for you, so that you do not have to do anything else.
Steps to SQL Agent Account
STEP 1
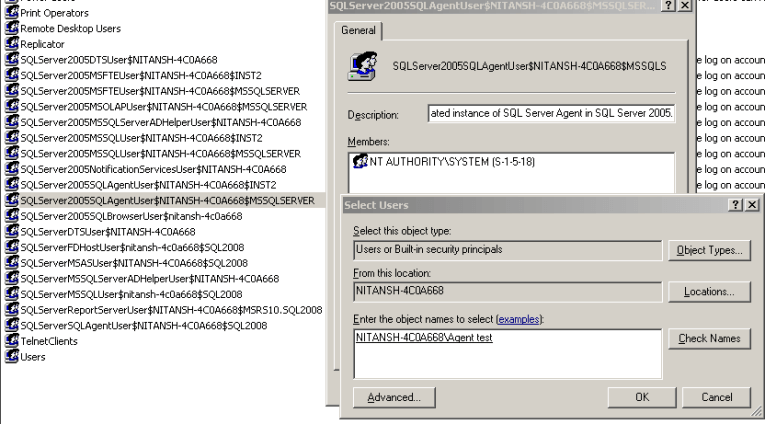
Add the account under which you want to run the SQL Server agent service in the SQLServer2005SQLAgentUser$ComputerName$MSSQLSERVER group. (Right click my computer -> Manage -> Local Users and Groups -> Groups). Then find the group, right click on it and select Properties. This group is pre-configured with all the required permissions to run the SQL Agent service. Also, make sure the account you add to thsi group is not a member of the local administrator group. In this example I am adding "Agent test" to this group.
STEP 2
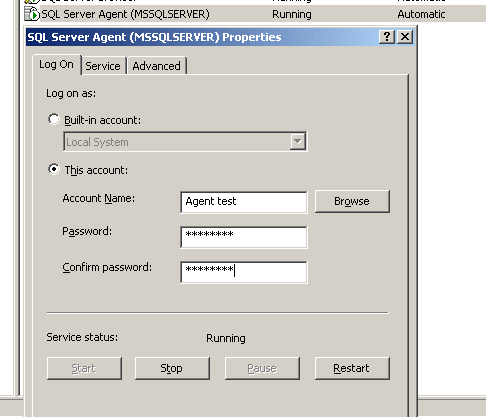
Change the log on account of the SQL Server Agent service in SQL Server Configuration Manager in SQL Server 2005. Use the account that you just added to the SQLServer2005SQLAgentUser$ComputerName$MSSQLSERVER group, in my case it is "Agent test". You may also consider doing it through services.msc, but it is recommended to do it using SQL Server Configuration Manager. The reason is, when you install SQL2005, a service master key for encryption is created. This key is then used to encrypt certificates and any other encryption keys. The service master key (SMK) is linked to the service account and changing this account can make the key invalid and then it can't open the certificates anymore. When you change your service account through SQL Server Configuration Manager, SQL 2005 will take care of creating a SMK. By default, only members of the local administrators group can alter the service account, start, stop, pause, resume or restart a service.
STEP 3
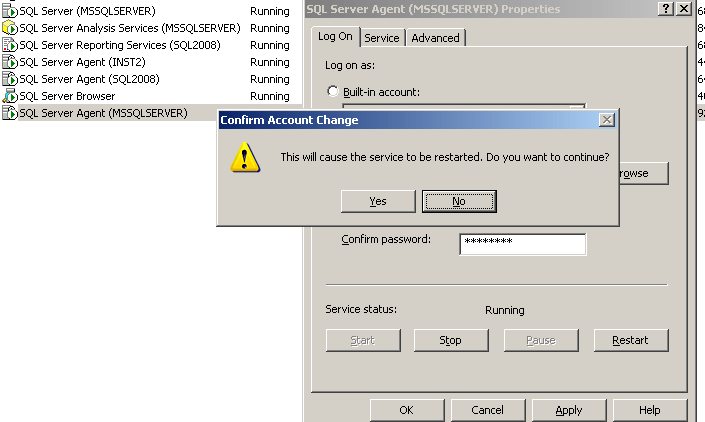
Restart the SQL Server Agent service, so that the new account goes into affect.
STEP 4
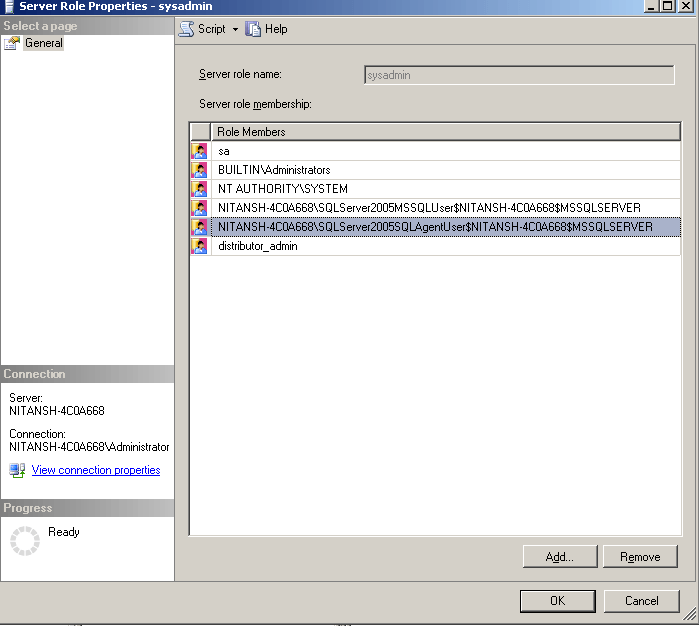
You can check in SSMS that SQLServer2005SQLAgentUser$ComputerName$MSSQLSERVER group is a member of sysadmin role. In SSMS, go to Security -> Sever Roles. Right click on "sysadmin" and select Properties to view the scrreen below. If it is not already there, follow the steps in step 4a.
STEP 4a - add login and role
If this group is not already part of the sysadmin role, follow these steps.
Add the group SQLServer2005SQLAgentUser$ComputerName$MSSQLSERVER as a Windows authenticated login in SQL Server
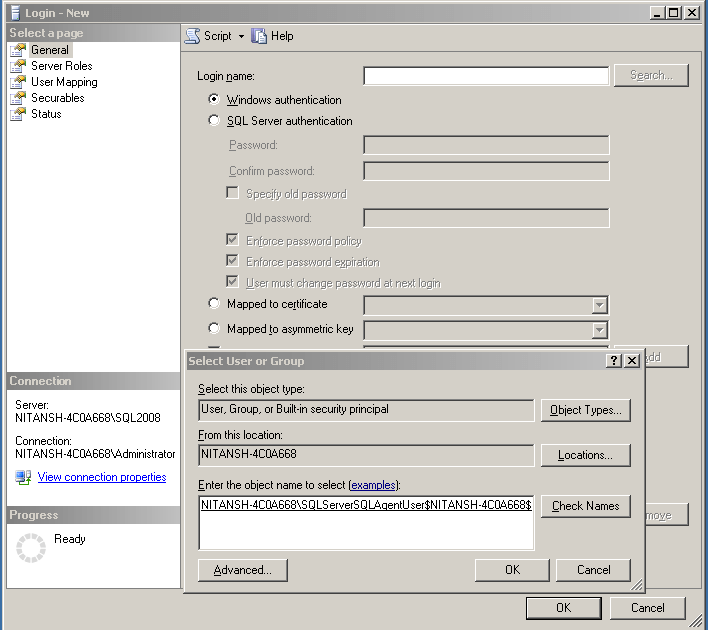
And then assign the sysadmin role to this login.
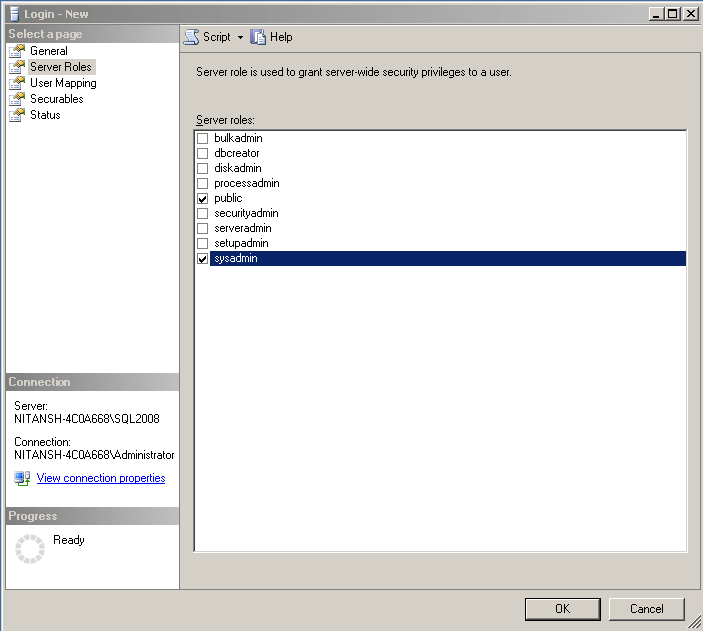
Now SQL Server agent is running under an account which is not a member of the local administrators group on the server.
Note: there is limitation for using multiserver administration when the SQL Server Agent service account is not a member of the local Administrators group. Enlisting target servers to a master server may fail with the following error message: "The enlist operation failed." To resolve this error, restart both the SQL Server and the SQL Server Agent services.
Next Steps
- Members of the SQLAgentUserRole, SQLAgentReaderRole, and SQLAgentOperatorRole fixed database roles in msdb, and members of the sysadmin fixed server role have access to SQL Server Agent. A user that does not belong to any of these roles cannot use SQL Server Agent.
- SQL Server Agent uses proxies to manage security contexts. A proxy can be used in more than one job step. Members of the sysadmin fixed server role can create proxies. Members of SQLAgentUserRole, SQLAgentReaderRole, or SQLAgentOperatorRole can only use proxies to which they have been granted specific access.
- Take advantage of these new security privileges available in SQL Server 2005 to secure your Jobs.
- Check out the published SQL Server Agent tips to implement jobs security.
- This same process should work for SQL Server 2005 and later versions.
About the author
 Nitansh Agarwal is a lead with 4+ years of extensive experience in database administration where he handles large critical databases.
This author pledges the content of this article is based on professional experience and not AI generated.
View all my tips
Article Last Updated: 2011-03-03


