By: Mohammed Moinudheen | Updated: 2011-07-22 | Comments (9) | Related: More > Database Administration
Problem
As per our business requirements, we are planning on archiving some historical data from large tables into a separate filegroup and make that filegroup read only. What are the options that are available for moving data in tables to a separate filegroup? Can you describe the steps for changing the filegroup option to read only? Check out this tip to learn more.
Solution
Since we cannot move data files between filegroups, it is a common practice to move data for a table between filegroups in a database. This excerpt from SQL Server Books Online says it all: "Because the leaf level of a clustered index and the data pages are the same by definition, creating a clustered index and using the ON partition_scheme_name or ON filegroup_name clause effectively moves a table from the filegroup on which the table was created to the new partition scheme or filegroup." (Source - http://msdn.microsoft.com/en-us/library/ms188783.aspx)
This is a straight forward method of moving data from a table from one filegroup to another. We can recreate\create the clustered index on the new filegroup thereby moving the data from one filegroup to another. There are some options that are generally followed and we shall discuss them here with some examples. Moving the data could be accomplished either through SQL Server Management Studio or via scripts. Sample scripts could be used as shown below to verify the data movement.
Let's create a sample database with three filegroups, then create a table with a clustered index to use in this tip's examples. Check out the script below:
/* Create a test database with 3 filegroups */
USE master;
GO
CREATE DATABASE Test
ON PRIMARY (NAME = Test_data1, FILENAME = 'C:\Test_data1.mdf'),
FILEGROUP Test_Secondary
(NAME = Test_data2, FILENAME = 'C:\Test_data2.ndf'),
FILEGROUP Test_Archive
(NAME = Test_data3, FILENAME = 'C:\Test_data3.ndf')
LOG ON(NAME = Test_log, FILENAME = 'C:\Test_log.ldf')
GO
/* Create a sample table and then create a clustered index */
USE Test
GO
CREATE TABLE dbo.employee
(emp_id int,
emp_fname varchar(10),
emp_lname varchar(10)) on test_secondary
GO
CREATE CLUSTERED INDEX CIX_emp_Id on Test.dbo.employee(emp_id)
GO
When we run the sp_helpindex system stored procedure on the employee table, we would see the clustered index is on the test_secondary filegroup:

Option 1 - Using SQL Server Management Studio to change the filegroup for the clustered index
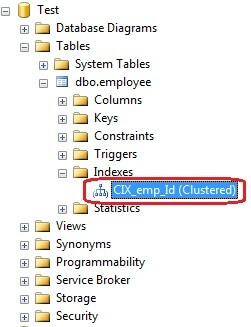
Using SQL Server Management Studio (SSMS), we could navigate (Root| Databases | Database Name i.e. Test | Tables | Table Name i.e. dbo.Employee | Indexes) to the path as shown in screenshot below to move the index from one filegroup to another.

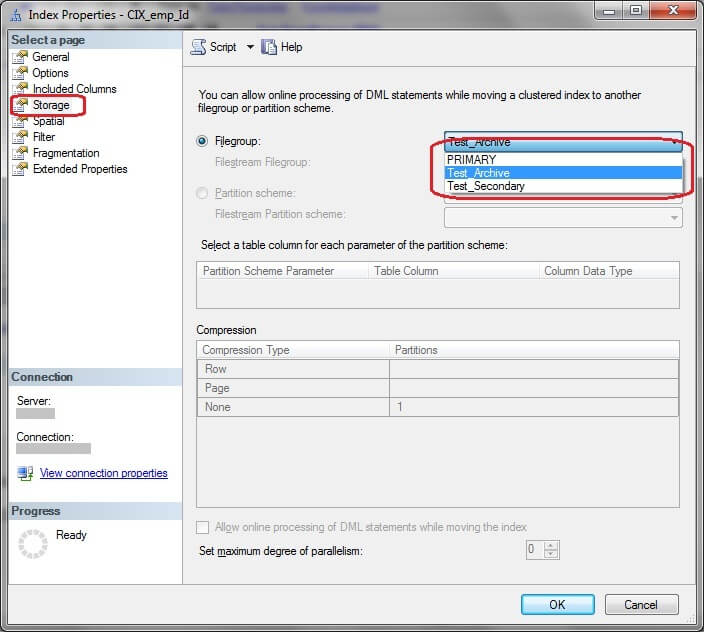
On right click on the index and choose the Properties option. In the Properties window, select the Storage tab as shown below and select the destination filegroup.

Once you click OK, the index will be moved, so be careful working through these steps on a production system when users are online. After running, sp_helpindex system stored procedure, we can verify the filegroup has changed as shown.

Option 2 - Using T-SQL scripts to change the filegroup for the clustered index
To accomplish the same task as outlined in option 1 with SQL Server Management Studio, we just need to use the script below to create the clustered index on the new filegroup.
CREATE CLUSTERED INDEX CIX_emp_Id ON Test.dbo.employee(emp_id)
WITH(DROP_EXISTING=ON,Online=ON) on [Test_Archive]
GO
In this script, we use the Online option to minimize the user impact during index creation as the clustered index creation in the offline mode would prevent user access to the table. In option 1, that is via SSMS, there is an option in the Index property->Storage tab, to allow online index creation. For that, the checkbox "Allow online processing of DML statements while moving the index", needs to be checked. This is possible only if we select "Rebuild Index" in the Options Tab of the Index property window.
Moving data with unique or primary key constraints on a table
In the two options listed above there were no constraints on the example table. However, in the real world they exist and I am not confident we would be able to use the steps outlined in option 1 with SSMS if the indexes were created by a unique or primary key constraint. Consider the sample table below:
USE Test
GO
CREATE TABLE dbo.employee1
(emp_id int constraint pk_emp_id primary key,
emp_fname varchar(10),
emp_lname varchar(10)) on test_secondary
GO
In this example, the primary key has been created on the dbo.employee1 table, which creates a unique clustered index as shown in screenshot below.

Even if we navigate in to the same screen in SSMS as shown in option 1 above, the option to move the indexes to different filegroup is disabled. In this case, we would need to use a similar script as used in option 2 to create the index on the new filegroup.
CREATE UNIQUE CLUSTERED INDEX pk_emp_id ON Test.dbo.employee1(emp_id)
WITH(DROP_EXISTING=ON,Online=ON) on [Test_Archive]
GO
Running the code above would move the index as shown in the screen shot below.

Determine the SQL Server objects per filegroup
It is a good idea to have a script handy in order to figure out on which objects reside in a particular filegroup in a database. There are some useful scripts in another tip, in the "How can I determine which objects exist in a particular filegroup?" section. The code below has been modified to fit our example.
/*Script for finding on which Filegroup the object resides in a database*/
USE Test
GO
SELECT object_name(i.[object_id]) as Name_of_Object,
i.name as Index_Name,
i.type_desc as Index_Type,
f.name as Name_of_Filegroup,
a.type as Object_Type,
f.type,
f.type_desc
FROM sys.filegroups as f
INNER JOIN sys.indexes as i
 ON f.data_space_id = i.data_space_id
INNER JOIN sys.all_objects as a
 ON i.object_id = a.object_id
WHERE a.type ='U' -- User defined tables only
AND object_name(i.[object_id]) ='employee' -- Specific object
GO
Sample output as shown.

Of course, we could collect this information through SSMS but it would be easier for us to gather this data using scripts.
Configuring a SQL Server filegroup as read only
As a final step let's configure the filegroup as read only. Check out the script below and be sure you have exclusive access to the database before running the code.
ALTER DATABASE Test MODIFY FILEGROUP Test_Archive READ_ONLY
GO
Next Steps
- With the examples in this tip, we can see how data can be moved from one filegroup to another as well as configure the filegroup for Read_Only mode. Taking these steps could protects the data from accidental loss and would meet your requirement of archiving historical data.
- Be sure to write your scripts carefully and test your code prior to running it in a production environment.
- Be careful running this code on a production system, may want to consider running this code during a maintenance window so the users are not impacted.
- Familiarize yourself with the different options available to move data from one filegroup to another based on your table design.
- Analyze the data completely before deciding to archive it into a separate filegroup.
About the author
 Mohammed Moinudheen is a SQL Server DBA with over 6 years experience managing production databases for a few Fortune 500 companies.
This author pledges the content of this article is based on professional experience and not AI generated.
View all my tips
Article Last Updated: 2011-07-22


