By: Arshad Ali | Updated: 2011-08-23 | Comments (9) | Related: 1 | 2 | 3 | 4 | > Integration Services Configuration Options
Problem
Deployment has always been a challenge for SSIS developers as they needed to write scripts for each individual package deployment. Though not impossible, but it is quite tedious and error prone especially if there are a lot of SSIS packages. SSIS developers have been envious of SSRS/SSAS developers as they have an easy way to create a single unit of deployment (deployment package) that contains everything needed for the deployment. The good news is that this is changing with the inclusion of the SSIS Package Deployment Model in SQL Server 2012. In this tip we cover the remaining items on how to use the new Package Deployment Model.
Solution
SSIS enhancements in SQL Server 2012 brings a brand new deployment model for SSIS project deployment. This new deployment model is called Project Deployment Model and unlike the Legacy Deployment Model where each package was a single unit of deployment, this new model creates a deployment packet containing everything (packages and parameters) needed for deployment in a single file that has an ispac extension and hence streamlines the deployment process.
In my last tip in this series I talked about basics of the new SSIS deployment model called Project Deployment Model, described some of the basic elements of this new deployment model, how it differs from the Legacy Deployment Model, how to create Integration Service Catalog, how to create a project with Project Deployment Model and finally how to deploy SSIS project to the Integration Services Catalog.
In this tip I am going to talk about Creating Environments, Environment variables,
Setting up an environment reference in the deployed project, Executing deployed
project/package using the environment for example either for TEST or PROD, analyzing
the operations performed on the Integration Services Catalog, validating the deployed
project or package, redeploying the project to Integration Services Catalog, analyzing
deployed project versions and restoring back to desired point if needed.
So what we all I am covering this tip series:
- Creating Integration Services Catalog (Covered in Part 1)
- Creating a SSIS project with Project Deployment Model (Covered in Part 1)
- Deploying the project to Integration Services Catalog (Covered in Part 1)
- Creating Environments, Environment variables
- Setting up environment reference in the deployed project
- Executing deployed project/package using the environment for example either for TEST or PROD
- Analyzing the operations performed on the Integration Services Catalog
- Validating the deployed project or package
- Redeploying the project to Integration Services Catalog
- Analyzing deployed project versions and restoring to desired one
4 - Creating Environments and Environment Variables...
As demonstrated in my last tip, you can create as many folders as you want inside the Integration Services Catalog. Each folder that you create, automatically creates two subfolders. The Projects subfolder will contain all the projects deployed to that folder whereas the Environments subfolder will contain all the environments created inside your created folder. We will create two environments (TEST and PROD) for our deployed project to be executed.
To create an environment, right click on the Environments subfolder and click on Create Environment menu item as shown below:

As you can notice in the below image, I have created two environments (TEST and PROD) as per our need:

Now right click on each individual environment, click on Properties and go to Variables on the left of the Properties page as shown below. Here we need to create a environmental variable to hold the database name to be used in that particular environment. As you can notice, for PROD environment I have created a variable called DatabaseName of type string and specified AdventureWorks2008R2Prod as its value. Likewise for TEST environment I have created a variable called DatabaseName of type string and specified AdventureWorks2008R2Test as its value.

5 - Setting up environment reference in the deployed project...
Now that we have deployed the project to the Integration Services Catalog and created environments, we need to set the reference or establish an association which tells project/packages what environments can be used. To do that, right click on the deployed project and click on Properties, on the Project Properties page click the References on the left and on the right side page click on Add Reference to add a reference for TEST and PROD environments as shown below:

Add references for both environments (TEST and PROD) as shown above. Once done click on Parameters on the Project Properties page and specify the value of the project parameter (DatabaseName) which will come from an environment variable called DatabaseName as shown below:

6 - Executing deployed project/package using the environment for example either for TEST or PROD...
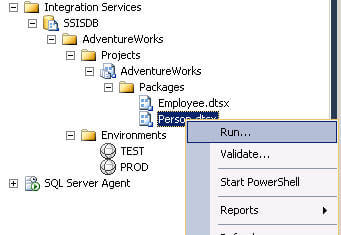
Now that we are done with project deployment, creation of environment/environments variables, setting up reference for these environments, its time for project/package execution. You can execute all the packages inside a project at once or you can select an individual package to execute. Right click on the project/package and click on the Run menu item as shown below to launch the Run Package window:

On the Run Package window, specify the environment you want the package to be executed for. You can select the environment from the Environment references combo box. If you want your package to be executed in 32 bit runtime on the 64 bit server you can check the box on the bottom right after the Parameters grid:

Once you hit the OK button on the above screen, it will start executing the package and will display the execution status (like who initiated it, what time it was initiated, the current status, etc) in the Package Running Information window as shown below:

If you want to verify what parameter values were used during execution, you can click on the Parameters tab on the Package Running Information window as shown below. I selected PROD environment when executing the package and hence the value from the PROD environment variable has been used to feed the value for the parameter:

7 - Analyzing the operations performed on the Integration Services Catalog...
Integration Services Catalog tracks all the activity or operations that you perform on it. It also tracks the internal operations performed. Integration Services catalog provides a cleanup job which can be controlled by several catalog properties. To view what operations have been performed on the Integration Services Catalog, right click on the catalog and click on Operations menu item as shown below:

The Operations window will list all the operations performed in a grid in descending order. You can double click any of the rows in the grid to display the detail information about the operation and its execution.

8 - Validating the deployed project or package...
Validation is the process to avoid runtime failures, it checks that the package does not have any issues which can cause it to fail during runtime. For example, it confirms that either parameters have necessary values or can get the necessary value with a specific environment reference. You can either validate the whole project at once or each package individually. To validate a project, right click on the project and click on Validate menu item as shown below:

When you are validating a project or package you need to specify the environment reference to use for parameters and environment variables for reference resolution. Select the reference from the Environment references combo box and click on OK to start the validation operation. In my case I have created a dummy environment (called NA) with incorrect variable values and I am expecting validation to fail.

And as expected I get the validation error as shown in the image below. So what I did is, I provided a wrong value for the DatabaseName variable of NA environment which could not be validated because that database does not exist and hence it failed:

9 - Redeploying the project to Integration Services Catalog...
Changes are inevitable, no matter how much time you spend during planning, design and development there will come a time when you need to make changes either to fix bugs, to improve the performance or add features. So now the question is how we can go ahead and redeploy the changes to Integration Services Catalog? The process of redeploying a SSIS project is not much different from the deploying it the first time. After you are done with your changes in the project (notice I have added one more package in the project for customer data movement), simply go to Solution Explorer, right click on the project name and then click on Deploy menu item as shown below:

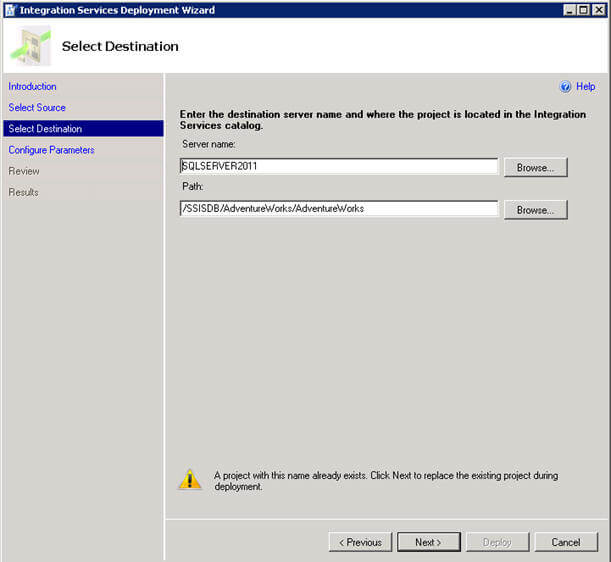
Clicking on Deploy menu will launch the Integration Services Deployment Wizard. On the Select Destination page you can see one warning about preexistence of the project on the Integration Services Catalog, the rest of the steps remain the same as a deployment. Please note, Integration Services Catalog maintains the versions of project deployment (the max number of versions to be maintained is controlled by catalog properties), the last version will be replaced with latest deployment, but the previous versions will also be available in the catalog in case you want to revert back.

10 - Analyzing deployed project versions and restoring to desired one...
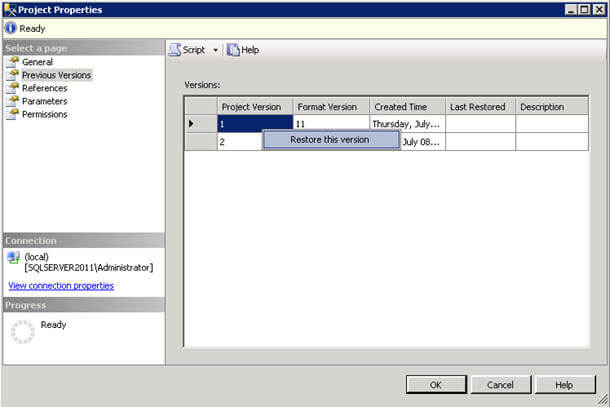
To view the previous versions of a deployed project, you can right click on the Projects folder in Integration Services catalog and click on Properties. On the Project Properties window, click on Previous Versions link on the left of the Project Properties as shown below. On the right side you will notice all the project versions which are currently being maintained by Integration Services catalog. You can revert back to any of the available version by clicking on the Restore this version menu.

Notes
- I have shown features and power of Integration Services catalog using the UI (User Interface), but you can also manage and control it using T-SQL commands.
- The sample code, example and UI is based on SQL Server 2012 CTP 1, it might change in future CTPs or in final/RTM release.
Next Steps
- Read Part 1 of this tip series
- Review What's New (Integration Services) on msdn
About the author
 Arshad Ali is a SQL and BI Developer focusing on Data Warehousing projects for Microsoft.
This author pledges the content of this article is based on professional experience and not AI generated.
View all my tips
Article Last Updated: 2011-08-23


