By: Manvendra Singh | Updated: 2011-12-19 | Comments (3) | Related: > PowerShell
Problem
As we all know, Microsoft has announced support to run SQL Server on Windows Server 2008 R2 Server Core Edition which is GUI-less OS. In this tip I will explain the step by step process to install and enable PowerShell on a Windows 2008 R2 Server Core. PowerShell is basic prerequisite to install SQL Server on Windows Server 2008 R2 Server Core Edition. Check out this tip to get started with the PowerShell installation.
Solution
Based on the current build of Microsoft SQL Server 2012, it does not install or enable Windows PowerShell. However Windows PowerShell 2.0 is an installation prerequisite. If SQL Server setup reports that Windows PowerShell 2.0 is not present, you can install or enable it by below instructions on Windows Server 2008 R2 Server Core Edition.
Steps to enable PowerShell
Step 1 - Type "powershell" at the command prompt to find out if PowerShell is enabled or not. If PowerShell is enabled it will route you to the PS root directory. If PowerShell is not installed/enabled then Windows will not recognized this command.
As you can see in above screenshot, PowerShell is not enabled on this machine so our next step will be to enable it.
Step 2 - Run the "sconfig.cmd" command on your command prompt and press enter. Once you will press enter, it will open all of the options of system configuration as shown in the image below. The "sconfig.cmd" command is the Server Configuration Tool to configure and manage several common aspects of the Windows Server 2008 R2 Server Core installation. You must be a member of the Administrators group to use the tool.
You will be prompted to enter the number for the application which you want to configure. In our circumstances we will choose "4 (Configure Remote Management)" in order to enable PowerShell.
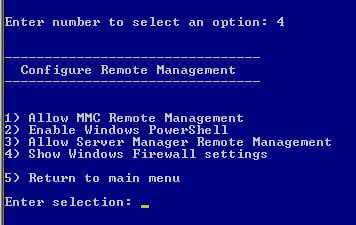
Step 3 - Once you have pressed "4" then press enter to see all of the options under the "Configure Remote Management" interface.

As you can see there are 5 options to choose from. The second option is for PowerShell. Choose option 2 in order to "Enable Windows PowerShell".
Step 4 - After you type "2" and press enter, the PowerShell configuration will start and the configuration process will look like the below screenshot.

Step 5 - Once PowerShell has been successfully enabled, a separate command prompt screen will be pop-up and closed after the process reaches 100% completion. This is the deployment of features using the Dism.exe (Deployment Image Servicing and Management) tool. DISM enumerates, installs, uninstalls, configures and updates the features and packages in Windows images. See the screenshot below.

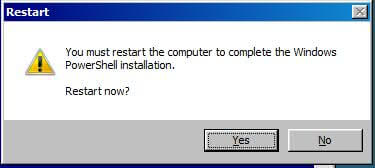
Step 6 - After all of the processes have completed, a restart window will appear and ask you to restart the machine in order for all of the changes to be committed. Click the "Yes" button to restart the machine.

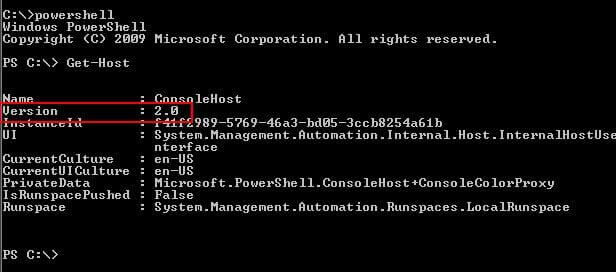
Step 7 - Once the has been rebooted, type "powershell" on the command prompt. This time it will take few seconds to load then route you to a PS command prompt. You can run the "Get-Host" cmdlet to check the PowerShell version as shown in the screenshot below.

Next Steps
- At this point in time, you can proceed with your SQL Server installation. You can also enable PowerShell remoting which is a great feature of PowerShell 2.0 to manage your servers remotely from your local machine.
- Continue learning about PowerShell.
About the author
 Manvendra Singh has over 5 years of experience with SQL Server and has focused on Database Mirroring, Replication, Log Shipping, etc.
This author pledges the content of this article is based on professional experience and not AI generated.
View all my tips
Article Last Updated: 2011-12-19


