By: Daniel Calbimonte | Updated: 2012-05-08 | Comments (14) | Related: More > Import and Export
Problem
Sometimes we need to import information from MS Access. We could use the Microsoft SQL Server Migration Assistant, but sometimes we need to add custom transformations and it is necessary to use more sophisticated tools. In this tip, we are going to walk through step by step how to migrate a MS Access table to SQL Server using SQL Server Integration Services (SSIS). The tip assumes that the readers have none to little experience with MS Access and SQL Server Integration Services (SSIS).
Solution
Requirements
This example is using SQL Server 2008 R2, but it should work with SQL 2005 and SQL 2008 as well. You will need to have SSIS and MS Access installed.
Getting Started
In this demonstration we are going to create a Table named Customer in MS Access and then import the table to SQL Server using SSIS.
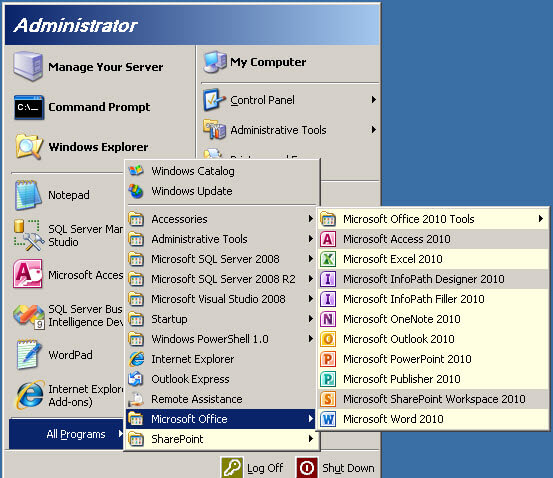
- Let's start the MS Access. Go to the Windows Start Menu > All Programs > Microsoft Office and click Microsoft Access 2010

- In Microsoft Access 2010, click the Browse icon.

- In the File New Database, specify the file name and the path. In this instance the file name will be customer.accdb and it will be stored in the c:\ drive and press OK.

- In Access, press the Create button.
- In the second column double click in the header and type FirstName.
- In second row enter a First Name.

- Add some more data to the table.

- Press the Save icon and in the Save As Window, type Customer and press OK.

- You have just created an Access Database named customer.accdb with a table named customer. Close MS Access.
- Let's start the SQL Server Business Intelligence Development Studio to import the table into SQL Server. Go to the Windows Start > All Programs > Microsoft SQL Server 2008 R2> SQL Server Business Intelligence Development Studio.

- In the Business Intelligence Development Studio, select File > New > Project

- In the New Project Window, select Integration Services Project and specify a name and location for the project.

- From the Toolbox, drag and drop a DataFlow Task to the Design pane.
- In the design pane double click the DataFlow Task.

- In the Data Flow tab, drag and drop a OLEBD Source and Destination to the design pane.

- Click on the green arrow and drag it to join the OLEDB Source and Destination.

- In the OLE DB Source Editor window, press the New... button to create a new connection.

- In the Configure OLE DB Connection Manager, press New... again.

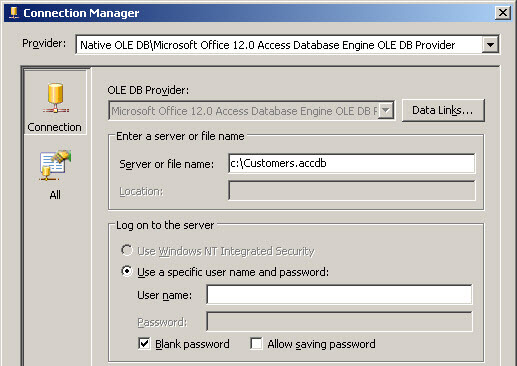
- In the Provider combobox, select Native OLE DB\Microsoft Office 12.0 Access Database Engine OLE DB Provider.
- In the Server or file name type the path of the Access database. In this example it is in the c:\Customers.accdb (verify the step 3 to review).
- Check the Blank Password option and press OK.

- In the Configure OLE DB Connection Manager, press OK
- In the OLE DB Source Editor, in the Name of the Table or view select the table created in Access (created in step 8).

- Double click the OLEDB Destination.

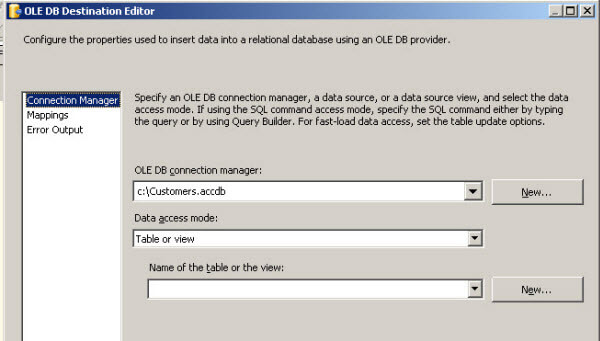
- In the OLE DB Destination Editor Window, in the OLE DB connection manager, press the New... button.

- In the Configure OLE DB Connection Manager, press New...

- In the Connection Manager make sure that the Provider combobox is using the Native OLE DB\SQL Server Native Client 10.0
- In the Server name, type the SQL Server Name.
- In the select or enter Database Name, select the SQL Server database where you want to store the Access data and press OK. You can choose any database. In this instance, a database named test is used.

- In the OLE DB Destination Editor Window, go to the Name of the table or View combobox and press the New... button.

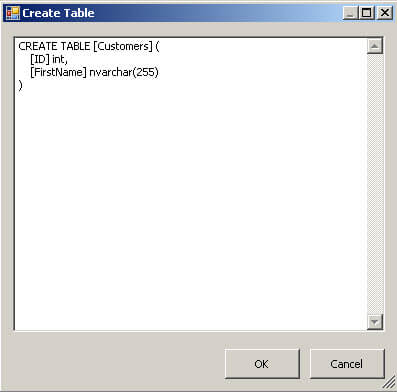
- In the Create Table, type this and press OK:
CREATE TABLE [Customers](
[ID] int,
[FirstName] nvarchar(255)
)

- In the OLE DB Destination Editor Click on the Mappings page and press OK.

- Now the project is ready to start importing the data from MS Access to SQL Server. Now, press the start debugging icon to start importing the data.

- To verify that everything worked, open SQL Server Management Studio and verify the data is in the database used for the import. In this case, the test database was used (verify this from step 29).
- Finally query the table to verify the data was successfully imported.

- Congratulations! You have created an SSIS project to import data from MS Access to SQL Server.
Next Steps
- Read these tips related to importing data
- Learn more about these tools:
- Microsoft Access: http://office.microsoft.com/en-us/access-help/create-a-table-HA001224251.aspx
- SSIS projects: http://msdn.microsoft.com/en-us/library/ms169917.aspx
About the author
 Daniel Calbimonte is a Microsoft SQL Server MVP, Microsoft Certified Trainer and 6-time Microsoft Certified IT Professional. Daniel started his career in 2001 and has worked with SQL Server 6.0 to 2022. Daniel is a DBA as well as specializes in Business Intelligence (SSIS, SSAS, SSRS) technologies.
This author pledges the content of this article is based on professional experience and not AI generated.
View all my tips
Article Last Updated: 2012-05-08


