By: Mohammed Moinudheen | Updated: 2012-05-31 | Comments (8) | Related: > Testing
Problem
SQL Server 2012 offers many new features such as Always On Availability Groups, clustering, contained databases, etc... The downside is setting this up in a lab environment takes a lot of time and resources. In this tip we cover how to get access to Microsoft Virtual Labs that are already setup, so you can test and work with these new features.
Solution
To get access to these environments, we can use the Microsoft Virtual Labs which are freely available online. We will share the Microsoft links from where you could start your lab session and run through the instruction manual and perform the steps as described in the manual.
The lab sessions are timed to a duration ranging between 1 hour to 2.5 hours. However, there is a mechanism by which we could perform a one time extension to extend the duration by an hour for a lab session. For the sake of clarity and ease of use, screenshots shown in this tip will guide you through the process and enable you to carry out these lab sessions.
This link, hhttp://technet.microsoft.com/en-us/virtuallabs/default, lists the various Microsoft products and versions for which virtual labs are available.
Here are specific labs for SQL Server:
- http://technet.microsoft.com/en-us/virtuallabs/hh859575 (Virtual labs for SQL Server 2012)
- http://technet.microsoft.com/en-us/virtuallabs/cc164207 (Virtual labs for SQL Server 2008R2 and SQL Server 2008)
- http://technet.microsoft.com/en-us/virtuallabs/bb499681 (Virtual labs for SQL Server 2005)
If for example, you chose to work with Always On Availability Groups from the link for virtual labs related to SQL Server 2012, you click on the entry shown below.

Once you click this link, the next step would be to launch the virtual lab. The recommended screen resolution is 1024x768. While doing the lab exercise, if you face any difficulties in viewing the entire screen, you might have to change the screen resolution to the recommended setting. /p>

After clicking the 'Launch Virtual Lab' button, the virtual lab gets booted as shown in the screenshot below.

After this, you will encounter the below screen, click on 'Connect' to connect to the virtual lab.

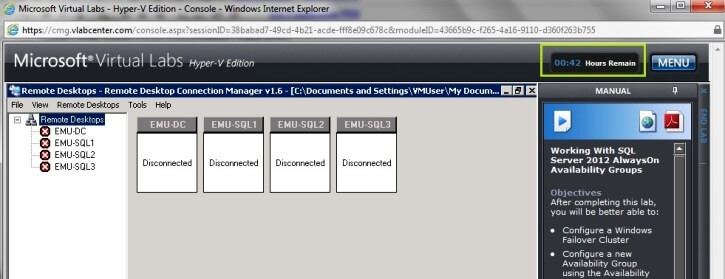
You will then encounter a pop up window which displays some information on how to connect to the virtual name. Go through the contents of this window and then close it. Once done, you will be in the Virtual Lab environment and will need to follow the instructions as displayed on the right side of the screen. The complete instructions can be downloaded by clicking on the PDF icon as shown on the right hand side.

Also, note the time remaining in the right top corner as shown above. As mentioned in the beginning of the tip, the labs are 1 to 2.5.hours, but we can extend the lab one time for an extra hour. To get the extension, click on the 'MENU' icon on the top right and click on Support > Troubleshooting/FAQ as shown below.

Click on the option to extend the duration of your lab session by an hour as shown below.

Summary
The virtual labs will allow you to try out some useful scenarios that you might have thought of performing on your own cluster configuration. I have found that in most cases the time allotted is quite sufficient for completing all the exercises provided in the instructions manual.
Next Steps
- Check the links that are shared above and get familiar regarding usage of these new features in SQL Server.
- Check out this link for some more lab based scenarios related to SQL Server: http://www.microsoft.com/sqlserver/en/us/learning-center/virtual-labs.aspx
About the author
 Mohammed Moinudheen is a SQL Server DBA with over 6 years experience managing production databases for a few Fortune 500 companies.
This author pledges the content of this article is based on professional experience and not AI generated.
View all my tips
Article Last Updated: 2012-05-31


