By: Dale Kelly | Updated: 2012-05-23 | Comments (17) | Related: > Monitoring
Problem
One of my SQL servers has a database that grows very rapidly (1 GB per week). I needed an easy way to monitor the growth of this database. I also needed an easy way to monitor all my servers for growth trending.
Solution
I know there are tools that will monitor database file size, but I wanted something easy and something I could use to gather and retain historical data. It also had to be free. After a little research I decided to try using PowerShell. I did some searching on the internet and found some sample scripts for connecting to servers, getting data from those servers and then writing the data to an Excel spreadsheet.
Prepare the environment
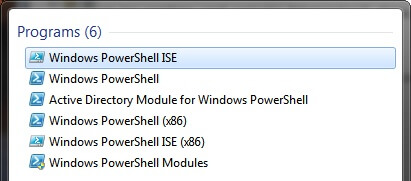
Before we start let me say that I am not a PowerShell guru, so some of the terminology I use may not be exact. The first thing you will need to do is start PowerShell. In Windows 7 click the Start button and type PowerShell in the Search field. When I do this on my system I am presented with a couple choices. The first two items in the list will start PowerShell, Windows PowerShell ISE is a GUI interface and Windows PowerShell is the command line interface. I like to use Windows PowerShell ISE.

The next thing you will need to do to use PowerShell on your system is to change the execution policy. By default the execution policy is set to Restricted, this means that no scripts will run, not any at all. To check what the current execution policy is set to, open PowerShell and enter the command Get-ExecutionPolicy. I have set my execution policy to RemoteSigned, this allows scripts I have written to run and to run scripts from the internet only if those scripts have been signed by a trusted publisher. To set the execution policy enter the command Set-ExecutionPolicy RemoteSigned. Note: there are other options for execution policy, check the documentation for the appropriate policy. Now that I have the execution policy set I am ready to go.
What I wanted to accomplish was to look at all my SQL servers and get the actual data file and log file size in megabytes. The script shown below reads a .txt file that lists all my SQL servers and gets the file name, file path, file size, and used size for both data file (.mdf) and log file (.ldf) for each database on each server in the .txt file. The data is then written to a spreadsheet on my local machine.
#Create a new Excel object using COM
$Excel = New-Object -ComObject Excel.Application
$Excel.visible = $True
$Excel = $Excel.Workbooks.Add()
$Sheet = $Excel.Worksheets.Item(1)
$intRow = 1
 ForEach ($instance in Get-Content "C:\Users\dkelly\Documents\PowershellScripts\sqlservers.txt")
    {
    [System.Reflection.Assembly]::LoadWithPartialName('Microsoft.SqlServer.SMO') | out-null
    $s = New-Object ('Microsoft.SqlServer.Management.Smo.Server') $instance
    $dbs=$s.Databases

     $intRow++
     #Create column headers
     $Sheet.Cells.Item($intRow,1) = "Server: $s"
     $Sheet.Cells.Item($intRow,1).Font.Size = 12
     $Sheet.Cells.Item($intRow,1).Font.Bold = $True

     $intRow++
     $Sheet.Cells.Item($intRow,2) = "Database"
     $Sheet.Cells.Item($intRow,2).Font.Bold = $True
     $Sheet.Cells.Item($intRow,3) = "Data Name"
     $Sheet.Cells.Item($intRow,3).Font.Bold = $True
     $Sheet.Cells.Item($intRow,4) = "Data File"
     $Sheet.Cells.Item($intRow,4).Font.Bold = $True
     $sheet.Cells.Item($intRow,5) = "Data Size (MB)"
     $Sheet.Cells.Item($intRow,5).Font.Bold = $True
     $Sheet.Cells.Item($intRow,6) = "Data Used Space (MB)"
     $Sheet.Cells.Item($intRow,6).Font.Bold = $True
     $Sheet.Cells.Item($intRow,7) = "Log Name"
     $Sheet.Cells.Item($intRow,7).Font.Bold = $True
     $Sheet.Cells.Item($intRow,8) = "Log Size (MB)"
     $Sheet.Cells.Item($intRow,8).Font.Bold = $True
     $Sheet.Cells.Item($intRow,9) = "Log Used Space (MB)"
     $Sheet.Cells.Item($intRow,9).Font.Bold = $True
     $Sheet.Cells.Item($intRow,10) = "Log File"
     $Sheet.Cells.Item($intRow,10).Font.Bold = $True

    foreach ($db in $dbs)
        {

          $dbname = $db.Name
          $fileGroups = $db.FileGroups

          ForEach ($fg in $fileGroups)
            {
       #   write-host $fg.files | select name
            If ($fg)
                {

                    $intRow++

                    $mdfInfo = $fg.Files | Select Name, FileName, size, UsedSpace
                    $Sheet.Cells.Item($intRow,2) = $dbname
                    $Sheet.Cells.Item($intRow,3) = $mdfInfo.Name
                    $Sheet.Cells.Item($intRow,4) = $mdfInfo.FileName
                    $Sheet.Cells.Item($intRow,5) = ($mdfInfo.size / 1000)
                    $Sheet.Cells.Item($intRow,6) = ($mdfInfo.UsedSpace / 1000)

                    $logInfo = $db.LogFiles | Select Name, FileName, Size, UsedSpace
                    $Sheet.Cells.Item($intRow,7) = $logInfo.Name
                    $Sheet.Cells.Item($intRow,8) = ($logInfo.Size / 1000)
                    $Sheet.Cells.Item($intRow,9) = ($logInfo.UsedSpace / 1000)
                    $Sheet.Cells.Item($intRow,10) = $logInfo.FileName
                }
            }
        }
        $intRow++
    }
    $Sheet.UsedRange.EntireColumn.AutoFit()
The sqlserver.txt file is just a list of server names, one name per line with no punctuation as shown here;
testserver2
testserver3
The first four lines in the script create the Excel spreadsheet. Then for each server in the sqlserver.txt file we use the Microsoft.SQLServer.Management.SMO.Server class to create a server object of SQL Server. From the server object we can get the databases, $dbs=$s.Databases, on each server. The next several lines in the script set the values in the columns of the header row in the spreadsheet. The section of the script starting with foreach ($db in $dbs) is the part of the script that actually gets the database file data and writes it to the spreadsheet.
Shown below is the resulting spreadsheet. I broke the spreadsheet image into 3 images for readability.


A couple things to note about this process. Sometimes when I execute the script the Execl spreadsheet does not get created correctly and the script throws a series of errors. I just stop the script and start it again and it works. I do not know why it does this. The script can probably be modified to write the data directly to a SQL database, but I chose to write it to a spreadsheet for a variety of reasons. In my next tip I will describe the process for getting the data into a database using SSIS then reporting on that data. Please stayed tuned.
Next Steps
- Try it out, copy the script, create a sqlserver.txt file and try it.
- As always be sure to test in a test environment before using in production.
- For more information check these references.
About the author
 Dale Kelly has been in the computer industry since the late 80s and is currently a Sr. DBA responsible for 26 SQL Servers.
This author pledges the content of this article is based on professional experience and not AI generated.
View all my tips
Article Last Updated: 2012-05-23


