By: Edwin Sarmiento | Updated: 2012-08-13 | Comments (2) | Related: 1 | 2 | 3 | 4 | > Clustering
Problem
In a previous tip on Install SQL Server 2008 on a Windows Server 2008 Cluster Part 1, we have seen how to install and configure SQL Server 2008 on a Windows Server 2008 Failover Cluster. We now have a new requirement to deploy a SQL Server 2012 instance on a multi-subnet cluster that spans different geographical locations. How do I install and configure a SQL Server 2012 on a multi-subnet cluster?
Solution
To continue this series on Installing SQL Server 2012 on a Multi-Subnet Cluster, we will look at installing SQL Server 2012 in a multi-subnet cluster. In Part 1, we have configured the storage in both of the servers that we will be using as part of our cluster. In Part 2, we've created the Windows Server 2008 R2 multi-subnet cluster, configured the cluster heartbeat settings and modified the cluster quorum configuration. In this tip, we will proceed with the installation of SQL Server 2012 in a multi-subnet cluster.
Much Ado About MSDTC
What exactly is MSDTC? The Microsoft Distributed Transaction Coordinator (MSDTC) is a transaction manager that permits client applications to include several different data sources in one transaction and which then coordinates committing the distributed transaction across all the servers that are enlisted in the transaction. There have been a lot of discussions online about whether or not to configure a clustered MSDTC resource for a SQL Server Failover Cluster instance. This is primarily because of the changes made to MSDTC in Windows Server 2008, particularly the ease of configuration within a failover cluster. A more detailed explanation of how MSDTC works in Windows Server 2008 Failover Cluster is available from the SQL Server 2008 Failover Clustering whitepaper from the SQLCAT team. And, so the question remains: Do we need MSDTC in a SQL Server 2012 Failover Cluster? My answer: determine earlier on whether or not you'll need it. Books Online is explicit about this: if you are only installing the database engine, the clustered MSDTC resource is not required. In fact, you can proceed with the installation of the database engine in the cluster without a MSDTC resource and only get a warning in the validation checks. If, however, you still want to configure a clustered MSDTC resource because you may be anticipating a future need, you can go ahead and do so. The steps to configure a clustered MSDTC resource on a Windows Server 2008 R2 multi-subnet cluster is the same as what was outlined in this tipwith just one slight modification: you need to have multiple virtual IP addresses assigned to it - one for each subnet. In my example, I did not configure a clustered MSDTC resource to prove that you can indeed proceed with the SQL Server 2012 Failover Cluster installation.
Install SQL Server 2012 on a Multi-Subnet Failover Cluster
I'm assuming that you have already installed the .NET Framework 3.5.1 as recommended in Part 1. However, you still need to install the .NET Framework 4.0 as it is a prerequisite. The installation process will automatically install this for you, but I prefer installing it prior to running the SQL Server installation process. This is because I've spent a fair amount of time trying to figure out why the installation takes longer than it should only to find out that a significant amount of time was spent installing the .NET Framework 4.0. In fact, since I clone virtual machines on a regular basis, I've included both the .NET Framework versions 3.5.1 and 4.0 in my standard image prior to running Sysprepto speed up the installation process.
Similar to SQL Server 2008 Failover Clustering, there are two options to install SQL Server 2012 on a multi-subnet cluster. The first one is by using the Integrated failover cluster install with the Add Node option and the second one is the Advanced/Enterprise installation option. The process outlined below will take into account the first option.
Here is how to install SQL Server 2012 on a multi-subnet cluster:
- Run setup.exe from the installation media to launch SQL Server Installation Center. Click on the Installationlink on the left-hand side
- Click the New SQL Server failover cluster installationlink. This will run the SQL Server 2012 Setup wizard

- In the Setup Support Rules dialog box, validate that the checks return successful results and click Next.

- In the Product Key dialog box, enter the product key that came with your installation media and click Next.

- In the License Terms dialog box, click the I accept the license terms check box and click Next. And, don't worry, you're not the only one NOT reading the EULA.

- In the Product Updates dialog box, you have the option to include SQL Server product updates like service packs and cumulative updates in the installation process. This is a new feature in SQL Server 2012 that integrates the latest updates in the installation process. By default, it searches for product updates thru the Windows Updates service online, assuming that the server has access to the Internet. In cases where your servers do not have access to the internet, you can manually download the updates and store them on a network shared folder. You can, then, point the installation media to search the network shared folder instead. A more detailed approach to using this feature is outlined in this Microsoft TechNet article. Click Next.

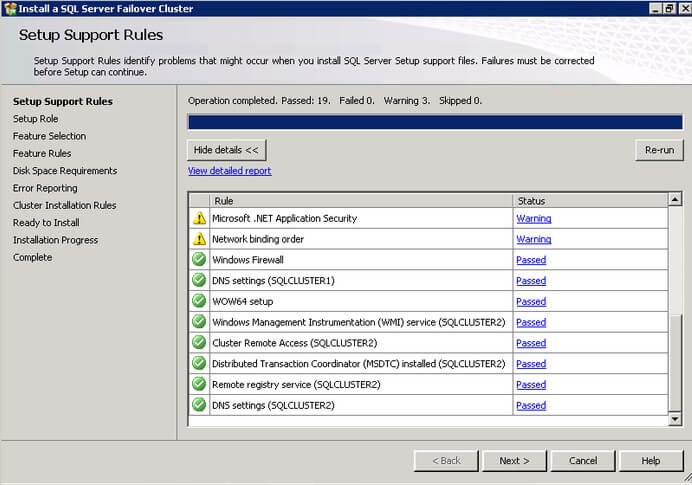
- In the Setup Support Rules dialog box, validate that the checks return successful results. If the checks returned a few warnings, make sure you fix them before proceeding with the installation. An example of this is the Network binding order. The public network cards should be first on both nodes. You can also disable NETBIOS and DNS registration on the heartbeat and iSCSI network cards to avoid additional overhead. Be sure to check your binding order as well. For more details on the network binding order warning, see Microsoft KB 955963. This blog post also explains what the network binding order rule is for and how you can further configure it. Also, if you decide not to configure a clustered MSDTC resource, it will be flagged as a warning in this dialog box. However, it's not a show stopper and you can proceed with the installation. Click Next.

- In the Setup Role dialog box, select the SQL Server Feature Installation option and click Next.

- In the Feature Selection dialog box, select only the components that you want installed. For the Shared feature directory, you can keep the default path if you have sufficient disk space on your C:\ drive or anywhere that is a local disk as this will be used by the SQL Server installation process later on. The directory for the clustered database engine will be different. In my example, I have another local drive available - drive D:\ - where I will store the tempdb database. We'll discuss more about that later. Click Next.

- In the Feature Rules dialog box, verify that all the rules have passed. If the rules returned a few warnings, make sure you fix them before proceeding with the installation. Click Next.

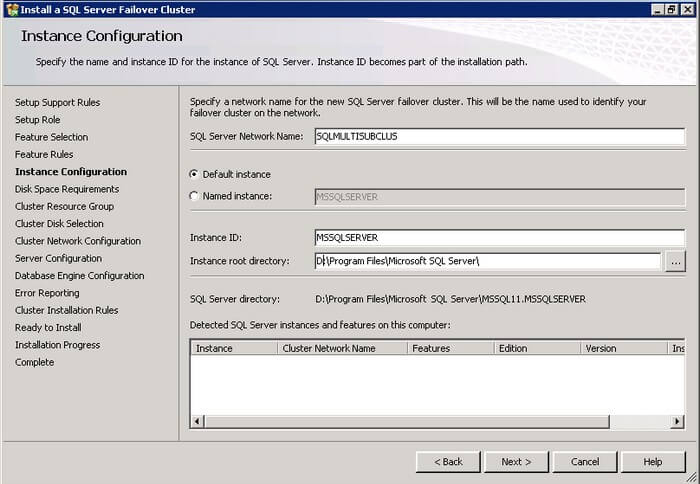
- In the Instance Configuration dialog box, enter the SQL Server Network Name. This is the name that will be available on the network for the clients to access. This will vary depending on your selection of whether it is a default or named instance. In this example, default instance is selected. A couple of things need highlighting in this section. By default, the instance name is used as the Instance ID. This is used to identify installation directories and registry keys for your instance of SQL Server and is helpful when you want to run multiple instances in a cluster. This is the case for default instances and named instances. For a default instance, the instance name and instance ID would be MSSQLSERVER. To use a non-default instance ID, you should select the Instance IDbox and specify a value.
The section on Detected SQL Server instances and features on this computer would make sense if there are other SQL Server instances running on your server. Click Next.

- In the Disk Space Requirements dialog box, check that you have enough space on your local disks to install the SQL Server 2012 binaries. Click Next.

- In the Cluster Resource Group dialog box, check the resources available on your Windows Server 2008 R2 cluster. This tells you that a new Resource Group will be created on your cluster for the SQL Server instance. To specify the SQL Server cluster resource group name, you can either use the drop-down box to specify an existing group to use or type the name of a new group to create it. Click Next.

- In the Cluster Disk Selection dialog box, select the available disk groups that are on the cluster for SQL Server 2012 to use. In this example, three clustered disk groups - L_Drive, M_Drive and S_Drive - have been selected to be used by SQL Server 2012. I will be using one disk resource for the system databases, one for the data files and one for the log files. Click Next.

- In the Cluster Network Configuration dialog box, enter the virtual IP address and subnet mask that your SQL Server 2012 cluster will use. Notice that the setup process has detected the existence of two network subnets - LAN_DC1 and LAN_DC2. These are the names of the network adapters that I have defined in my Windows Server 2008 R2 Failover Cluster. Since you are performing the installation on a cluster node that belongs to one of the network subnets, only that option will be available. The other option to assign a virtual IP address will be made available to you when you run the Add Node option.
We will be using the following information for our SQL Server failover cluster instance.
Virtual Server Name Networks IP Address SQLMULTISUBCLUS 172.16.0.0/24 172.16.0.113 192.168.0.0/24 192.168.0.113 Deselect the checkbox under the DHCP column as you will be using static IP addresses. Click Next.

- In the Server Configuration dialog box, enter the credentials that you will use for your SQL Server service accounts in the Service Accounts tab. In the Collation tab, select the appropriate collation to be used by SQL Server. Note that the startup type is set to manual for all cluster-aware services and cannot be changed during the installation process. The startup type behavior of the SQL Server services will be controlled by the cluster resource group. Click Next.

- In the Database Engine Configuration dialog box, select the appropriate Authentication Mode in the Server Authentication tab. If you want to add the currently logged on user to be a part of the SQL Server administrators group, click the Add Current User button. Otherwise, you can add the appropriate domain accounts or security groups.
What I'd really want you to focus your attention on is the Data Directories tab. Notice that I used the local drive D:\ for my tempdbdatabase files. This is a new feature in SQL Server 2012 where you can now store your tempdb database on a local disk in a Windows Failover Cluster. You can still choose to host the tempdb database on a clustered storage. But do you want to know why having the tempdb database in local disks is a good thing for a SQL Server Failover Clustered instance? This is because tempdb is a scratch database that gets recreated every time the SQL Server service is started. And since a cluster resource failover is simply a service stop-start process that is being controlled by the cluster resource group, tempdb gets recreated whenever you do a failover on all of the nodes of the cluster. In a multi-subnet cluster that spans across geographically dispersed data centers, replicating the storage that hosts the tempdb database doesn't make sense. It's just wasted bandwidth and IO resources that will get thrown away during failover.
When you choose a local drive versus a clustered drive for the tempdb database, you will get prompted to make sure that all of the nodes in the cluster contain the same directory structure and that the SQL Server service account has read/write permissions on those folders. To make sure that you don't forget, take the time to go thru all of the nodes in your Windows Failover Cluster and create the same folder structure in the same local drive prior to proceeding with the installation. Click Next.

- In the Error and Usage Reporting dialog box, click Next.

- In the Cluster Installation Rules dialog box, verify that all checks are successful. Click Next.

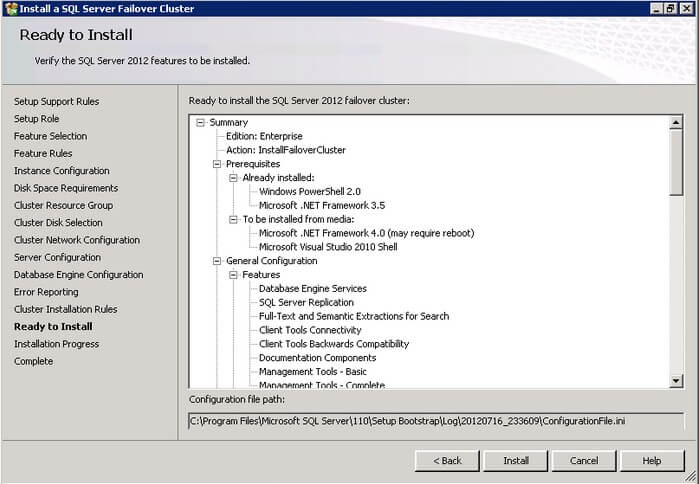
- In the Ready to Install dialog box, verify that all configurations are correct. Click Next.

- In the Complete dialog box, click Close. This concludes the installation of a SQL Server 2012 Multi-Subnet Failover Cluster.

At the completion of a successful installation and configuration of the node, you now have a functional (not necessarily fully functional) failover cluster instance. Since our goal is high availability, we still have to add the second node to the SQL Server 2012 multi-subnet cluster. In the last part of this series, we will add the second node in the failover cluster, configure other network properties for the cluster resource and the new flexible failover policies for SQL Server 2012 failover cluster instances. Stay tuned.
Next Steps
- Review the previous tips on Install SQL Server 2008 on a Windows Server 2008 Cluster Part 1, Part 2, Part 3 and Part 4.
- Download and install an Evaluation copy of Windows Server 2008 R2 and SQL Server 2012.
- Start working on building your test environment in preparation for setting up a SQL Server 2012 multi-subnet cluster on Windows Server 2008 R2. This is a great opportunity to learn more about networking concepts and fundamentals as a SQL Server DBA.
About the author
 Edwin M Sarmiento is a Microsoft SQL Server MVP and Microsoft Certified Master from Ottawa, Canada specializing in high availability, disaster recovery and system infrastructures.
This author pledges the content of this article is based on professional experience and not AI generated.
View all my tips
Article Last Updated: 2012-08-13


