By: Dan Quinones | Updated: 2012-11-27 | Comments (18) | Related: > Clustering
Problem
With the introduction of SQL Server 2012 Microsoft officially supports local disk TempDB in SQL Server cluster configurations. This tip will show you how to configure TempDB on a local disk when installing your SQL Server 2012 cluster. We will also discuss the benefits of using TempDB on a local disk and point out potential issues that may arise and how to avoid them.
Solution
The use of local disks for TempDB allows us to have more flexibility when configuring for optimal performance. It is a common performance recommendation to create the TempDB database on the fastest storage available. With the capability to utilize local disk for TempDB placement we can easily utilize disks that are larger, have a higher rotational speed or use SSD disks. SSDs are becoming more and more common and are available in multiple form factors. PCIe board SSDs, such as FusionIO and OCZ, offer even greater potential for performance improvement as they utilize the PCIe bus to provide more throughput than would be possible going through a disk interface or HBA.
Another advantage of placing TempDB on a local disk is that it creates separate paths of traffic by having your data and log files on the SAN while TempDB is on the local disk. Whether using a PCIe SSD or traditional hard drive SSDs, operations for TempDB will bypass your HBAs. This helps TempDB operations avoid congestion or contention on a shared storage network or array.
Additionally, for geographically dispersed cluster's this is a desired feature as you no longer have to replicate TempDB between sites. This translates to increased bandwidth availability and faster failovers.
Configuring SQL Server 2012 Cluster TempDB Local Directory
Prerequisites
Prior to installing a clustered SQL Server instance you should already have a working Windows 2008 cluster with a shared quorum disk as well as a clustered Distributed Transaction Coordinator.
The following layout would be representative of a typical cluster install for one SQL Server 2012 instance and will be utilized for this tip. For more complex configurations you may wish to add additional cluster disks for system databases, backups, etc.
|
Sample Cluster Disk Layout | |||||
| Disk Letter | Disk Type | Purpose | |||
| C:\ | Local | OS System Drive | |||
| T:\ | Local | SQL TempDB | |||
| Q:\ | SAN | Cluster Quorum | |||
| M:\ | SAN | Cluster DTC | |||
| S:\ | SAN | SQL Data | |||
| L:\ | SAN | SQL Log | |||
Installing the First SQL Server Cluster Node
- Launch setup from the SQL Server 2012 media.
- Start your SQL Server 2012 cluster installation by clicking New SQL failover cluster installation from the Installation page.

- Proceed through the installation steps, accepting the license, selecting the desired features, naming the instance and specifying a cluster resource group name.
- When you get to the Cluster Disk Selection screen select the shared cluster disks that you will use for data and log directories.

- Continue through the installation, providing the cluster network information and service accounts.
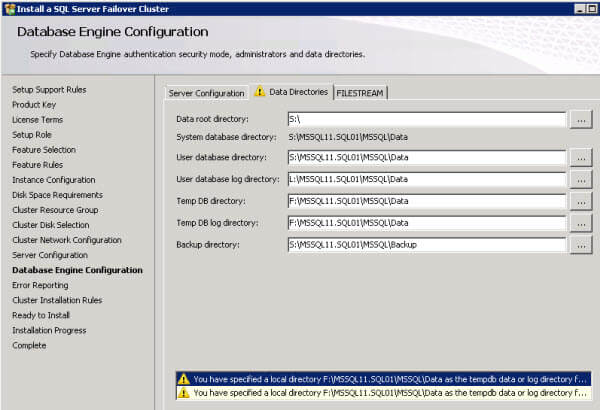
- When you get to the Database Engine Configuration specify your SAN disks for the Data and Log directories. Specify the local disk for your TempDB directories.

A warning indication will appear advising you to ensure that the same local path exists on every cluster node. As we will see cluster failover will fail if the exact local path is not defined on all cluster nodes.

- Continue through the remaining cluster install steps and complete the installation.

- When finished your disks in Windows Explorer should look as follows. Note that the Operating System and TempDB are local disks while the remainder are SAN disks.

Installing Additional SQL Server 2012 Cluster Nodes
When adding additional nodes to the cluster the key is to ensure the folders are created with the same path for the local TempDB directory. The SQL Server cluster group will fail to come online if the full path is not created on the additional instance.
- Launch the SQL Server 2012 setup on to the next node of your cluster, click Add node to a SQL Server failover cluster on the Installation page as shown below.

- Proceed through the Add Node steps, selecting the same settings as configured for the first node. You do not need to specify the path to any disks during an Add Node installation.
- Complete the installation on the additional node.

SQL Server Cluster Failover Validation
You have now completed installing SQL Server 2012 on at least 2 nodes to form a cluster. The next step would be to verify cluster failover between nodes.


The cluster should now fail over between all nodes while utilizing local disk for TempDB on each node.

Next Steps
- Analyze your environment and determine if any of the benefits noted in this tip could help your organization.
- Microsoft Support Statement for local disk TempDB - Hardware and Software Requirements for Installing SQL Server 2012.
- Check out these tips:
About the author
 Dan Quinones is an Architect/Systems Engineer with over 11 years of experience specializing in Microsoft Server and Database technologies.
This author pledges the content of this article is based on professional experience and not AI generated.
View all my tips
Article Last Updated: 2012-11-27


