By: Arshad Ali | Updated: 2013-10-11 | Comments (2) | Related: > Backup
Problem
The two main PowerShell cmdlets introduced in SQL Server 2012 to do backup and restore operations are Backup-SqlDatabase and Restore-SqlDatabase. These cmdlets have been further enhanced and new cmdlets have been introduced in SQL Server 2012 SP1 CU4 to allow backing up your database to Windows Azure Blob storage and restoring from there as needed. In this tip we look at how to write PowerShell scripts for backing up and restoring a database to Windows Azure Blob storage.
Solution
SQL Server 2012 Service Pack 1 Cumulative Update 4 adds support for SQL Server backup and restore with Windows Azure blob Storage using PowerShell scripting by enhancing existing PowerShell cmdlets and by adding new PowerShell cmdlets.
In this tip I am going to demonstrate how you can use Backup-SqlDatabase and Restore-SqlDatabase PowerShell cmdlets along with other new cmdlets for taking a backup of your databases to Windows Azure Storage service and restoring it from there.
If you are new to PowerShell, you can find more PowerShell related tips here.
Understanding PowerShell cmdlets needed to backup and restore SQL Server databases
This is the set of cmdlets used for taking a backup of the database and restoring it from Windows Azure storage account. Please note, these cmdlets are available and supported for creating backups on Windows Azure Storage account only if you have installed SQL Server 2012 Service Pack 1 Cumulative Update 4.
|
PowerShell Cmdlets |
Description |
|---|---|
| New-SqlCredential | Used for creating Credential object to connect to Windows Azure Storage for storing SQL Server database backup file |
| Remove-SqlCredential | Used for deleting a Credential object |
| Get-SqlCredential | Used for retrieving the Credential object and its properties |
| Set-SqlCredential | Used for changing or setting the properties of the SQL Credential Object |
| Backup-SqlDatabase | Used for creating a SQL Server database backup |
| Restore-SqlDatabase | Used for restoring from SQL Server database backup file |
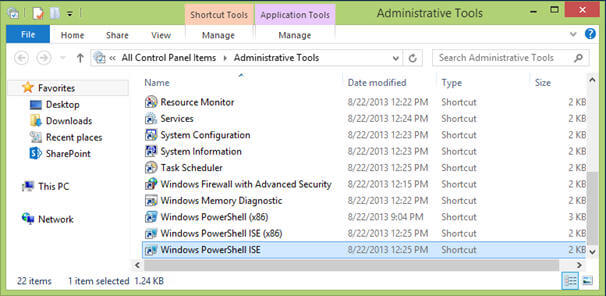
Although PowerShell scripting is supposed to be used in an automated mode, when you are developing or writing PowerShell scripts you can use a the GUI (Graphical User Interface) IDE (Integrated Development Environment) which comes with Windows. To launch this IDE, go to Control Panel then click on Windows PowerShell ISE as shown below. You can find more about it here:

Backing up a database to Windows Azure Blob Storage Account using PowerShell
Before you can take a backup of your database you need to first create a credential (a credential contains the authentication information that is required to connect to a resource outside of SQL Server; in our case a Windows Azure Storage account) and use that credential during backup in order to connect to Windows Azure Storage account for storing the backup file there. You need to use the New-SqlCredential cmdlet for creating a new credential:
##############################################################
#import sql PowerShell module
##############################################################
Import-Module sqlps
##############################################################
# Variable
##############################################################
# create variables
$serverPath = "SQLSERVER:\SQL\ARALI-LP\SQL2012"
$storageAccount = "mydatabasebackstore"
$storageKey = "953VVI+PWHEpLLtKOatR/P+bJ4Va*********************NbkJze9Gvbi9vzp768ovkImeYNLeHaeA=="
$secureString = convertto-securestring $storageKey -asplaintext -force
$credentialName = "mydatabasebackstorecredential"
##############################################################
# Navigate to SQL Server instance
##############################################################
# navigate to SQL Server Instance
CD $serverPath
# you can view all the databases on the specified instance
dir Databases
##############################################################
# Create Credential
##############################################################
New-sqlcredential -Name $credentialName -Identity $storageAccount -Secret $secureString
Once you have a credential created, you can call the Backup-SqlDatabase cmdlet to start creating the backup of the database:
##############################################################
## Backing up AdventureWorks2012 to Windows Azure Storage
##############################################################
# specify backup file name
$backupFile = "https://mydatabasebackstore.blob.core.windows.net/adventureworks/AdventureWorks2012.bak"
# backup Database to URL
Backup-SqlDatabase -Database "AdventureWorks2012" -backupFile $backupFile -SqlCredential $credentialName -CompressionOption On
Depending on the network speed and database size it might take some time and this is how your console screen should look in Windows PowerShell ISE after completion of the backup operation:

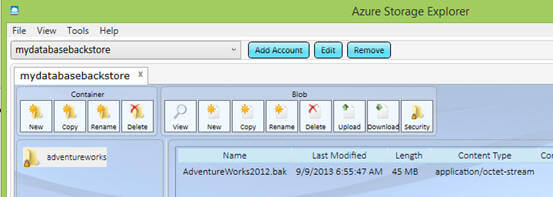
Now if you go to the Azure Storage Explorer, you will notice the availability of the above created backup file in the container specified as shown below:

Restoring a database backup from Windows Azure Blob Storage Account using PowerShell
Before we restore, let me truncate SalesOrderDetail table with the following commands:
USE AdventureWorks2012
SELECT COUNT(*) FROM [Sales].[SalesOrderDetail]
TRUNCATE TABLE [Sales].[SalesOrderDetail]
SELECT COUNT(*) FROM [Sales].[SalesOrderDetail]
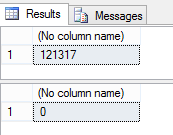
After truncation, you will notice no records exist in the SalesOrderDetail table.

Now like the backup operation, for restoring a database, you need to have a credential created for connecting to the Windows Azure Storage account and then you can run the code below. For the restore you can call the Restore-SqlDatabase cmdlet to start restoring the database from the backup file stored in the Windows Azure Storage Account:
##############################################################
## Restoring AdventureWorks2012 from Windows Azure Storage
##############################################################
# specify backup file name
$backupFile = "https://mydatabasebackstore.blob.core.windows.net/adventureworks/AdventureWorks2012.bak"
# Restore Database and move files
$newDataFilePath = New-Object Microsoft.SqlServer.Management.Smo.RelocateFile ("AdventureWorks2012_Data","D:\D Drive\SQL Server 2012\SampleDatabases\AdventureWorks2012_Data.mdf")
$newLogFilePath = New-Object Microsoft.SqlServer.Management.Smo.RelocateFile("AdventureWorks2012_Log","D:\D Drive\SQL Server 2012\SampleDatabases\AdventureWorks2012_log.ldf")
Restore-SqlDatabase -Database "AdventureWorks2012" -SqlCredential $credentialName -BackupFile $backupFile -RelocateFile @($newDataFilePath,$newLogFilePath)
Again depending on your network speed and size of the database, the restore operation might take some time and this is how it should look during execution of the above code for the restore:

After the restore is complete, we can verify the SalesOrderDetail table now contains data as it was before with the following command:
USE AdventureWorks2012
SELECT COUNT(*) FROM [Sales].[SalesOrderDetail]
GO
You can see we have the data in the SalesOrderDetail after the database restore was done successfully as shown below:

Exclusive Lock to Restore Database
To restore a database SQL Server needs to acquire an exclusive lock on the database being restored. If you try to restore a database that is in use, SQL Server will throw the following exception:

Next Steps
- Review Use PowerShell to Backup Multiple Databases to Windows Azure Blob Storage Service on msdn.
- Review Backup and Restore SQL Server with the SQL Server 2012 PowerShell cmdlets article on Simple-Talk.
- Review PowerShell related tips.
- Review my other tips in this series
- Review other SQL Azure related tips
About the author
 Arshad Ali is a SQL and BI Developer focusing on Data Warehousing projects for Microsoft.
This author pledges the content of this article is based on professional experience and not AI generated.
View all my tips
Article Last Updated: 2013-10-11


