By: Tim Smith | Updated: 2014-05-12 | Comments (22) | Related: > PowerShell
Problem
A few colleagues have asked me if PowerShell provides an easy way to export Excel as a CSV. Whether we have multiple Excel files, or just multiple worksheets in Excel, PowerShell simplifies the process. In addition to that, once the format is in CSV, we have multiple options to insert the data into a SQL Server database.
Solution
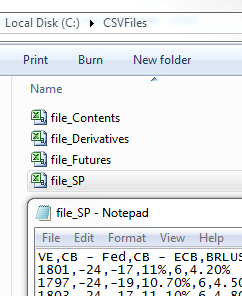
In this simple example, we'll use an Excel workbook that has four different worksheets - Derivatives, SP, Futures, Contents. We want each worksheet as it's own CSV file and we want the CSV file name to take into account its Excel source as well as the workbook where it originates.

The following will fire off Excel (don't run just yet), but keep it invisible in the background:
    $excelFile = "C:\ExcelFiles\OurFile.xlsx"
    $E = New-Object -ComObject Excel.Application
    $E.Visible = $false
    $E.DisplayAlerts = $false
Since we want to be able to change the file location, we'll change $excelFile = "C:\ExcelFiles\OurFile.xlsx" to $excelFile = "C:\ExcelFiles\" + $excelFileName + ".xlsx".
Next, let's pass in the workbook and loop through each worksheet in the workbook:
    $wb = $E.Workbooks.Open($excelFile)
    foreach ($ws in $wb.Worksheets)
    {
        $n = $excelFileName + "_" + $ws.Name
    }
Here, we've opened the workbook of our Excel file, and looped through each worksheet initiating a new variable called $n, which holds the Excel file name with an underscore and the worksheet name. Our naming convention for our CSV files is now built.
Now, we want to save the Excel file in the correct format and exit Excel. While we're at it, let's wrap our code in a function that we can call where we'll enter the Excel file name and the location we want to drop the CSVs into:
Function ExportWSToCSV ($excelFileName, $csvLoc)
{
    $excelFile = "C:\ExcelFiles\" + $excelFileName + ".xlsx"
    $E = New-Object -ComObject Excel.Application
    $E.Visible = $false
    $E.DisplayAlerts = $false
    $wb = $E.Workbooks.Open($excelFile)
    foreach ($ws in $wb.Worksheets)
    {
        $n = $excelFileName + "_" + $ws.Name
        $ws.SaveAs($csvLoc + $n + ".csv", 6)
    }
    $E.Quit()
}
ExportWSToCSV -excelFileName "file" -csvLoc "C:\CSVFiles\"
Just a note here, while in Windows 7 everything terminates correctly, sometimes Excel will linger in Windows 8. We can add the below line after $E.Quit().
stop-process -processname EXCEL
Extract All Worksheets from All Files
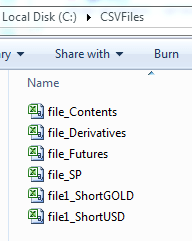
Finally, if we want export multiple Excel files, we'll get all the Excel files in a specific location by filtering on the Excel extension and storing the results in a variable ($ens below this). From there, we'll loop through each Excel file and call our function - in the below example, we exported 4 worksheets from file> and 2 worksheets from file1:
$ens = Get-ChildItem "C:\ExcelFiles\" -filter *.xlsx
foreach($e in $ens)
{
    ExportWSToCSV -excelFileName $e.BaseName -csvLoc "C:\CSVFiles\"
}

Now that our Excel worksheets are CSVs, we have quite a few different tools that we can import the data. As we can see, PowerShell makes CSV creation from Excel simple and quick.
Next Steps
- Edit the function in a way that matches your needs.
- Test the script on Excel files.
About the author
 Tim Smith works as a DBA and developer and also teaches Automating ETL on Udemy.
This author pledges the content of this article is based on professional experience and not AI generated.
View all my tips
Article Last Updated: 2014-05-12


