By: Fikrat Azizov | Updated: 2015-05-21 | Comments (3) | Related: 1 | 2 | 3 | > Monitoring
Problem
As a SQL Server DBA you need to constantly take care of performance related issues before performance degrades to a point where it is noticeable and a problem to the business. There are several tools and ways to collect SQL Server performance related metrics and in this series of tips we'll demonstrate the ways to build a centralized, integrated and flexible data collection and analysis system. In Part1 I demonstrated usage of PowerShell scripts to collect performance metrics from multiple servers into a central repository database and this tip we will look at SSIS components.
Solution
Overview
In this tip we'll build an ETL package which will read raw performance data from the central repository database (PerfCollection), classify data based on predetermined performance metric thresholds and load it into a data warehouse. The data uploads are incremental and could be triggered from SQL Server Agent Jobs. The package was created using SSIS 2008, but could easily be upgraded to higher versions.
Data model
PerfDWH Db serves as a data warehouse for the OLAP cube.
The PerfDWH Db schema is shown below:
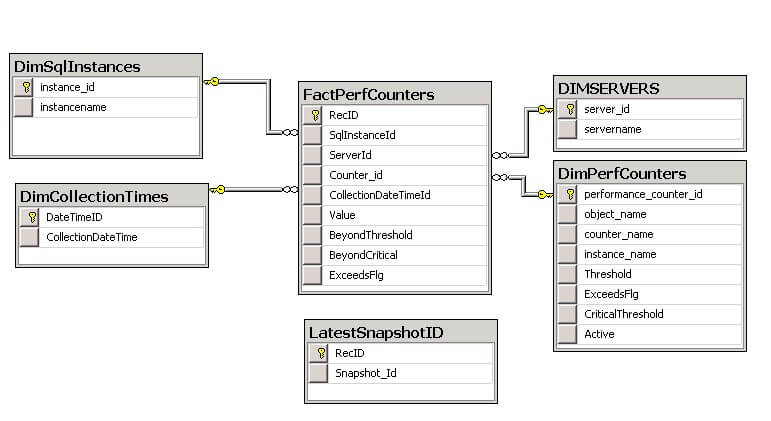
Here are short descriptions of the PerfDWH Db tables:
- DimSQLInstances - Dimension table for SQL instances.
- DimPerfCounters - Dimension table for performance counters and counter instances.
- DimServers - Dimension table for server names.
- DimCollectionTimes - Dimension table for collection time sets.
- FactPerfCounters - Fact table containing the performance data.
- LatestSnapshotID - Table
to store the ID of the latest uploaded data from the PerfCounterData table.
SSIS Package Deployment
I'll demonstrate the package deployment to a SQL instance, which is preferable from a security point of view, however it could also be deployed to the file system. Alternatively, it could also be converted into a SSIS 2012 project model and deployed into the SSIS catalog, which allows flexible configuration and logging features.
Deployment steps are as follows:
1: Download deployment package from here and unzip its content.
2: Open CreatePerfDWHDb.sql script, change the location of DB files if required and execute it to create PerfDWH Db and included objects.
3: Import the package into the central server by following the below steps:
3.1: Start SSMS and connect to Integration Services:
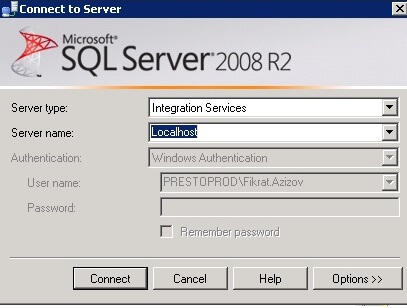
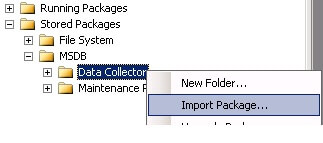
3.2: Expand Stored Packages | MSDB, right click on the Data Collector folder and select 'Import Packages'.
3.3: Select 'File system' in 'Package location' field and specify the package location in the 'Package path' field.
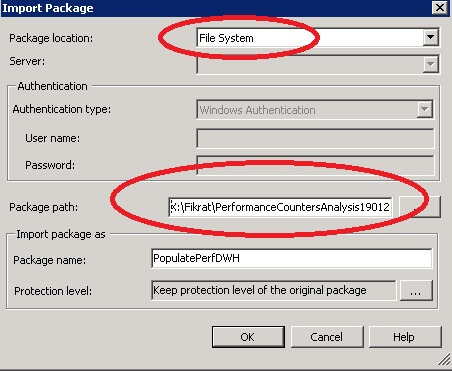
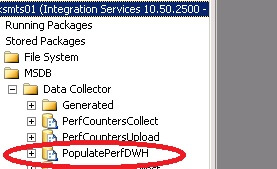
Package's name will appear under MSDB as shown below:
4: Open the CreateSecurityObjectsDWH.sql script, specify domain name, username and password to create a credential, which will be used later by the collection jobs, and execute it to create a credential and proxy accounts for SQL Agent. The domain user account would need to be a member of the db_datareader group for the PerfCollections database and member of the db_writer group for the PerfDWH database to be able to read from the source and write to the destination database.
5: Open
the CreatePerfDWH_ETLJobs.sql script, specify the instance name, where the SSIS package have been
deployed (see step 3 above) as well as the data processing frequency value for
the local variable @ProcessFrequency_Min and execute it to create the data
processing job. The ETL package will be running under the proxy account created
in
step 4.
Configuring the SSIS Package
The package is using configuration settings based on environment variables as shown below:

So, we'll need to create the following environment variables (see below):
- PerfCollectionSqlInstance - SQL instance name hosting both the source (PerfCollection) and destination (PerfDWH) databases
- PerfCollectionLogFolder - Folder for the package logs
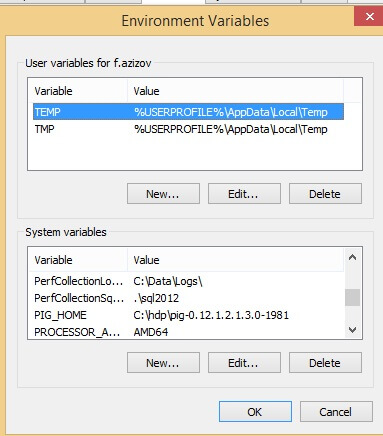
Note: You may need to restart the server once the environment variables are configured, in order for them to take effect.
Package's internals
Below is the package structure:
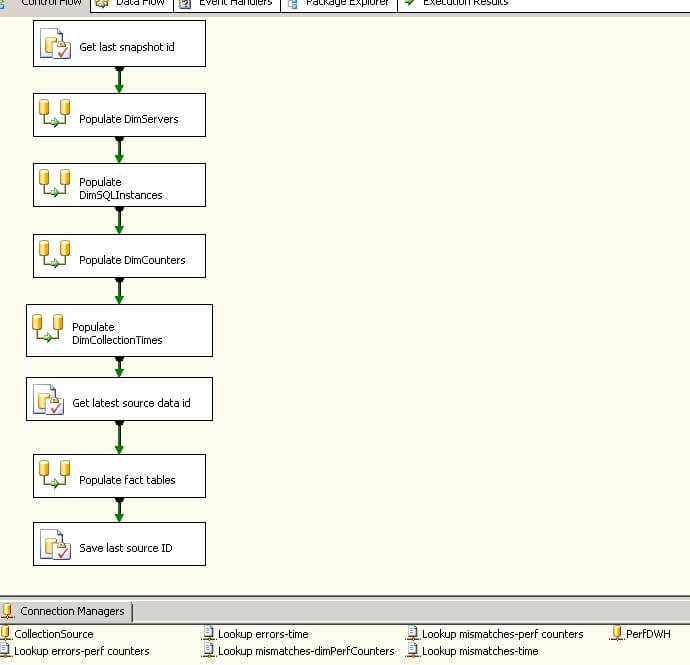
Given the nature of this package, it's unlikely that dimension values involved here would be changed after insertion. So, I've used Fixed (Type 1) Slowly Changing Dimensions for all dimensions. You can read more about various types of dimension change tracking in this tip.
Here is the description of package components:
- Get Last Snapshot ID - Reads last uploaded ID from the source (PerfCollections/PerfCounterData), which was saved in the PerfDWH/LatestSnapshotID table during the package's previous execution. This component is intended to facilitate an incremental upload.
- Populate DimServers - Incremental population of the DimServers table.
- Populate DimSQLInstances - Incremental population of the DimSQLInstances table.
- Populate DimCounters - Incremental population of the DimCounters table.
- Populate DimCollectionTimes - Incremental population of the DimCollectionTimes table.
- Get latest source data ID- Reads the last available ID from the source (PerfCollections/PerfCounterData).
- Populate Fact tables - Incremental population of the FactPerfCounters table.
- Save last source ID - Saves last uploaded ID into the LatestSnapshotID table.
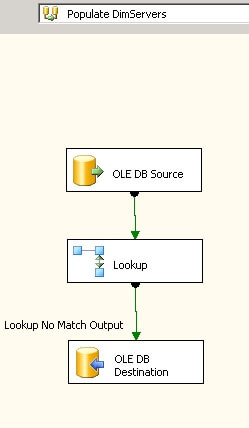
Dimension tables have similar population logic (see sample below) - they compare source and destination tables then insert missing rows into the destination. I've preserved business/production keys in case of dimensions like DimSQLInstances and DimServers. However, I had to create surrogate keys for dimensions DimCounters and DimCollectionTimes.
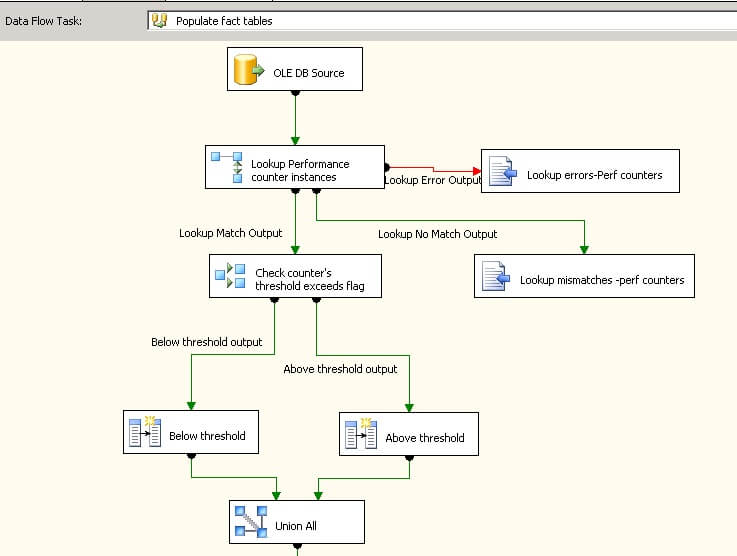
Here is the 'Populate Fact tables' component's internal logic:
1: Read rows from the PerfCollections/PerfCounterData table, then insert data since the last execution (i.e. with row ID's exceeding last saved ID value in LatestSnapshotID).
2: Find matching counter configuration in PerfCounter_Groups table in order to classify the metric. Please note, only metrics with 'True' values in their 'Aggregate' filed would be eligible for upload.
3: Validate if 'ExceedsFlg' field is set to 'True'.
4: Depending on the 'ExceedsFlg' field's value, validate if the actual value of the counter is above the 'Threshold' or 'CriticalThreshold' fields of the PerfCounter_Groups row and mark the counter value as exceeding threshold or critical threshold accordingly. For example, if a metric's threshold is 300, the critical threshold is 2000 and the 'ExceedsFlg' is set to 'True', the counter's value would be marked as 'exceeding threshold', when it's between 300 and 2000 and would be set to 'exceeding critical threshold', when it goes above 2000. Similarly, when the metric's 'ExceedsFlg' field is set to 'False' it'll be marked as exceeding threshold, when it's value drops below the threshold value for this metric. Below you can see the top part of Populate Fact tables component:
5: Find matching for input row from the DimCollectionTimes and use its ID field as a foreign key in the destination fact table. Because DimCollectionTimes table is being populated before fact table, typically there should be no mismatch.
6: Find match for input row from the DimCounters table use its ID field as a foreign key in the destination fact table. Because the DimCounters table is being populated before fact table, typically there should be no mismatch.
7: Write into the destination table
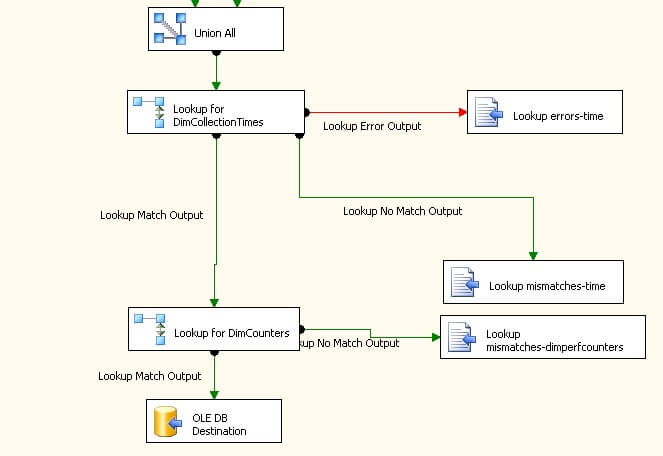
Note: Lookup components will log lookup mismatches, as well as errors into csv files located in the folder, specified by the PerfCollectionLogFolder environment variable.
Next Steps
- Review Part 1
- Stayed tuned for Part 3 to see how to build OLAP cube to analyze performance data
About the author
 Fikrat Azizov has been working with SQL Server since 2002 and has earned two MCSE certifications. He’s currently working as a Solutions Architect at Slalom Canada.
This author pledges the content of this article is based on professional experience and not AI generated.
View all my tips
Article Last Updated: 2015-05-21


