By: Rob Fisch | Updated: 2010-02-04 | Comments | Related: > SharePoint
Problem
After having implemented a new installation of MOSS 2007, I cannot figure out how to get Excel Services working. I have added the Excel Web Access web part, and linked to a MS Excel 2007 worksheet, but all I get is an error message that says "You do not have permissions to open this file on Excel Services". I also don't know how to display a specific part of the spreadsheet.
Solution
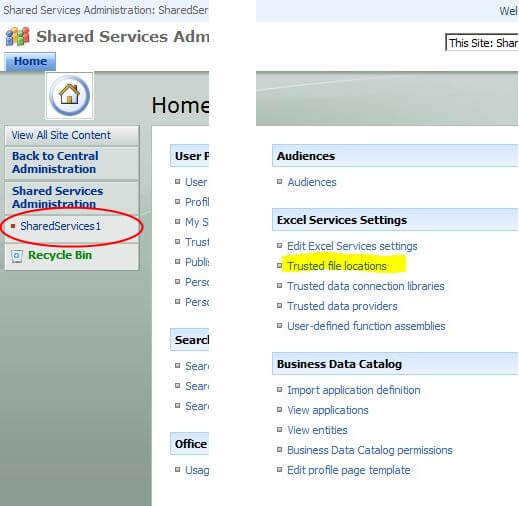
Excel Services requires that you proactively allow access to the service within the Sharepoint 3.0 Central Administration console. So the first thing to do is set up the "Trusted file locations" in Shared Servers.

Click "Add Trusted File Location". Then enter the path to the site or library you want to allow Excel Services for. If there are security implications, you can limit accessibility to a specific site or library. If you can't think of a single reason to exclude use of Excel Servers, you can enter the base URL of your site collection.
You can see from the configuration tool that options exist for locations outside of SharePoint. A "UNC" will work for locations on a file server. "HTTP" is for a web server outside of SharePoint.
The next requirement is that you use an Excel 2007 (or above) document. Excel 2003 documents will not work with Excel Services.
Create and upload a sample Excel (2007) document. Feel free to use my sample document.
The sample spreadsheet has 3 specifically named objects.
- Ptable - "Named Range" for upper left table.
- Tpivot - "Name" of the pivot table under "Pivot Options"
- Pchart - Name of the Pivot chart below. In "PivotChart Tools" look on the "Layout" tab for the "Chart Name".
These named objects are important for the Excel Web Access web part.
Now we are ready to add the Excel Web Access web parts to a site page. This can be the main page of a SharePoint site, or a specifically created Web Part Page.
Edit the page and add some Excel Web Access web parts. My example uses 3 of them. After they are arranged on the page, select "Modify Shared Web Part" from the "Edit" dropdown of each one and configure the Workbook Display options.
There are 2 critical configurations. The "Workbook" which is the URL path to the spreadsheet in the document library. You can actually browse to it by using the ellipsis button, or just type or paste the path directly.
In the "Named Item" section, type the name of one of the specifically named objects in the spreadsheet (Named Range, Chart Name, Pivot table name, etc).
When finished with each web part, click "OK". After configuring the "Appearance" options in each web part, your page should look something like this:
To customize the web part, enter a desired Title, Height, and Width in the "Appearance" section of the web part properties.
Also uncheck the "Autogenerate Web Part Title" option or your custom "Title" (above) will not work.
Summary
So what's the purpose of all this fuss? Why not just present a link to the actual spreadsheet and be done with it? It's a good question. The answer is that it is all about "presentation". Excel Services provides a way to deliver specific content to users in a web friendly format. You can present charts and graphs to users in a friendly web format (with just a web browser). By updating your data (in this case, kept in the spreadsheet), the rich content is delivered automatically. Though it's not a topic for this tip, you can also configure Excel Services content to extract data from external sources in real time.
Next Steps
- Learn to create external data connections in the Excel Services documents. You may want/need to define "Trusted data providers" and/or Trusted data connection libraries in the SharedServices of your SharePoint Central Administration configuration.
About the author
 Rob Fisch has worked with SQL Server since version 6.5 as a dba, developer, report writer and data warehouse designer.
This author pledges the content of this article is based on professional experience and not AI generated.
View all my tips
Article Last Updated: 2010-02-04


