By: Knox Cameron | Updated: 2011-01-06 | Comments (3) | Related: > Sharepoint Design
Problem
Wiki libraries are a great way for people to share "free form" information with their team and wider audiences. They includes features such as letting you easily create new pages simply by creating a "forward" link to a page name that doesn't exist yet, as well as letting you review changes made over a page's history, and checking for "incoming links" to a page.
SharePoint's wikis are basic but functional. Some of the features SharePoint leaves out, such as text formatting markup, is not required because SharePoint's native functionality is better. Plus you have other SharePoint functionality not typically found in wikis such as web parts, lists and libraries, metadata and so on.
The problem is that they can be a bit too "free form": if you create a new page, it's always blank. Often, it would be nice to create pages with a standard layout to show the user what information to include. For example, you might create a wiki library to hold pages for team members to share status information about each active project. It would be good to have a standard layout with the project name and manager at the top of each page. However, users have to know to add that information each time they create a new page.
Unfortunately, there is no system of templates for wiki pages in SharePoint. Not even in SharePoint 2010, where wiki pages have become the default page type for non-publishing sites. There are some add-ons available to provide that kind of functionality, such as the community kit in CodePlex, but they require installation of components on the server.
Solution
In this tip, we will show two solutions based on client-side JavaScript code. The first is a solution for SharePoint 2007 (WSS 3) that creates a new page and copies the content from an existing page into it. The second is a solution for SharePoint (Foundation) 2010 that uses the same remote commands as SharePoint Designer to make a complete copy of an existing page.
Both of these solutions can be implemented as-is by an administrator without programming knowledge. However, programming knowledge would let you adapt and enhance the solutions, and would be useful if you need to troubleshoot issues.
Either solution could be used to support multiple templates - just follow the steps again in the same or a different library.
SharePoint 2007 - copy content
For this solution, you will need to find some internal information about the page that comes up when you create a new wiki page. To get this, you will need a tool like the Internet Explorer Developer's Toolbar, available as a free add-on for Internet Explorer up to version 7 (Download details: Internet Explorer Developer Toolbar), but available as a standard component in Internet Explorer 8 (press F12 to activate it). For FireFox, an equivalent tool is Firebug.
The steps are:
Get˙a copy of˙the URL of the page that comes up if you select the option to create a new page in the wiki library. Copy it from the address bar of the browser into a NotePad file. It looks something like:
http://www.yourhost.com/sitename/_layouts/CreateWebPage.aspx?List={GUID}&RootFolderUrl=/sitename/Wiki Pages
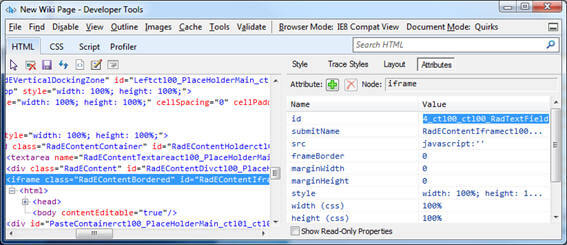
Use the Internet Explorer Developer's Toolbar (or equivalent) to get a copy of the IDs of the page name field (an html INPUT control)˙and page body field˙(an html IFRAME)˙on the CreateWebPage.aspx page.
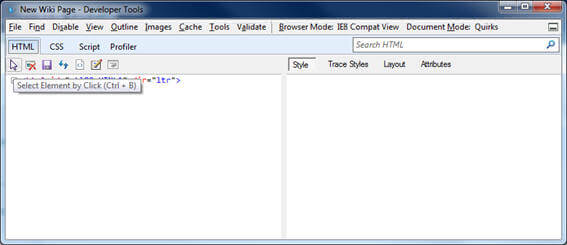
- Open the toolbar then select the toolbar option to Select Element by Click
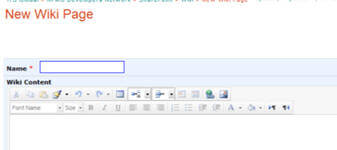
- In the page, click on the Name field. It will be highlighted with a blue border.
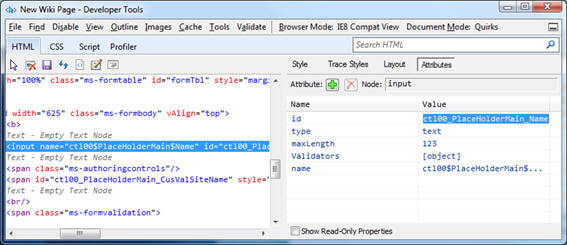
- In the developer toolbar, find the id property, select it and copy it to NotePad
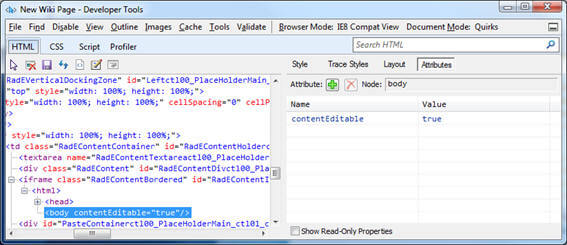
- Repeat the same process to select the page body field. In the toolbar, you will see that the iFrame that contains it is above it in the hierarchy. Select the iFrame, then copy the id into NotePad as before.
Create the page with "template" content.
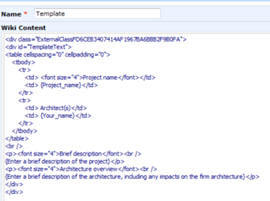
In the source (HTML) view of the page body content, put the tag <div id=TemplateText> at the start of the template content, and </div> at the end, to mark the content to be copied to the new page, for example:
Select Edit Page from the Site Actions menu (not the wiki "edit" link) and add a content editor web part to the web part zone at the bottom of the˙template page.
Open the properties of the content editor web part, and select the button to edit the source.
Copy and paste the below script.
<hr/>
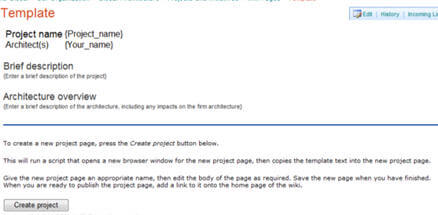
<P>To create a new project page, press the <em>Create project</em>
button below.</P>
<P>This will run a script that opens a new browser window for the new
project page, then copies the template text into the new project page.</P>
<P>Give the new project page an appropriate name, then edit the body
of the page as required. Save the new page when you have finished.
When you are ready to publish the project page, add a link to it onto
the home page of the wiki.</P>
<script type="text/javascript" language="javascript">

var oNewWindow;

function CreateProject()
{
var sURL = "PUT_CREATE_PAGE_URL_HERE"
oNewWindow = window.open(sURL);

window.setTimeout("SetData();",3000);
}

function SetData()
{
while (oNewWindow.document.readyState != "complete")
{
}

var control = document.getElementById('TemplateText');

if (control == null)
{
alert('ERROR template content not found');
}
else
{
var controlValue = control.innerHTML;

var NameField =
 oNewWindow.document.getElementById('PUT_PAGE_NAME_FIELD_ID_HERE');
NameField.value='{Project_Short_Name}';
var TextiFrame =
 oNewWindow.document.getElementById('PUT_PAGE_BODY_IFRAME_ID_HERE');
TextiFrame.Document.body.innerHTML=controlValue;
}
}
</script>
<input id="AutoButton" type="button" value="Create project"
onclick="CreateProject();" />
Replace the page creation URL, page name field ID and page body field ID in the script with the values for your environment, which are saved in your NotePad file.
Save the changes, and save the page. Then test!
SharePoint 2010
Unfortunately, the solution above won't work for SharePoint 2010.
For a start, it does not have a page for creating new wiki pages like the one in 2007. Even if it did, the above solution would not bring over all the content.
The reason is that SharePoint 2010 now allows you to embed web parts in the rich text content of wiki pages. Although these appear as part of the rich content to a user, on the page they are actually stored in a hidden web part zone. The rich content just contains a marker where they are placed when the page is displayed. So the above approach would copy the markers but miss the actual web parts.
So what we need is a solution that will actually copy the template page as a complete object. The best way I could find to do this was to use the FrontPage RPC protocol, the same protocol used by SharePoint Designer when editing a site.
This protocol is documented and supported, and has a move document Method that does what we need (when you give it the option to copy rather than actually move the file).˙However, it is also very old, and pre-dates all our modern standards for web services. I found it temperamental about getting data in exactly the right format, and the results of operations are returned as fairly unstructured html. The key to getting the protocol right in the end was to use Fiddler to capture the commands used by SharePoint Designer to copy a file, and emulate those commands.
For this solution, I used jQuery: The Write Less, Do More, JavaScript Library. This has functions to handle posting the RPC requests to SharePoint. Note that, although Microsoft supports the use of jQuery with SharePoint 2010, you still need to add the jQuery library onto your site and add a reference to it.
The steps are:
- Download the jQuery library file, and save it into a SharePoint library on your site. Make sure it is published and available to all users.
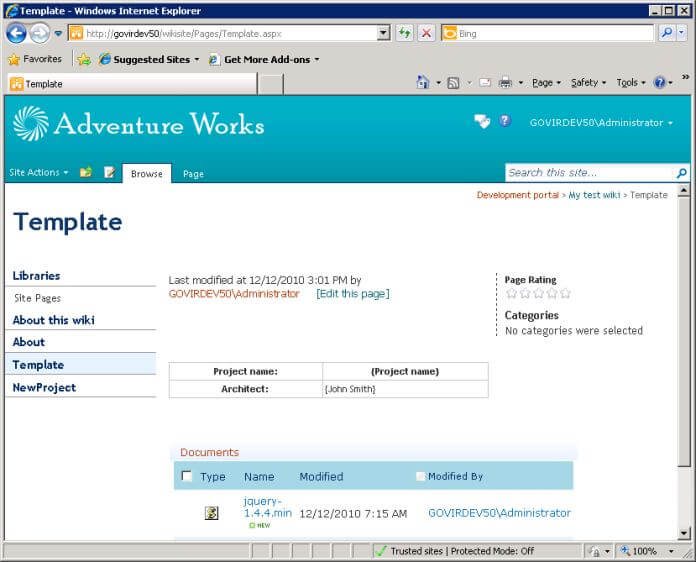
- Create the template page in your wiki site/library. For demonstration, I made one that looks like this:
- Create a page to be used to create new pages. I called mine "NewProject". Add some explanatory text, then insert a Content Editor web part in the rich content field.
- Click inside the content area of the web part and select HTML > Edit HTML Source from the ribbon. Make sure you are not seeing the HTML source of the rich text field containing the web part (I find this sometimes happens). Copy and paste the following code.
<hr/>
<p>To create a new project page, type the project name then press the
<em>Create project</em> button below.</p>
<p>This will run a script that copies the template project page into a new
page.</p>
<p>Edit the body of the page as required. Save the new page when you have
finished. When you are ready to
publish the project page, add a link to it onto the home page of the wiki.</p>
<!-- edit the path to the JQuery library file for your environment -->
<script src="/wikisite/Documents/jquery-1.4.4.min.js" type="text/javascript">
</script>
<script type="text/javascript">
function myCreateProject()
{
// Configure these for your environment
// include no slashes in paths
var PATHTOWIKI = "/wikisite";
var PATHTOPAGES = "Pages";
// file name only for template page, no extension
var TEMPLATEFILENAME = "Template";
var myPathToWiki = encodeURIComponent(PATHTOWIKI);
var myPathToPages = PATHTOPAGES + "%2f";
var myTemplateFileName = encodeURIComponent(TEMPLATEFILENAME) + "%2easpx";
var EnteredProject = document.getElementById("NewProjName");
var myNewName = EnteredProject.value;
if(myNewName == "")
{
alert('Please enter a name for the new project page');
}
else
{
myNewName = encodeURIComponent(myNewName) + "%2easpx"
$.ajax({
url: PATHTOWIKI + "/_vti_bin/_vti_aut/author.dll",
data: ( "method=move+document%3a14%2e0%2e0%2e4730&service%5fname="
+ myPathToWiki +
"&oldUrl=" + myPathToPages + myTemplateFileName +
"&newUrl=" + myPathToPages + myNewName +
"&url%5flist=%5b%5d&rename%5foption=nochangeall&put%5foption=edit&docopy=true"
),
success: function(data)
{
var rpcmsg1 = getMessage(data, "message=", "<p>");
$("#myInfo").append("<br/>" + rpcmsg1);
if(rpcmsg1.indexOf("successfully") < 0)
{
// get error info
var rpcmsg2 = getMessage(data, "msg=", "<li>");
$("#myInfo").append("<br/>" + rpcmsg2 + "<br/>");
}
else
{
$("#myInfo").append("<br/><a href=\"/" + PATHTOWIKI + "/" + PATHTOPAGES +
"/" + myNewName + "\">Go to new page</a><br/>");
}
},
type: "POST",
beforeSend: function(XMLHttpRequest)
{
XMLHttpRequest.setRequestHeader("X-Vermeer-Content-Type",
"application/x-www-form-urlencoded");
}
});
}
}
function getMessage(data, startmsg, delim)
{
var msgpos = data.indexOf(startmsg);
var endpos = data.indexOf(delim, msgpos);
var rpcmsg = data.substring(msgpos + startmsg.length, endpos);
return rpcmsg;
}
</script>
<input id="NewProjName" type="text"/> <input id="AutoButton"
onclick="myCreateProject();" type="button" value="Create project"/> <br/>
<p>˙</p>
<div id="myInfo"><b>Results</b><br/></div>
- Edit the three variables with names in BLOCK CAPITALS near the top to match your site URL, the name of the library containing the wiki pages and the file name of the template page. Also edit the path to the jQuery library file near the top, or remove that block if you already load the jQuery library in your master page.
- Save the changes to the Content Editor Web Part then save the page. Now you can test!
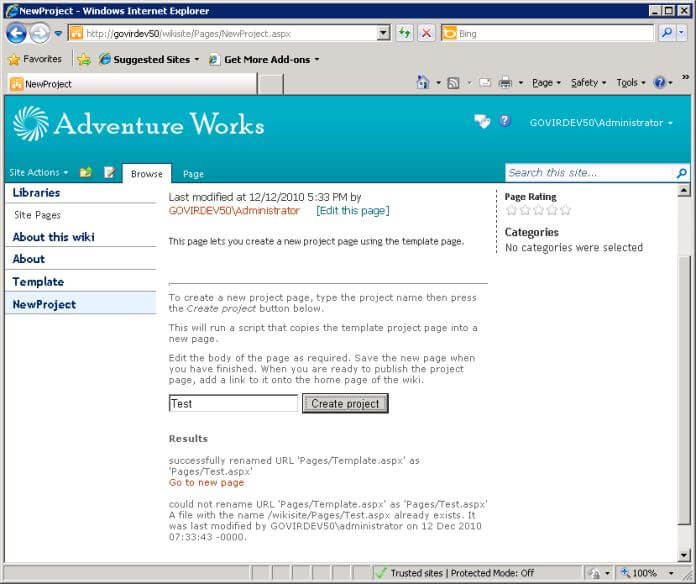
In this screenshot, I entered a name for a new page of "Test" and clicked the button. This was successfully created by copying the template (although SharePoint reports it as a "rename" operation), and the link can be used to go to the new page. To demonstrate the error handling, I clicked the button again without changing the name, which generated the error that the file already exists.˙
Comments and caveats
This solution requires the FrontPage RPC functionality to work. This is enabled by default, but may be disabled in your environment if (for example) use of SharePoint Designer is blocked.
I have not tested it, but this solution should also work for SharePoint 2007. The version number on the "move document" method may need to be adjusted.
The solution could easily be adapted to other requirements involving copying files in SharePoint.
Some notes on the code for programmers who are interested:
- I had problems with the id selector '#' in jQuery not working reliably, similar to what was described in jQuery in SharePoint for Hackers, hence the use of getElementById.
- I ended up manually encoding some of the characters when I was having issues getting the RPC calls to work. Some of that is probably unnecessary, but hey, it works.
- I wasted a lot of time trying to use the object/value pairs format for the data parameter on the ajax call, but gave up as it never seemed to encode them the way the FrontPage RPC requires. In particular, RPC required the underscore character in parameter names to be encoded. Manually encoding my own string was inelegant, but again, it works.
- The results from the RPC call are returned as an HTML page with paragraphs and list items. Hence the string matching to find the useful bits of information to return to the user.
Next Steps
- Set up a wiki library and try out the solution for creating pages from a template that is suitable for the version of SharePoint you are using.
- Learn more about understanding and creating libraries in SharePoint 2010
- Explore the other possibilities for using jQuery in SharePoint, for example Hiding the SharePoint Search Scope Dropdown List.
About the author
 Knox Cameron
This author pledges the content of this article is based on professional experience and not AI generated.
View all my tips
Article Last Updated: 2011-01-06


