By: Knox Cameron | Updated: 2011-06-21 | Comments | Related: > SharePoint Document Management
Problem
You have been given a SharePoint site to use as a document storage area for your team. You know how to save documents into folders in a SharePoint document library, just like you would do with a file share. But folders have always been a hassle to use.
- It's often difficult for people to find documents, because one person's logic of which folder a document belongs in, doesn't always match another person's.
- It can be time consuming to browse down and up through a folder structure to find documents.
- A document is only ever in one folder, so you only get one convenient grouping. For example, you could put documents into folders based on which client they relate to, but then you can't easily see all proposals.
Isn't there a better way?
Solution
There surely is! Let's look at how you can organize your documents and get the best value from SharePoint, instead of just using it like a file share. It takes a bit of preparation work, but the results are that it is much easier to find and use documents.
We are going to look at the scenario of a team that works for a group of clients producing a number of different kinds of documents. We will look at how you can tag content so documents are easy to find, and so it's easy to find all documents relating to a particular client, or produced by a particular team member, or of a particular type.
Of course, SharePoint has a huge depth of capability, such as approval workflows and ability to link to enterprise CRM or HR systems. But in this tip, we are going to keep it simple and just look at something you can easily set up for your team just using standard SharePoint capabilities.
In the second part of this tip, we will look at more ways of using tag information in the documents, and more ways to customize the views.
What is metadata?
Metadata is just a fancy word for tags that you add to content (documents) to make them easy to find again. Even a standard document library has basic metadata that shows up as columns in a list view like this:
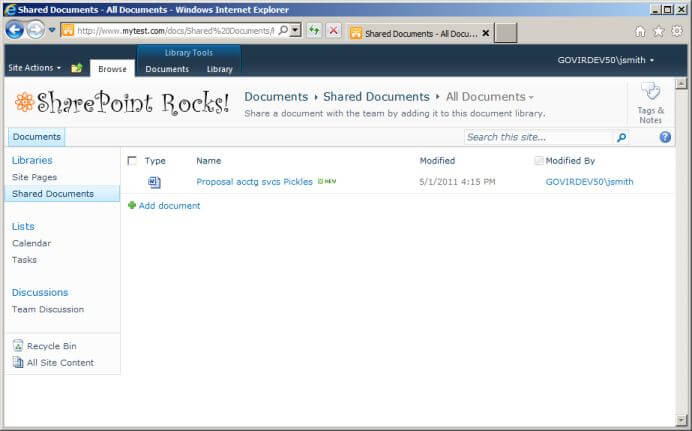
The columns "Type" (in this case, a Word document), "Name" (the file name), "Modified" (the date and time the file was modified) and "Modified By" (the user who modified the document) are all metadata tags, otherwise known as columns in the document library. However, these tags are all very generic and of limited use. Let's look at how we can set up our own tags.
Preparing to tag
You need to work out what tags you are going to use. There are a few things to bear in mind.
First, they must make sense to you and to your users. If you have standard terminology that everyone knows in your business, use it. SharePoint allows you to enter both a column name and a brief description. Make good use of the description to clarify the purpose of the column: a rule of thumb is to make sure it uses different words than the column name.
Second, as much as possible, provide a brief option list for users to pick from. Make the options broad, and if possible avoid a "Miscellaneous" or "Other" option. Providing an option list helps clarify the purpose of the column for users, saves them time, and improves consistency (for example, avoiding spelling mistakes by users)
Third, and most importantly, KISS: keep it short and simple! You can probably easily think of twenty different ways to tag your documents, but keep it to a small number for which you can see an immediate use. Your users will quickly get frustrated and annoyed if they have to fill in a lengthy form to save a document, and will end up selecting defaults or entering minimal detail.
Adding columns
In our scenario, the important attributes we want to capture are document type, client and consultant. Let's go ahead and set those up in the library.
Document type column
Document type in this example is a simple choice from Proposal, Working paper, Interim report and Final report.
Browse to the default view of the library. Select the Library tab in the ribbon, and in the Manage Views group, select the Create Column button.

Enter the column name, in this case "Document type". Set the type of information to Choice. Enter a description, and enter the choices.
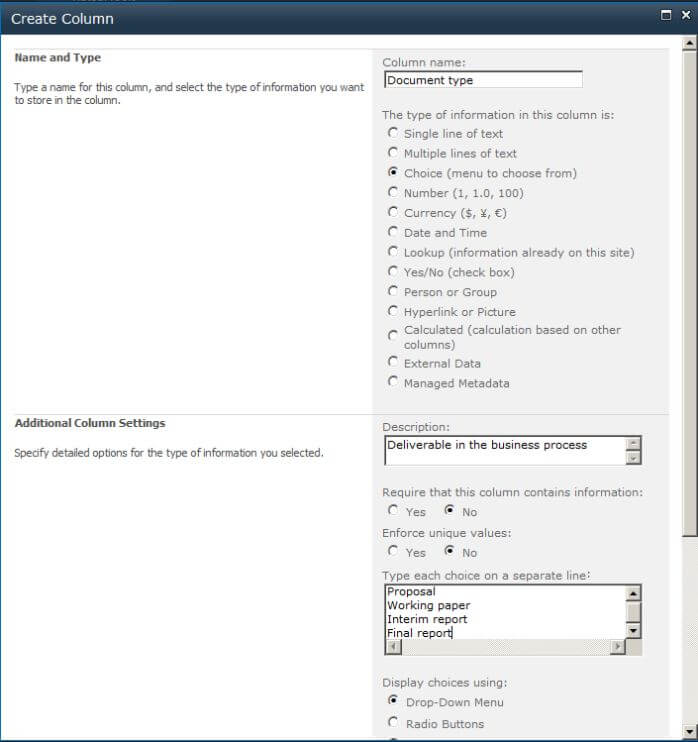
SharePoint will automatically make the first entered choice (in this case, "Proposal") the default. This can be a trap, because everything will end up being a proposal if users are in a hurry! It's probably better to have no default. Delete the default value in the dialog.
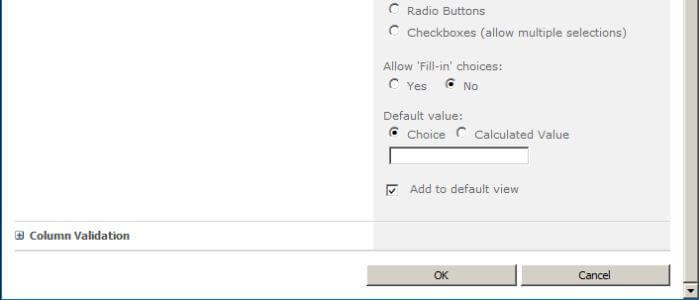
- There was an issue in SharePoint 2007 where you could not delete a default value once it was saved. This seems to be resolved in SharePoint 2010. The workaround was to select the "Calculated Value" option and enter the formula ="" (an equals sign and two double quotes).
Leave Add to default view selected, and select OK to create the column.
For the other two columns, client and consultant, we want to provide a list of names from which users may select, but we don't want to edit the column definition every time we hire a new consultant or start work for a new client. So we will make these columns lookup information from elsewhere in the site.
Client column
First, we need to create a client list. We will do this by creating a simple custom list in SharePoint.
Go to Site Actions > More Options... Select the option for a Custom List, and type a name for the list (in this case "Clients"). (I am creating a simple custom list for this example, but for a real solution you may prefer to use a "Contacts" list template which includes a range of address fields already set up.)
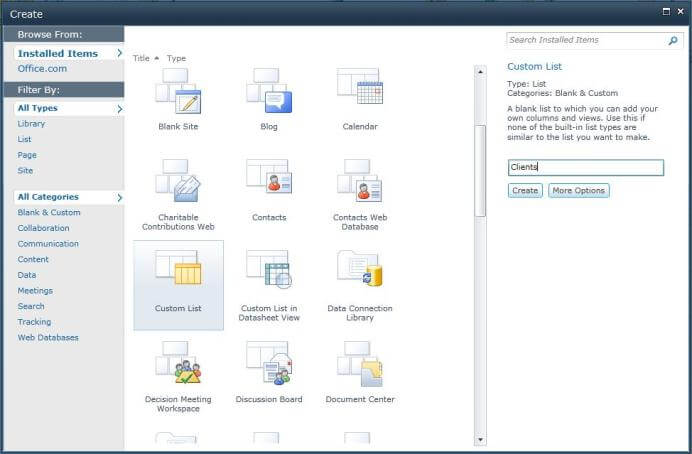
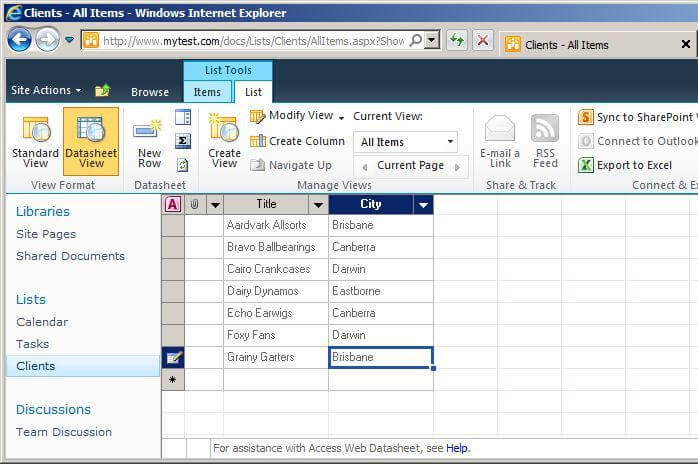
Click Create. This creates a simple list with a "Title" column, which we will use for the client name. We will add one more column, "City", for the city where the client is based, so we can use this later for a view of our documents by client city.
On the List tab of the ribbon, in the Manage Views group, click the Create Column button as you did earlier. Call the column "City". Leave all other options at their defaults and select OK.
For the purpose of demonstration, enter some information in the list. The quickest and easiest way to do this is to select the Datasheet View button at the top left of the List tab of the ribbon. You can then enter multiple rows by just typing and pressing the tab key, the same way you would in Excel or Access.
Now that we have a client list, we can create a column in the document library that uses it. Return to the document library using the link on the left. Again, select the option to Create Column in the Library tab of the ribbon. This time, type the name "Client". Then, select the information type "Lookup (information already on this site)". Enter a meaningful description, then in Get information from: select the "Clients" list. Make sure the Title column is selected, then select City as an additional column.
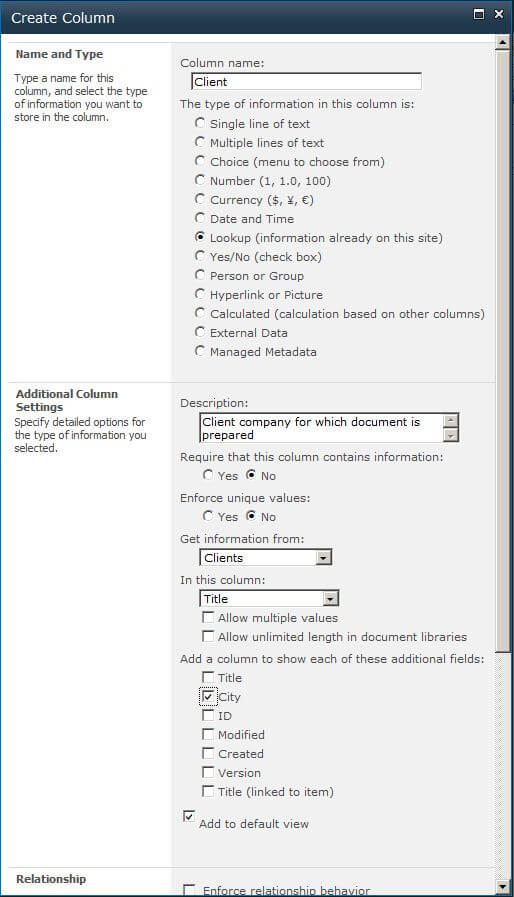
In the Relationship area, you will see that you can tell SharePoint to enforce the relationship so that (for example) no-one can delete a client for which there are linked documents. However, we will not worry about that for this exercise, so just scroll down and select OK.
Consultant column
The final column we will create is a column to show which consultant worked on the document. Although SharePoint keeps track of who uploads and amends documents, in our scenario we want to track the responsible consultant separately from the person who may have amended the document most recently.
We could create another custom list just like we did for clients. However, our consultants are all users in the system so we can just link to the existing user list in SharePoint.
Once again, select Create Column in the document library. This time, type in the name "Consultant". Select the type of information "Person or Group". Type an appropriate description, remembering this is meant to help users understand what information to fill in for the column.
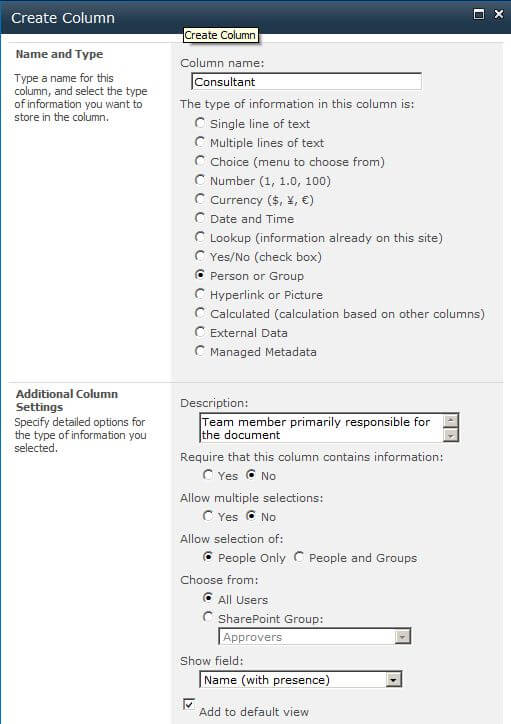
As you can see, there are options to allow users to select groups, and to restrict the selection to users in a particular group. For the purpose of this exercise, we will just accept the defaults so select OK.
Adding and tagging documents
Bulk adding documents
Now we have our columns ready, we can add our documents into the library and tag them. You probably have a collection of documents in a folder on your computer or a file share to start with. The quick way to get them into the library is to use Explorer view.
Select the Library tab from the ribbon in the library. In the Connect & Export group, select Open with Explorer.
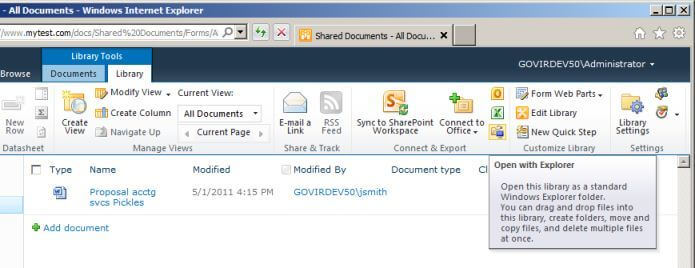
This will open a Windows Explorer window into which you can drag and drop documents to upload them into SharePoint.
- This button is only available if you are using Internet Explorer.
- Alternatively, you can use the Add document link in the library view, then select Upload Multiple Files..., then drag and drop documents into that window.
- SharePoint has more restrictive naming conventions than a file share. You may be unable to upload individual files where their name is too long or uses characters like & in the name.
- If you have or expect to end up with a large number of documents (more than say 1000), you should plan to use folders to break the documents up into more manageable sets. Although SharePoint 2010 is better able to deal with large numbers of documents in one folder than 2007, it is still better to avoid possible performance issues. You can still tag the documents as described below, and show all documents (for example) worked on by a particular consultant irrespective of which folder they are in.
Tagging in SharePoint
Once you have the documents in SharePoint, you can start tagging them using the columns we created. The easiest way to do this is using Datasheet View. As you did before with the company list, in the document library select the Datasheet View button at the top left of the Library tab of the ribbon. Now you can tag the documents spreadsheet-style.
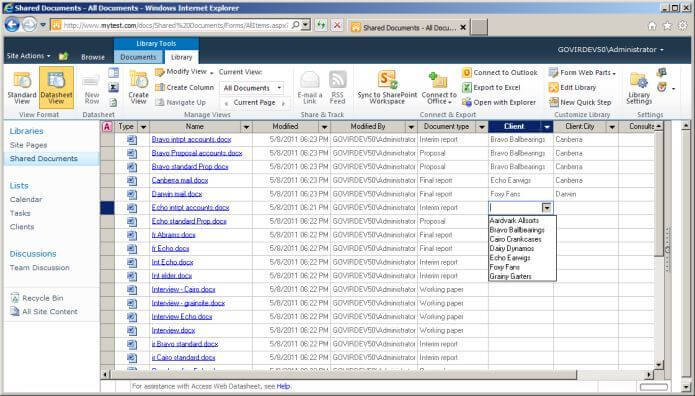
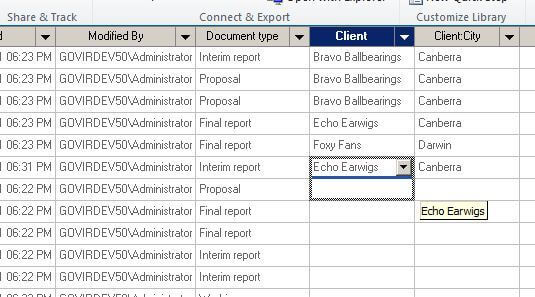
As you can see, you are given drop-down lists to select document type, client and consultant. After you select a client, the Client:City is automatically completed. You can also "fill down" where there are a group of documents with the same value, by dragging down the dot at the bottom right corner of a cell, just like you would in Excel.
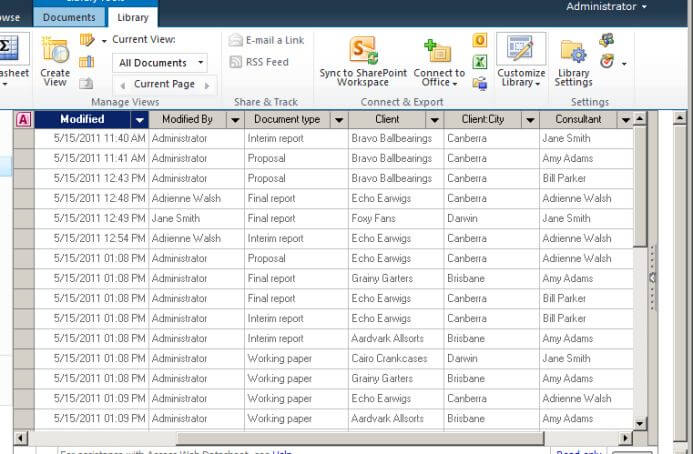
Similarly, you can fill in the consultant column by selecting people from the user list, so you end up with a library full of tagged documents.
Tagging in Office
Once a document is stored in SharePoint, you can directly work with it using the integration features in Office on your machine. This includes the ability to click on the document in a SharePoint view, whereupon the document opens in the appropriate Office application on your machine. Once you have finished, you can save and close the document, and Office will automatically save it back up to SharePoint. (There are a number of technical pre-requisites for this integration to work, so it may not be available in all cases.)
Part of the integration is the ability to edit metadata tags within the Office application, and use them in the document. Of course, for Office to know what tags are available, the document needs to be linked to the SharePoint library. So you need to create a document and save it into the library; or have opened a document from the library; or have created the document from a template in the library.
- You can create multiple templates in a library and associate them with different sets of metadata tags using SharePoint "content types", but that is beyond the scope of this article.
In a document linked with the SharePoint library, in Word 2010 select File, then in the Info tab, select Show Document Panel from the Properties drop down.
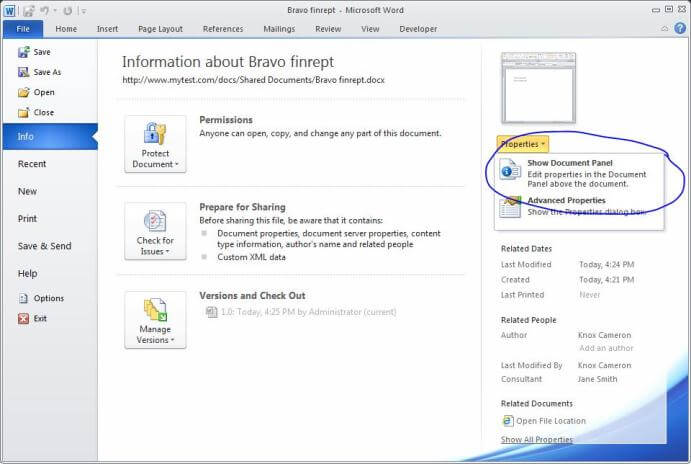
In Word 2007, select Office > Prepare > Properties.
Word will then show you the properties from the document library in a panel above the document. You can edit these properties directly in the panel, for example selecting a new client company.
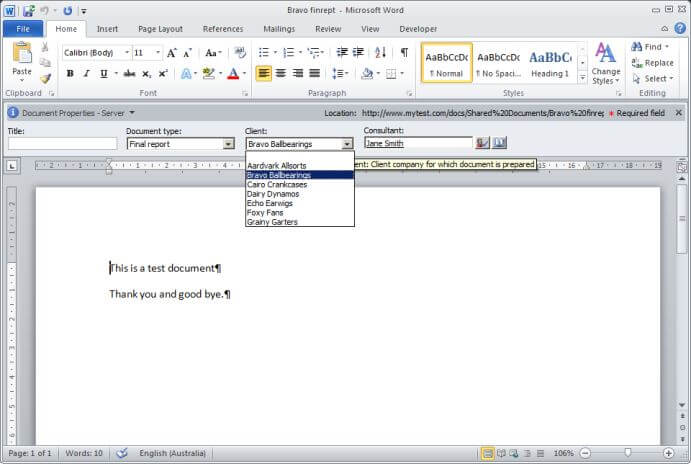
You can also use these properties in the body of the document. For example, you could have a document layout with a placeholder for the client company name, and have that linked to the client company selected in SharePoint.
To try this out, position the cursor at the end of the document, type a return and the word "Client:" and a space. Then select the Insert tab, then Quick Parts > Document Property > Client.
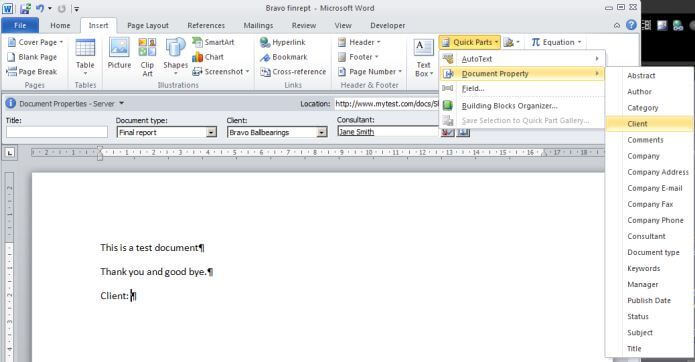
This gives you a Quick Part in the document which will print the client name, and even allow you to select a client when editing the document.
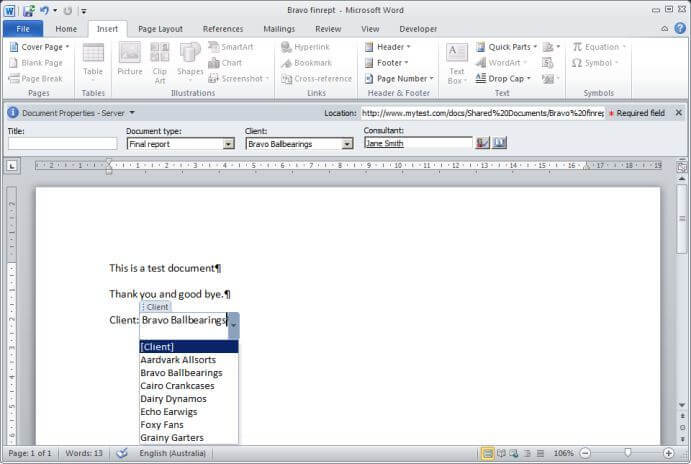
You will have noticed a number of other Document Properties in the Quick Parts menu apart from the ones that came from the SharePoint document library, such as Abstract and Comments. These are built into Word, and some of them are used in the templates and building blocks (like report cover pages) that come with Word. Some of them will automatically link with a column of the same name in a SharePoint document library, namely: Title, Author, Subject, Manager, Company, Category, and Keywords.
- Others, like for example Abstract, will not. If you create a column in SharePoint called Abstract, you will end up with two identical-looking "Abstract" options in the Quick Parts menu. One of them will insert the SharePoint tag and the other the separate Word document property.
- I have never seen this documented, so you remember you read it here first!
These quick parts allow you to set up documents so that the user selects or enters information once and it automatically fills in throughout the document. You could also set up a cover page to print with the document showing the tags that have been applied.
Viewing documents using the tags
Now the documents are tagged, we can use the tags to view documents in ways that make sense, without being limited by a fixed folder structure.
Ad hoc filtering
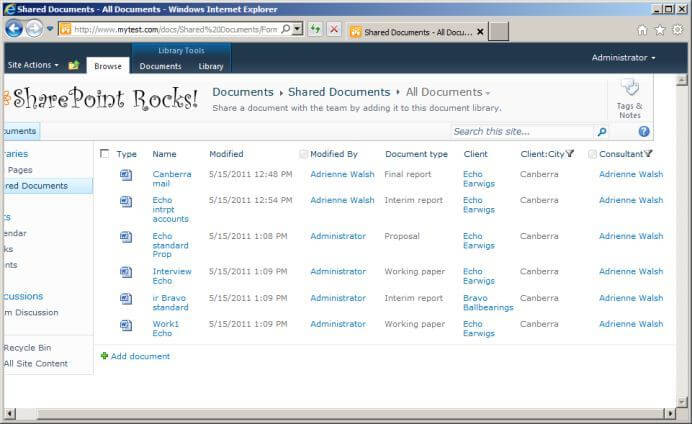
The first thing you can do is simply filter the library using the columns, the same way you would with a list in Excel. In the document library view, select the drop-down menu for any column heading to get sorting and filtering options for that heading.
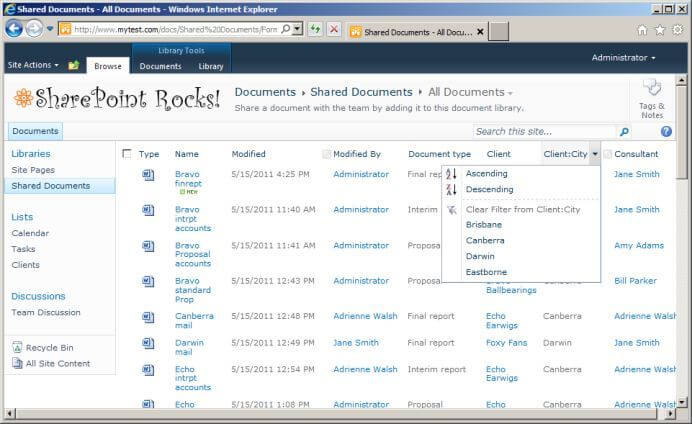
You can filter using multiple headings to quickly find all documents relating to a particular city by a particular consultant. A symbol indicates column headings with filters applied.
Creating views
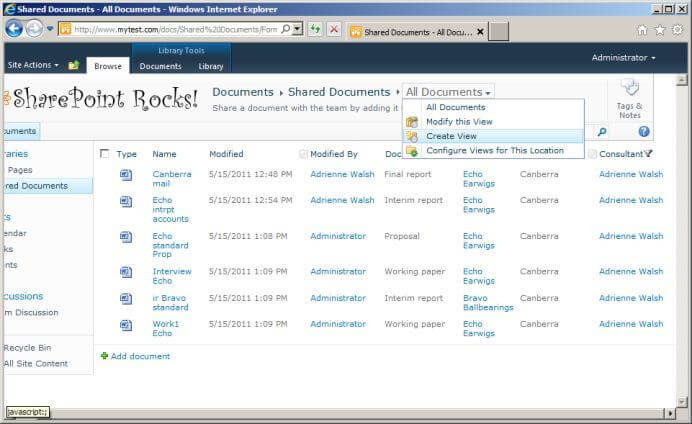
You can also prepare views for yourself and others to use, showing the columns you want to see, sorted and filtered as you wish, and using grouping so users can quickly find the documents they want.
To create a view, select the Create View option from the drop down under the current view name in the header.
You have various options for creating a new view, including various standard formats, or basing the new view on an existing one.
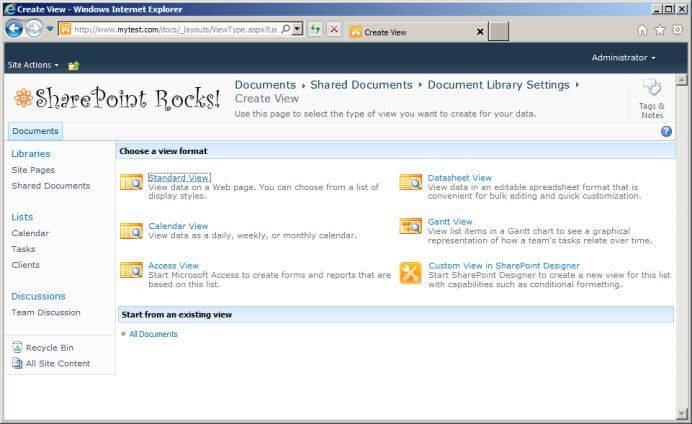
For this exercise, select the Standard View option. First, we will create a view showing documents grouped by client, so call the view "By Client". By default, it will be a public view, that is, visible to other users.
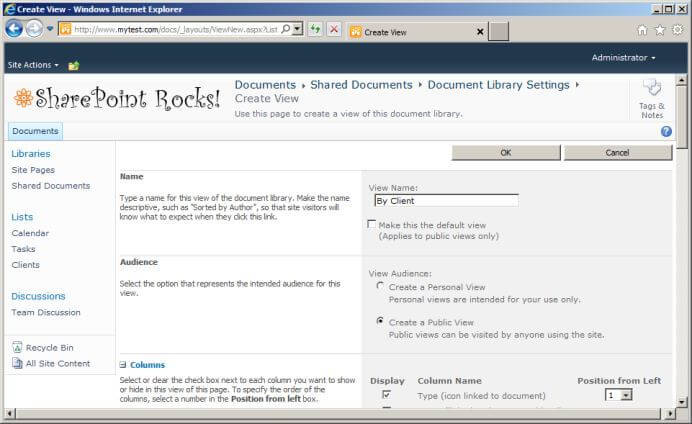
In the Columns section, you can select which columns you want to show in the view, and their order. The default or previously selected columns are listed first, then the rest in alphabetical order.
For this view, we will group by client so we don't need to include the client column. We will also group by document type, so we don't need that column either. De-select the check boxes for both those columns, as well as Client:City.
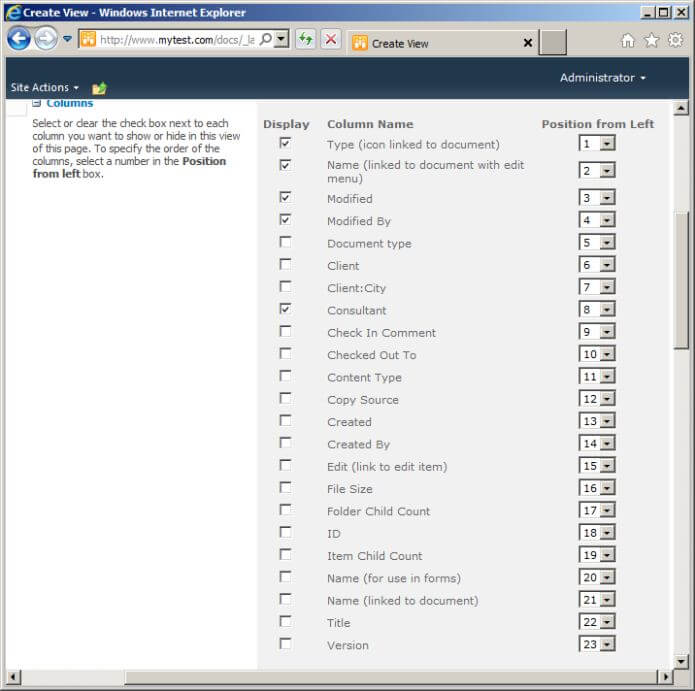
Note some of the other columns available that you can use in views:
- Copy source gets filled in automatically when a document is copied in SharePoint using the Send To option in its context menu in the library - it's only useful when you have a process where this is regularly being done
- You have three different variants of the Name (i.e. file name) column, depending on whether you want to give people a menu to perform various operations on the document, or you just want to give them a link to open the document, or you just want to show the name of the document with no link
- There is an "Edit (link to edit item)" column you can use to allow the user to edit the item if you are not showing the name
- Folder Child Count and Item Child Count can be used in views of libraries where documents are in folders. These columns will show the number of sub-folders and (non-folder) items within a folder. This is helpful for users to save them from navigating down into an empty folder when they are looking for something, although note that the count is not recursive (i.e. the item count will not include items within subfolders).
Next come options to sort and filter the view. We will select to sort the view by document name. You are shown three different options to sort by name, but they will all produce the same result so it doesn't matter which you pick.
As you can see, you can sort by two different columns. We are going to select options to group the view as well, which effectively acts as additional levels of sorting, so you can actually sort by up to four columns.
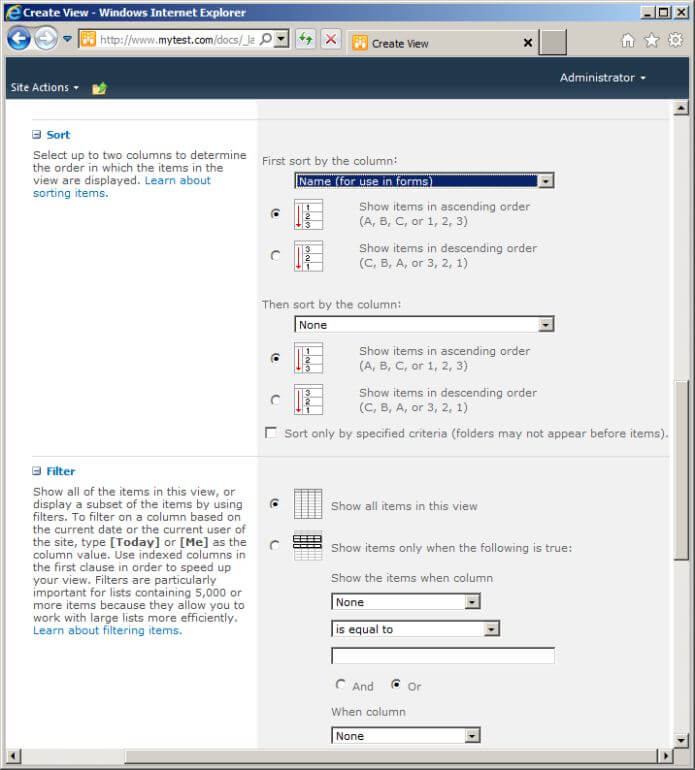
Filtering allows us to restrict the view to a subset of the documents, similar to the ad hoc filtering we did earlier. Note the options to filter by "[Today]" or "[Me]", which allow you to restrict the view to documents authored by the user, or where (say) an expiry or due date has been passed.
However, for this view, we will show all documents, so leave "Show all items in this view" selected and move down.
There are a number of view option sections which are less commonly used, so Microsoft collapses them by default. We will use the Group By section, so click the plus sign to expand it. Select to group first by Client then by Document type.
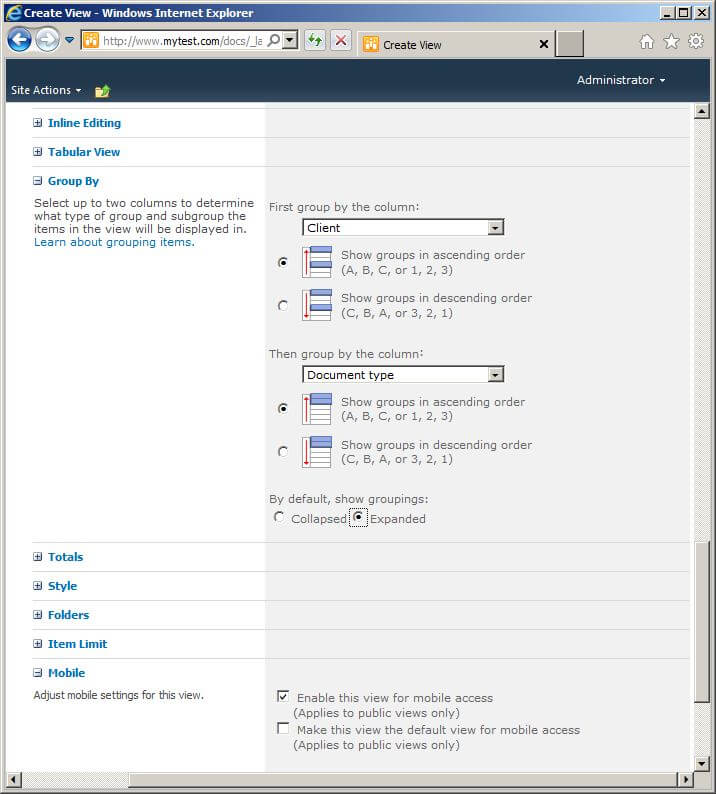
Now scroll down to the bottom of the screen and select OK. Your new view will be displayed.
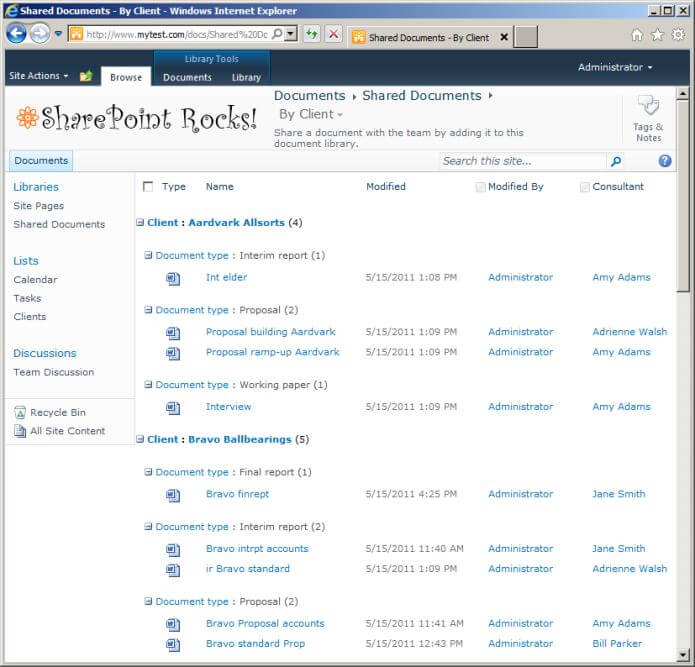
Following the same procedure, it is easy to create a view where (for example) the documents are grouped by client city then by client. Select the Create View option in the header again, but this time select By Client under the heading "Start from an existing view". Call the view "By City". Leave the same columns selected, but change the grouping to group by Client:City then Client.
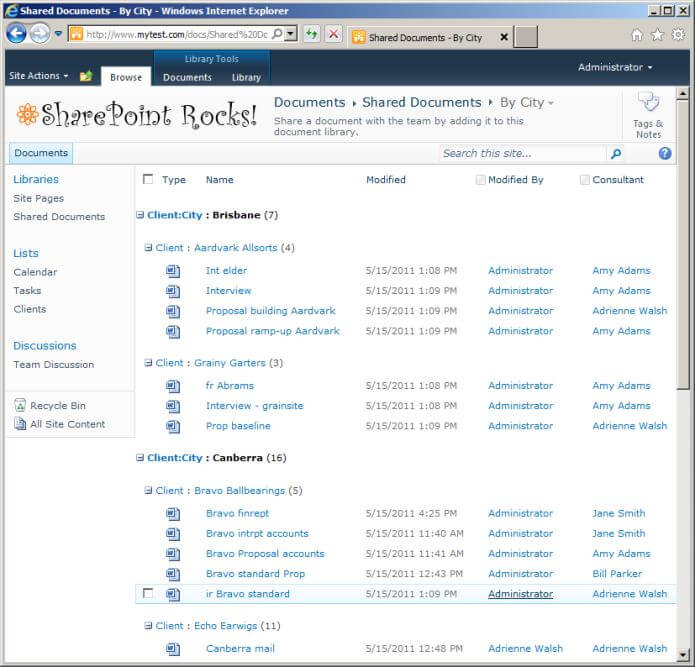
You couldn't have done this with documents in folders on a file share! Your users can now easily switch between the views using the drop-down in the banner.
Next Steps
- Work out what tags you want to apply to your documents, and set up columns in a document library
- Import and tag your existing documents
- Set up some views
- Show your users how to use the document libary, and how they can quickly and easily find documents using views or ad hoc filtering
- For an example of configuring custom views of a list, see How To Effectively Use SharePoint List Views - Part 1 (Basic Views), How To Effectively Use SharePoint List Views - Part 2 (Filtering and Sorting) and How To Effectively Use SharePoint List Views - Part 3 (Grouping and Summarizing)
- For more information about how to use Explorer View to work with documents in SharePoint, see Mass File Manipulation in SharePoint 2010
- Watch for Part 2 of this tip for more information on using tag information in Word, and customizing views
About the author
 Knox Cameron
This author pledges the content of this article is based on professional experience and not AI generated.
View all my tips
Article Last Updated: 2011-06-21


