By: Abin Jaik Antony | Updated: 2011-09-06 | Comments | Related: > SharePoint
Problem
Creating cascading dropdowns in SharePoint presents a difficult challenge. There is nothing built in to "Out of the Box" SharePoint lists and libraries that supports this. However, we can use InfoPath in a variety of ways to meet this challenge. This tip will illustrate one of the solutions, using a custom web service.
Solution
This solution illustrates the cascading dropdown of "Products" and "Categories".
Follow the simple steps to accomplish this task.
Step 1
Open Microsoft InfoPath 2007 from Start > All Programs > Microsoft Office.
Step 2
Create a blank InfoPath form template using the option "Design a Form Template". Don’t forget to check the option"Enable Browser Compatible Features" while creating the blank template.
Step 3
Now we have a blank InfoPath form in front of us. Drag and Drop two dropdowns from the toolbox and name them Categories and Products.
Step 4
Now we need to populate the dropdowns with data. For that we need to create data connections within the InfoPath form. The "Categories" dropdown can be populated directly from the "Categories" SharePoint list. But "Products" dropdown can’t be populated from products SharePoint list, because it is needed to populated according to the selected category. In the next 2 steps we will create data connections for the dropdowns.
Step 5
Here we create a data connection for the Categories dropdown. Select the "Dataconnections… " option from the "Tools" menu [menu available on the top portion] of the InfoPath form. From the "Dataconnections" window, click "add" and on the DataConnection wizard select the "Create new dataconnection" option with the "Receive Data" selection. On the "select the source of your data" step, go with the option "SharePoint Library or List".
Continue with the wizard. Proceed with the selection of our "Categories" SharePoint List. Once we finish with the DataConnection wizard steps, "Bind" the created "Categories" dataconnection with the "Categories" Dropdown by right clicking on the control. From the "Dropdown list properties", select the "Look up values from the external datasources" option.
Now there will be a selection with available data connections. Select our categories dataconnection and select the category field for the "Entries" option. Check on the InfoPath preview to see if the data is populated correctly or not.
Step 6
In this step we will create a data connection for the "Products" dropdown. Here we have to do some more work to create the "Products" data connection.
Before creating the data connection for "Products", we have to create a web service that has the function which returns a set of products according to the category that is being passed.
Create a WSPBuilder project and add a web service item to the project from the WSPBuilder project templates or you can go with other web service creation techniques and deploy it to the SharePoint site. Usually I create SharePoint components with the WSPBuilder . If it is with WSPBuilder, packaging and deployment is quite easy. According to the developer's preference this can be a SharePoint Project using Visual Studio templates as well.
Give a user-friendly name to the web service and in the code behind of the web service file add the following piece of code.
[WebMethod]
public DataSet GetProducts(string Category)
{
    DataSet dsProducts = new DataSet();
    DataTable dtProducts = new DataTable();
    DataColumn dcCategory = new DataColumn("Category");
    DataColumn dcProduct = new DataColumn("Product");
    dtProducts.Columns.Add(dcCategory);
    dtProducts.Columns.Add(dcProduct);

    SPSite site = SPContext.Current.Site;
    SPList list = site.OpenWeb().Lists["Products"];
    SPQuery query = new SPQuery();
    query.Query = @"<Where>
    <Eq>
       <FieldRef Name='Category' />
       <Value Type='Lookup'>"+ Category  +@"</Value>
    </Eq>
    </Where>";
    SPListItemCollection itemCol = list.GetItems(query);

    DataRow drCategory;
    foreach (SPListItem item in itemCol)
    {
        drCategory = dtProducts.NewRow();
        drCategory[dcCategory] = Convert.ToString(item["Category"]);
        drCategory[dcProduct] = Convert.ToString(item["Product"]);
        dtProducts.Rows.Add(drCategory);
    }

    dsProducts.Tables.Add(dtProducts);
    return dsProducts;
}
This web service method will return set of products for the given category. Build the project, then build the WSP and deploy to the SharePoint site. After the deployment of the WSP , we can find the web service in the _layouts virtual directory of the SharePoint site in IIS. It will look like this http://servername:5050/_layouts/CascadingDDLService.asmx . Browse that .asmx file and check whether the "GetProducts" web service method is working when invoking it. If it is working, we can proceed with it during the creation of the "Products" dataconnection.
Now we can start creating the dataconnection for "Products". Follow the procedures mentioned in Step 5 (above) until you reach the step for "select the source of your data" on the data connection wizard. On this step you have to select the "Web service" option rather than the "SharePoint Library or List" option shown in step 5.
After selecting the the "Web Service" option , the next step will ask for the web service URL. Provide our web service URL that we deployed before. It will give a set of web-methods in the web service. In our case it will be only the method "GetProducts". Click next. Then it will ask for the default parameter values. Go on with the Wizard. On the last step uncheck the option "Automatically retrieve data when form is opened". Then click Finish to end dataconnection wizard.
Now the "Products" dataconnection is created and we can bind this dataconnection to the Product dropdown list. Follow the same procedures mentioned in step 5 above, to bind the dataconnection on the dropdown.
Step 7
The next step is to create the "Rules" for the Categories Dropdown. This step is very important for the cascading to work.
Right click on the Categories dropdown, select the "Rules" option. From the rules window, click the "Add" button to add a rule for the categories dropdown.
When clicking the "Add" button, you will see a window like this.
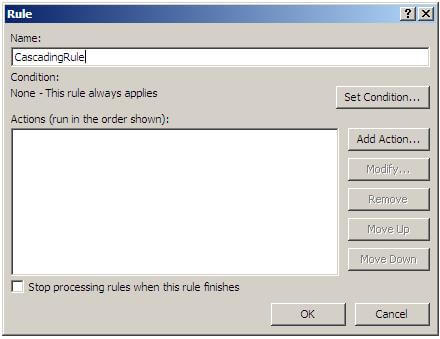
Name the rule with a user-friendly name. Click on the "Set Condition" button and set a condition as illustrated below.

We need to set the condition that the Rule needs to run when Categories is not blank.
After setting the Condition we can set the "Actions" for the rule. Here we need to set 3 actions. Click on the "Add Action" button to set an action.
In first action we will set the Products Field (previously the set value was Null). Select "Set a field’s value" from the action’s dropdown. Select the Products Field from the main datasource and click OK without setting the value.
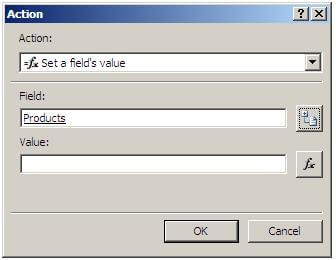
On the second action we need to set the Category parameter for the "GetProducts" dataconnection, which is a secondary datasource. Select "Set a field’s value" from the action’s dropdown. In the Field section, select the Category parameter...
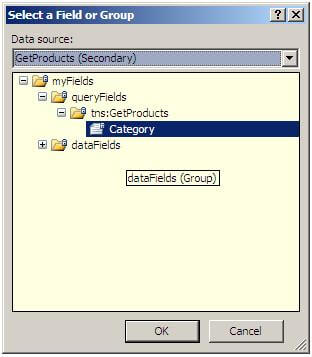
...and set its value to the Main datasource Category Field.
In the third action we will populate the "GetProducts" datasource . For that, select "Query using a dataconnection" from action’s dropdown and select the "GetProducts" dataconnection from Data connection’s dropdown.
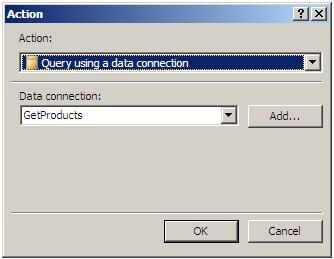
Finally the Rule window will look like this:
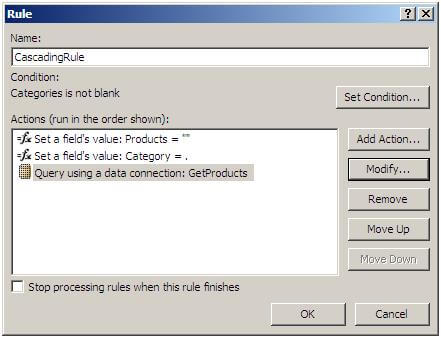
Now save InfoPath Form and publish to any SharePoint site. Browse the InfoPath form from your browser, the cascading dropdown will work with charm…
Next Steps
- Check out these other tips:
About the author
 Abin Jaik Antony
This author pledges the content of this article is based on professional experience and not AI generated.
View all my tips
Article Last Updated: 2011-09-06


