By: Koen Verbeeck | Updated: 2016-05-17 | Comments (8) | Related: > Master Data Services
Problem
I have an entity in SQL Server Master Data Services (MDS) and I want to put an approval process into place. Meaning, if someone makes a change to a member of this entity, this change should be approved by an administrator before the update goes live. How can I achieve this?
Solution
Master Data Services has a new feature in the SQL Server 2016 release: Change Sets. With this feature, users can attach member changes into a change set. An entity administrator can then approve or reject this change set. Using change sets streamlines the approval process and gives the administrator the opportunity to approve or reject multiple changes at once. In this tip, we'll focus on creating the necessary users to test this feature, creating change sets and adding changes to a change set. A second part will focus later on the approval process itself.
SQL Server 2016 Preview
At the time of writing, SQL Server 2016 is still in preview (currently Release Candidate 3 (RC3) has been released). This means functionality or features of Master Data Services might change, disappear or be added in the final release.
Test Set-up of SQL Server 2016 Master Data Services Change Sets
To test this new feature, we'll need an entity for which we want an approval workflow. When you create a new entity, you can simply enable this by selecting the checkbox Approval Required.

Be aware that if you are the only administrator, you cannot make any actual changes to the members of an entity, since you cannot approve your own changes. MDS warns you for this and suggests to add a second user as an administrator. After the entity has been created, you can easily check which entities require approval in the overview.

Let's add another user to MDS. This user will make the changes which we will approve or reject using the administrator account. In the User and Group Permissions section, add a new user. Then click the pencil to edit its permissions.

In the Functions tab, add Explorer. Don't forget to click on the pencil first to go into edit mode.

In the Models tab give the user the necessary permissions to make changes to the entity.

Log in using this user so we can make changes to the test entity and try out the change sets feature.
Creating a Change Set in Master Data Services
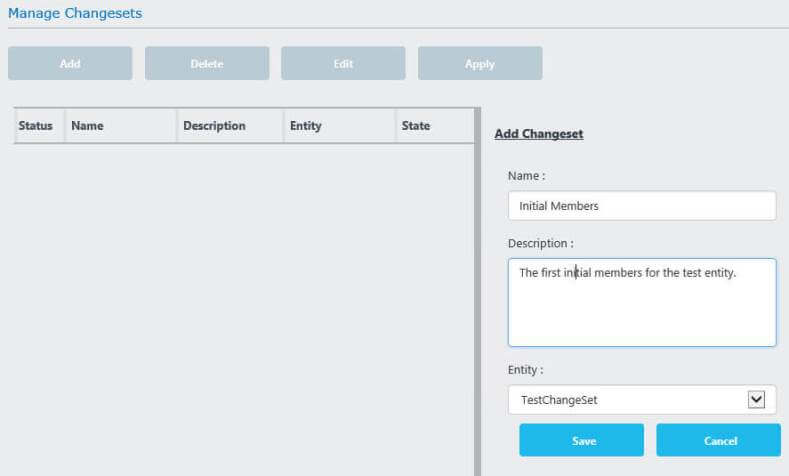
In the Explorer, there's a specific section for managing change sets.

Click on Add to create a new change set. You can specify a name, a description and the entity to which it belongs.

After the creation state, the change set has the status open, meaning it's ready to accept member changes.

Another method to create a change set is to add an entity member or to make a change to an existing member. When you do so, a pop-up will warn you that the entity needs approval and that the change needs to be added to a change set. You can either create a new one by specifying a name, or add the change to an existing change set.

When the change is added to a change set, the changes are indicated in yellow in the explorer. Furthermore, the change itself is displayed in the change set overview at the bottom right.

Let's add a couple more changes to the change set.

At this point, the user can either discard the change set - and thus discarding all changes - or the user can submit the change set for approval by an administrator. Once the change set is submitted, the status is set to Pending.

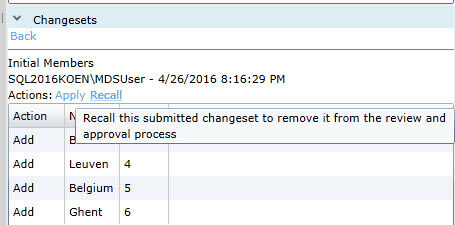
If you double click on the change set, you can view the individual changes again. There, you can also recall a change set. This changes to status from pending back to open. As long as a change set is not submitted, it's not visible to other users, even administrators.

Conclusion
In this tip we covered change sets from the user perspective: we saw how easy it is to create a change set for an entity and add one or more member changes to it. We saw how we can discard this change set, or how we can submit or recall it. In the next part, we'll take a look at change sets from the administrator point of view.
Next Steps
- Try it out yourself! Create a change set and familiarize yourself with all of the different statuses and actions. Stay tuned for part 2 of this tip.
- You can find more Master Data Services tips in this overview.
- For more SQL Server 2016 tips, you can use this overview.
About the author
 Koen Verbeeck is a seasoned business intelligence consultant at AE. He has over a decade of experience with the Microsoft Data Platform in numerous industries. He holds several certifications and is a prolific writer contributing content about SSIS, ADF, SSAS, SSRS, MDS, Power BI, Snowflake and Azure services. He has spoken at PASS, SQLBits, dataMinds Connect and delivers webinars on MSSQLTips.com. Koen has been awarded the Microsoft MVP data platform award for many years.
This author pledges the content of this article is based on professional experience and not AI generated.
View all my tips
Article Last Updated: 2016-05-17


