By: Manvendra Singh | Updated: 2016-07-11 | Comments (4) | Related: More > Database Administration
Problem
Suppose your SQL Server database has multiple data files in a single filegroup with each data file having some data. You have a requirement to consolidate your data files or migrate data from one data file to another. This tip will help you in achieving your goal.
Solution
Before going ahead you should read my last article about how SQL Server allocates data pages to data files. As we know every SQL Server database has two operating system files: a data file and a log file. Data files are of two types. The first is the Primary data file which is mandatory for each database containing the startup information for the database. The secondary data file that is optional and can be used to spread data across multiple disks by putting each file on a different disk drive. Further, a SQL Server database can have multiple data and log files, but only one primary data file. Above these operating system files, there are filegroups. A filegroup works as a logical container for datafiles. One filegroup can have multiple data files.
Now, let's start with creating a SQL Server database with three data files in one filegroup and a log file. Then we will insert some data in a table in this database. Finally we will demonstrate data migration from one file to the others.
SQL Server database creation with multiple data files
Step 1: First we will create a database named "Manvendra" with three data files (1 primary and 2 secondary data files) in one filegroup and one log file by running the below T-SQL code. You can change the name of database, file path, file names, size and file growth according to your needs.
CREATE DATABASE [Manvendra]
 CONTAINMENT = NONE
 ON  PRIMARY
( NAME = N'Manvendra', FILENAME = N'C:\MSSQL\DATA\Manvendra.mdf',SIZE = 5MB , MAXSIZE = UNLIMITED, FILEGROWTH = 10MB ),
( NAME = N'Manvendra_1', FILENAME = N'C:\MSSQL\DATA\Manvendra_1.ndf',SIZE = 5MB , MAXSIZE = UNLIMITED, FILEGROWTH = 10MB ),
( NAME = N'Manvendra_2', FILENAME = N'C:\MSSQL\DATA\Manvendra_2.ndf' ,SIZE = 5MB , MAXSIZE = UNLIMITED, FILEGROWTH = 10MB )
 LOG ON
( NAME = N'Manvendra_log', FILENAME = N'C:\MSSQL\DATA\Manvendra_log.ldf',SIZE = 10MB , MAXSIZE = 1GB , FILEGROWTH = 10%)
GO
Step 2: The next step is to create a table in which we will insert data. Run the below command to create a table.
USE Manvendra;
GO
CREATE TABLE [Test_Data] (
    [Sr.No] INT IDENTITY,
    [Date] DATETIME DEFAULT GETDATE (),
    [City] CHAR (25) DEFAULT 'Bangalore',
    [Name] CHAR (25) DEFAULT 'Manvendra Deo Singh');
GO
Now we will check the free space available on each data file. We will compare the free space with the one which we will check post inserting data in the database.
USE Manvendra
Go
Select DB_NAME() AS [DatabaseName], Name, file_id, physical_name,
    (size * 8.0/1024) as Size,
    ((size * 8.0/1024) - (FILEPROPERTY(name, 'SpaceUsed') * 8.0/1024)) As FreeSpace
    From sys.database_files
GO
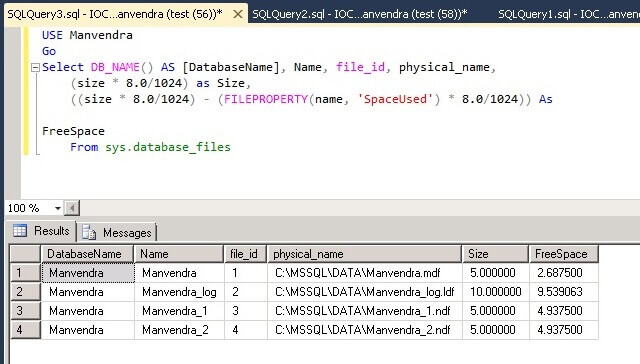
You can see the available free space in each data files. Make a note here, we will compare this screenshot in the validation section post migrating data from the data file. Now run the below DBCC command to check total allocated pages/extents for each data file.
DBCC showfilestats
GO
We can see the number of extents that have been allocated to each data file. The next step is to load this table with the data and then we will check the free spaces and allocated extents for each respective data file.
Step 3: Now we will insert some rows in the above created table so that the data can be saved for each data file. Run the below command to insert 20000 rows to the table "Test_Data".
USE Manvendra
GO
INSERT INTO Test_DATA DEFAULT VALUES ;
GO 20000
Step 4: Here is the real scenario. A database with multiple data files having some data in each data file where we need to migrate data from one file to another. To do so, we will check the available free space in each data file and the total allocated pages for each data file so that we will compare these values after migrating data to other data files.
USE Manvendra
GO
Select DB_NAME() AS [DatabaseName], Name, file_id, physical_name,
    (size * 8.0/1024) as Size,
    ((size * 8.0/1024) - (FILEPROPERTY(name, 'SpaceUsed') * 8.0/1024)) As FreeSpace
    From sys.database_files
GO
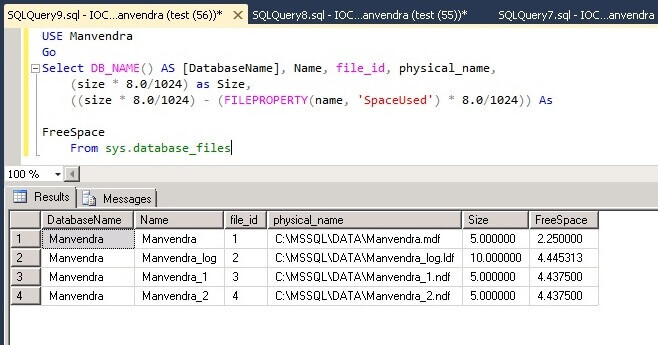
You can see the available free space in each data file. Also we can see same amount of space has been allocated to each data file. You can see the free space in the secondary data files. Both data files have the same amount of free space. We can compare this screenshot to the validation section post data migration. Now run below the DBCC command to check the total allocated pages/extents for each data file.
DBCC showfilestats
GO
You can see the total pages that have been allocated to each respective data file. Now the primary data file has 44 extents and secondary data files have 18 extents so total data saved is 62 extents. One thing to note is that same number of extents have been allocated to both secondary data files. This is due to proportional fill algorithm which I have been described in my last article.
Step 5: We have also an option to find all the data files where our table has been stored. Now we will see table "Test_Data" is saved on which data files by running the below DBCC command.
DBCC IND ('Manvendra', 'Test_data', -1);
GO
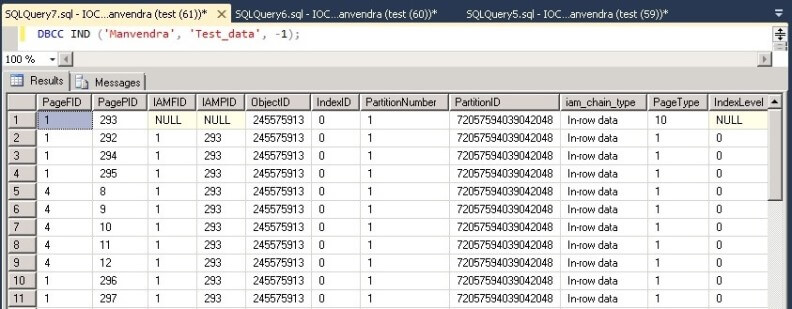
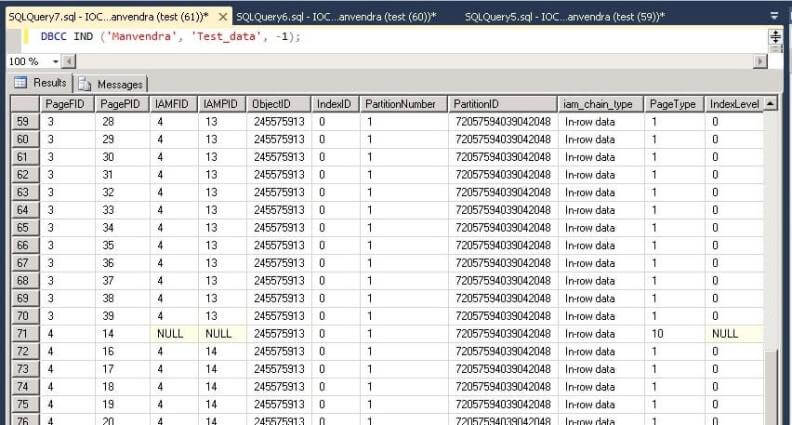
Here you can see two screenshots, it's because the number of rows in the output is very large so I captured two screenshots to show you the data file IDs on which table Test_data has been stored. We can see each data page and the respective file IDs where table "Test_Data" saved. We can say that table "Test_data" is saved on all three data files as highlighted in the above screenshot.
Move SQL Server data between data files
As we know, data is stored on all data files, so as per our requirement we have to migrate data from one data file to others. We will use the DBCC SHRINKFILE command to migrate the data. The DBCC SHRINKFILE command shrinks the size of the specified data or log file for the current database, or empties a file by moving the data from the specified file to other files in the same filegroup. We need to pass the logical file name of data file from which we want to migrate our data along with the argument "EMPTYFILE" which will empty the given file and migrate all data from the specified file to the other files in the same filegroup. We can get the logical name of all data files from the above screenshots. Here I am targeting to move data from file ID 4, the logical name of this file is Manvendra_2.ndf. Run the below command to get this done.
USE Manvendra
GO
DBCC SHRINKFILE ('Manvendra_2', EMPTYFILE);
GO
We can see that "UsedPages" value is showing zero, that means all the data allocated to this data file has been migrated to other data files. We will validate this data migration in the next section.
Validate Data Migration
In this section, we will validate whether the data is really migrated to other data files or not. First we will check the available free spaces in each of the data files. If the data is migrated then the free space of specified data file will be increased and the completed data file will look empty. Run the below command which we have run in the above steps.
USE Manvendra
GO
SELECT DB_NAME() AS [DatabaseName], Name, file_id, physical_name,
    (size * 8.0/1024) as Size,
    ((size * 8.0/1024) - (FILEPROPERTY(name, 'SpaceUsed') * 8.0/1024)) As FreeSpace
    FROM sys.database_files
GO
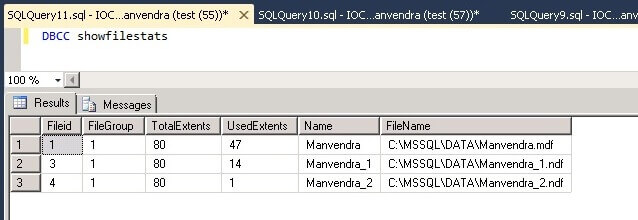
We can see that the available free space in data file Manvendra_2 has been increased to 4.93 MB which was the initial size when we have created the dummy database and a table. If you check the available free space for the rest of the data files which have been reduced to a lower level now if you compare it to first screenshot which was taken just after inserting all the data in above section. It means the data has been migrated from Manvendra_2 file to the other two files.
Another option to validate the data migration is to check the allocated pages/extents of each data files by running the below DBCC command.
DBCC showfilestats
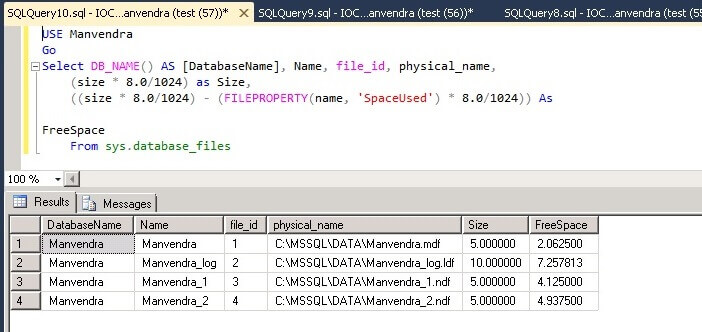
We can see only one extent is allocated to Manvendra_2 data file which was earlier 9. It means the rest of the extents have been migrated to both files so their allocated extents have been increased but the total number of extents are still 62. One extent which is left with the data file has file header information.
The final and best method for data validation is to check that your table has all of the data stored on specific files by running the below command.
DBCC IND ('Manvendra', 'Test_data', -1);
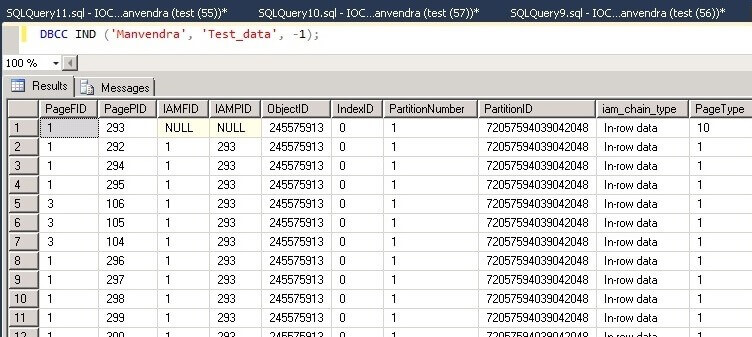
So here you can see that table Test_data is not stored on file ID 4 which is Manvendra_2. This table is stored on only two data files i.e. File ID 1 and 3 whereas same table was stored on all data files as shown in screenshot mentioned in the first section.
Next Steps
- Do not migrate data from any data file to others in your production environment until it is required.
- First test this process in a lower life cycle environment.
- Explore more knowledge in these SQL Server Database Administration Tips
About the author
 Manvendra Singh has over 5 years of experience with SQL Server and has focused on Database Mirroring, Replication, Log Shipping, etc.
This author pledges the content of this article is based on professional experience and not AI generated.
View all my tips
Article Last Updated: 2016-07-11


