By: Edwin Sarmiento | Updated: 2017-06-14 | Comments (5) | Related: > Clustering
Problem
A recommended best practice in previous versions of Windows Server operating system for failover clusters is to configure the binding order of the network adapters for all the nodes. In fact, if not properly configured, this appears as a Warning during the installation of a SQL Server failover clustered instance. However, I don’t see an option on how to do this in Windows Server 2016. How do I configure network binding order for the nodes in a Windows Server 2016 failover cluster?
Solution
In a previous tip on Installation and Configuration Outline, steps were outlined to configure network binding order for nodes in a Windows Server 2003 failover cluster. The process remained the same up until Windows Server 2012 R2. Unfortunately, the Adapters and Bindings tab for configuring Advanced Settings on the available network adapters is no longer available on Windows Server 2016.

Advanced Settings dialog box for Windows Server 2012 R2 (similar for earlier versions of Windows Server)

Advanced Settings dialog box for Windows Server 2016
This makes configuring the network binding order even more challenging. But before we go ahead and configure the network binding order for all of the network adapters of the nodes in a Windows Server 2016 failover cluster, we need to understand why we need to do it in the first place.
Network Binding Rule when Installing SQL Server Failover Clustered Instances
In the past, it is recommended to have multiple network adapters for a Windows Server Failover Cluster – one for production workloads and access to the Active Directory domain, another one for internal/private cluster communication (commonly known as heartbeat) and several others depending on how the failover cluster is configured. Windows Server 2008 allowed administrators to build a failover cluster even with a single network adapter. This assumes that you have multiple network adapters configured with NIC Teaming. When multiple network adapters are configured for NIC Teaming, it appears as a single network adapter from the point-of-view of the Windows Server operating system.
I’m not a big fan of having a single logical network adapter for a failover cluster, regardless of whether or not NIC Teaming was configured, particularly for physical server implementations (guest failover clusters on hypervisors don’t really need multiple network adapters as this should be handled by the physical server they run on top of). It creates the impression that only the network adapters should be considered for high availability and resiliency. I mentioned this on the previous tip on SQL Server 2012 Multi-Subnet Cluster Part 1. I still recommend having multiple network adapters in failover clusters to meet high availability, resiliency and quality of service (QoS) requirements.
The network binding rule when installing SQL Server failover clustered instances serves to verify that the network adapter configured to access the Active Directory domain network is at the top of the network binding order. If it isn’t, performance and availability problems might occur as the network stack will try to access the Active Directory domain for authentication. If, for example, the internal/private cluster communication network is at the top of the network binding order, the applications accessing Active Directory can time out because there is no path on the network to go thru Active Directory thru this network adapter. By default, network binding order is configured in the sequence of how the network adapters were installed and added to the server.
If the Windows Server 2016 failover cluster is still joined to an Active Directory domain, it makes sense to properly configure the network binding order as how it has been done in the past. Active Directory domain-independent failover clusters – briefly mentioned in this tip – do not need the network binding order configured as in the past.
Adapters and Bindings: Deprecated in Windows Server 2016
In Windows Server 2016 (as well as Windows 10), there are no components that still use the network binding order. Hence, Microsoft decided to remove it. By default, Windows uses the Interface Metric property of a network adapter to determine which route has the highest priority. The lower the Interface Metric property value, the higher the priority.
Also, the value of the Interface Metric property for a network adapter is automatically assigned, by default, and is based on the link speed. This is described in this Microsoft KB article: An explanation of the Automatic Metric feature for IPv4 routes.
Configuring Network Binding Order in Windows Server 2016
Letting Windows decide on how to prioritize the routing of traffic based link speed is fine assuming that you have configured your production network faster than your internal/private cluster communication network. In reality, they will both have the same speed because hardware is purchased in bulks instead of individually to lower procurement costs. Which is why you need to manually configure the prioritization or routing traffic thru the different network adapters in your Windows Server 2016 failover cluster nodes.
Using the GUI
You can use the Properties dialog box of the network adapter to manually assign the appropriate Interface Metric value. Start by doing this on the network adapter connected to the Active Directory network. Assuming that you are configuring a network adapter that has an IPv4 address assigned, select Internet Protocol Version 4 (TCP/IPv4) and click Properties.

In the Internet Protocol Version 4 (TCP/IPv4) Properties dialog box, click the Advanced button.

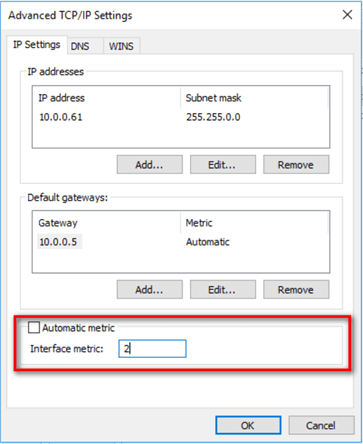
In the Advanced TCP/IP Settings dialog box, in the IP Settings tab, uncheck the Automatic metric checkbox and type a low value in the Interface metric: text box. In the example provided, a value of 1 is assigned. A low value indicates a higher priority.

Click OK on all of the dialog boxes to save the settings.
Repeat the steps outlined above to assign an Interface Metric value for the internal/private cluster communication network adapter. Assign a value higher than the one for the network adapter connected to the Active Directory network.

For simplicity, assign the same values for all of the network adapters in the nodes of the Windows Server 2016 failover cluster.
Using Windows PowerShell
Another way of setting the Interface Metric value for a network adapter is to use the Set-NetIPInterface PowerShell cmdlet. Before setting the Interface Metric value, you need to know which network adapter you are working with. This is where the Get-NetIPInterface PowerShell cmdlet comes in. As mentioned in this previous tip, it is recommended to properly name all of the objects – disks, network adapters, etc. – in the failover cluster to easily identify them during administration.
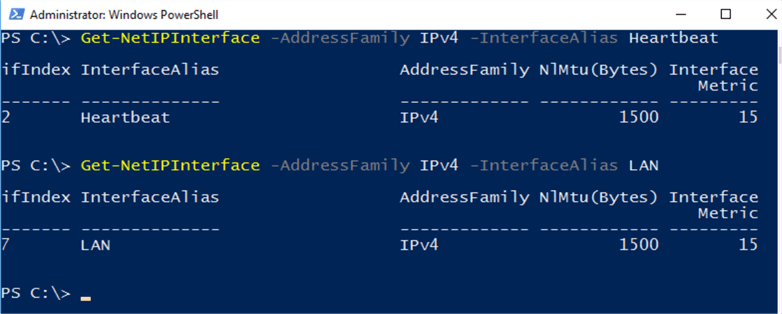
The example command below displays the properties of a specific network interface, only referring to the IPv4 address.
Get-NetIPInterface -AddressFamily IPv4 -InterfaceAlias "<name of network adapter>"
In the screenshot below, notice how Windows automatically assigned the Interface Metric value to both internal/private cluster communication network adapter (Heartbeat) and the network adapter connected to the Active Directory network (LAN). Based on this Microsoft KB article, for the assigned Interface Metric values, the link speed for both network adapters is between 10 Gb and 40 Gb.

Following the previous example and using the Set-NetIPInterface PowerShell cmdlet to assign the Interface Metric property value,
Set-NetIPInterface -InterfaceAlias "LAN" -InterfaceMetric 1
Set-NetIPInterface -InterfaceAlias "Heartbeat" -InterfaceMetric 2
Again, you need to do this on all of the nodes in your Windows Server 2016 failover cluster.
Next Steps
- Read the following tips
- Read the Microsoft KB article: You receive a warning about the network binding order on the Setup Support Rules page when you install SQL Server 2008 in a failover cluster
- Read the Microsoft KB article: An explanation of the Automatic Metric feature for IPv4 routes
- Read Configure the Order of Network Interfaces
About the author
 Edwin M Sarmiento is a Microsoft SQL Server MVP and Microsoft Certified Master from Ottawa, Canada specializing in high availability, disaster recovery and system infrastructures.
This author pledges the content of this article is based on professional experience and not AI generated.
View all my tips
Article Last Updated: 2017-06-14


