By: Bhavesh Patel | Updated: 2017-08-04 | Comments (9) | Related: > Restore
Problem
I needed to restore a database backup that was around 24 GB. I was trying to figure out how to make the restore run faster and I found some additional restore parameters that could be used. I tested these out and was able to make the restore complete faster and I will cover what I did in this tip.
Solution
The database backup was around 24GB and this was taking about 18 minutes to complete. By using some additional parameters I was able to make the restore compete about 40% faster.
Review the backup file’s health and size
First, I am going to check the health of database backup file to make sure it is not corrupt using the RESTORE VERIFYONLY command. As we can see below, the backup is valid.

Next, I am going to check the size and file details of the backup file, so I will run a RESTORE FILELISTONLY command for getting the backup file details. As you can see below, there are 2 files listed along with other attributes including the size of the file.

Configure Trace Flags to Return More Information
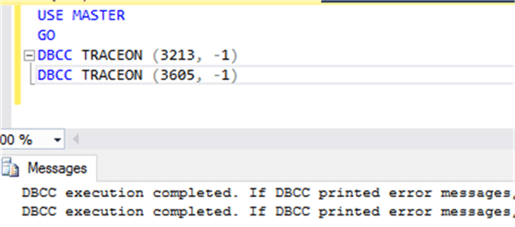
For the purpose of viewing database backup and restore statistics, I will configure two trace flags globally.
This trace flag outputs information for backups and restores.
DBCC TRACEON (3213, -1)
This outputs the information to the SQL Server error log.
DBCC TRACEON (3605, -1)
Database Restore with Default Settings
Now I am going to restore this database with the following restore command.
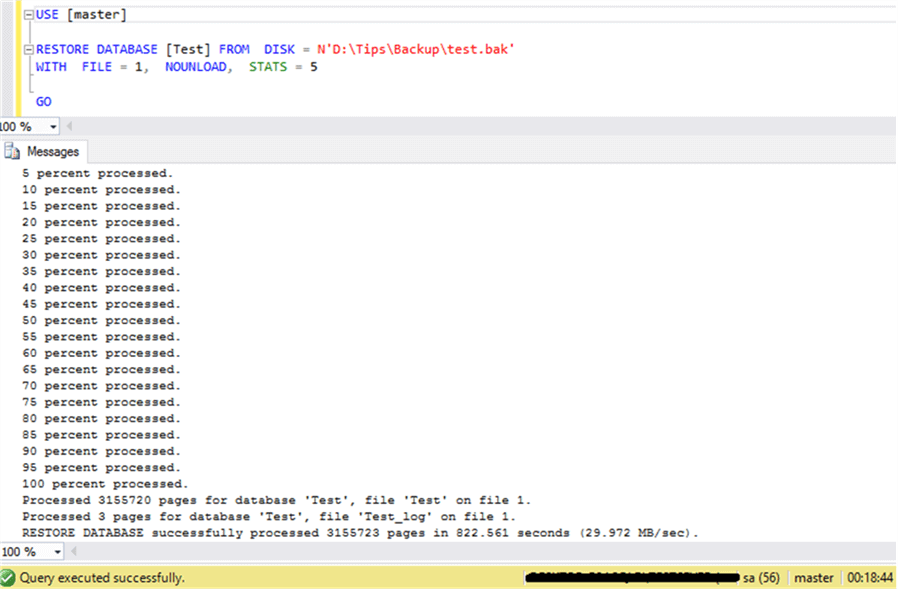
The database has been restored. This restore process completed in 18 minutes and 44 seconds.
Now I am going to check the restore related information from the error log using xp_ReadErrorLog to just return the information for the last hour. The information below was captured by turning on the trace flags above.
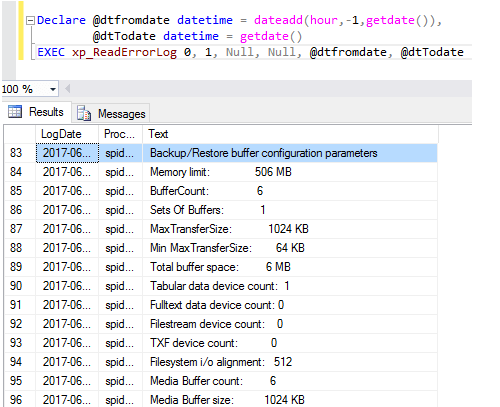
With the default settings, I can see the Max Transfer Size is 1024 KB and the Buffer Count is 6 and the Total Buffer Space is 6 MB. This is calculated as follows Total Buffer Space = Max Transfer Size * Buffer Count.
The other thing to note is the Memory Limit. We can see the Memory Limit is 506MB, but the Total Buffer Space being used is only 6MB. So, we will adjust some settings to increase the Total Buffer Space to see if we can speed up the restore.
Database Restore with Custom Settings
For more clarity, I am going to restore the database by using some additional parameters. I am going to adjust the Max Transfer Size and Buffer Count to see if we can make the restore run faster by using more memory.
The Max Transfer Size has a maximum of 4032 KB or 4 MB, but the Buffer Count can be adjusted higher. So to determine this we want to stay within the Memory Limit of 506 MB. So we can take 506 MB / 4 MB = 126 as the maximum we should use for the Buffer Count.
For this example though, I am only going to adjust the Buffer Count to 24, but use the maximum for the Max Transfer Size.
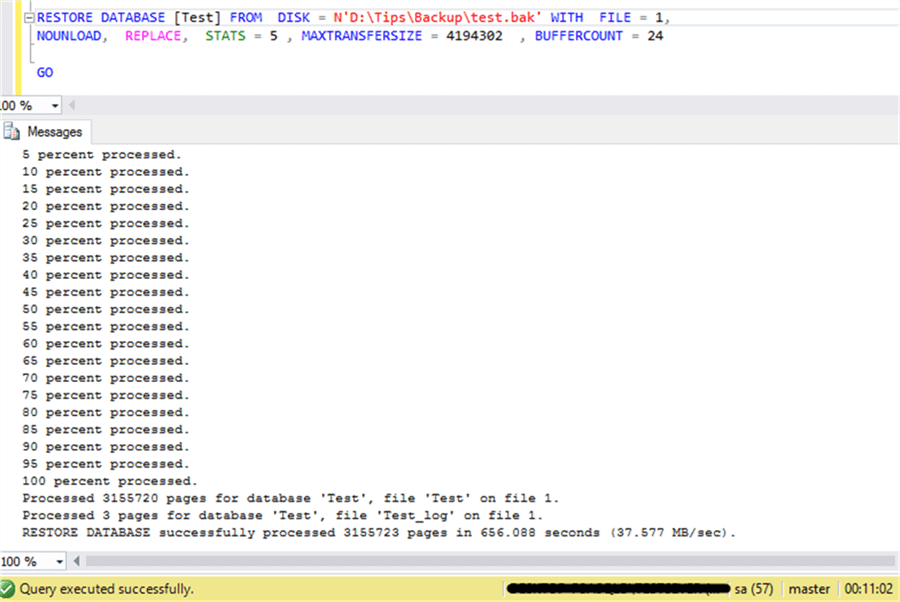
The restore with these additional parameters took 11 minutes and 2 seconds instead of the previous 18 minutes and 44 seconds. I have concluded that we can restore the database faster, if there is sufficient memory and server availability.
By using these additional parameters, the restore was faster based on availability of memory and server specifications. This database backup was 24 GB which worked well for this restore, but when restoring larger backups you may need to adjust these values otherwise you may get errors.
Now I am going to check the error log for this restore using xp_ReadErrorLog for last 1 hour.
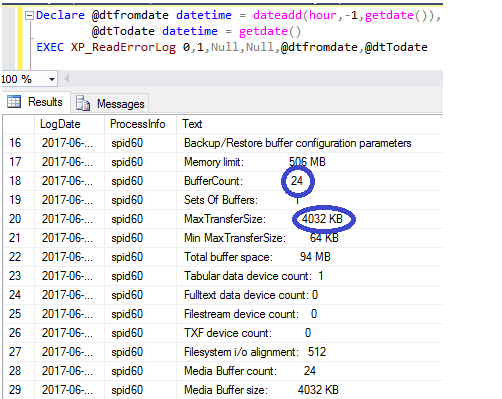
I can see the Max Transfer Size is now 4032 KB and the Buffer Count is 24 and the Total Buffer Space is now 94 MB.
To even get faster backups and restores, you could also look at these things:
- Parallel backup operations
- Backup device performance
- Instant file initialization
- Data compression
- Backup compression
To be more specific, check out this article on MSDN Optimizing Backup and Restore Performance in SQL Server.
Other things to note:
- When running the restore with these additional parameters and there is other server activity it could affect server performance.
- Prior to running, you should check memory and server resources before configure it to run automatically.
- I would suggest that you first run in a test environment before rolling out to production.
Next Steps
- Check out these restore tips.
- Check out these backup tips.
- You can also turn on the Trace Flags and just do a RESTORE VERIFYONLY to get the output in the SQL Server Error Log to find the settings.
About the author
 Bhavesh Patel is a SQL Server database professional with 10+ years of experience.
This author pledges the content of this article is based on professional experience and not AI generated.
View all my tips
Article Last Updated: 2017-08-04


