By: Thomas LaRock | Updated: 2017-08-28 | Comments (11) | Related: > Restore
Problem
Microsoft SQL Server does not allow for you to restore individual tables from a backup file, but there are times when you want to refresh a subset of tables, say inside of a data warehouse that has hundreds of tables. Restoring a 1TB data warehouse to refresh a few tables is inefficient, so we will show a more efficient method in this tip.
Solution
You can use a BACPAC to export and import a subset of tables in your SQL Server database. You can also automate the export and import by using the SqlPackage.exe executable that is installed with SQL Server.
Creation of a BACPAC inside of SQL Server Management Studio (SSMS) is easy to do. However, there is no option to script the creation of a BACPAC from within SSMS.
The BACPAC (and DACPAC) functionality inside of SSMS leverage the SqlPackage.exe executable that comes installed with SQL Server. The executable can be found in the installation directory, similar to the following: [install dir]\Microsoft SQL Server\140\DAC\bin. Here is the documentation on the parameters available for SqlPackage.exe. Using that document as a guide we can create an automated export and import process.
Create the command line syntax
Letís try this with one table from the AdventureWorks2014 database. We are going to create a BACPAC file by exporting the data from the HumanResources.Employee table:
.\sqlpackage.exe /Action:Export /ssn:PORC\SQL2016 /sdn:AdventureWorks2014 /tf:"C:\TeamData\FewTables.bacpac" /p:TableData=HumanResources.Employee
We are able to connect, and the process starts, but we see an error message:
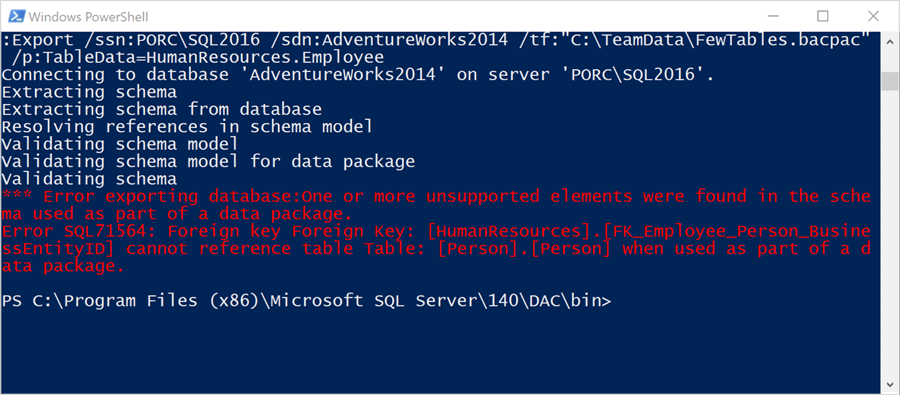
And thus, we see the real issue with trying to restore a subset of tables inside a relational database. When faced with this issue the traditional method is to manually remove the relations, migrate the data, and restore the relations after the migration is complete. However, with BACPAC, we can migrate the group of tables together.
Letís take a look at how that can be done using the SqlPackage.exe executable. We will export tables from the HumanResources schema along with two tables in the Person schema. My command line now looks like this:
.\sqlpackage.exe /Action:Export /ssn:PORC\SQL2016 /sdn:AdventureWorks2014 /tf:"C:\TeamData\FewTables.bacpac" /of /p:TableData=HumanResources.Department /p:TableData=HumanResources.Employee /p:TableData=HumanResources.EmployeeDepartmentHistory /p:TableData=HumanResources.EmployeePayHistory /p:TableData=HumanResources.Shift /p:TableData=Person.BusinessEntity /p:TableData=Person.Person
And we can run this without error:
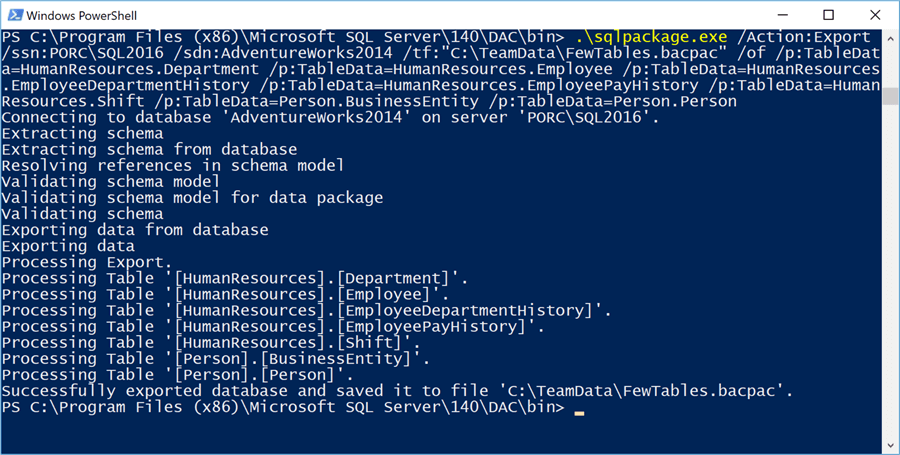
The BACPAC file has been created.
To import the data we can use the SqlPackage.exe executable with different options, but with an import caveat: we must import into a new database. We are not allowed to import into an existing database. This behavior is not different than importing from a BACPAC through SSMS, you must specify a new database name.
.\sqlpackage.exe /Action:Import /tsn:PORC\SQL2016 /tdn:FewTables /sf:"C:\TeamData\FewTables.bacpac"
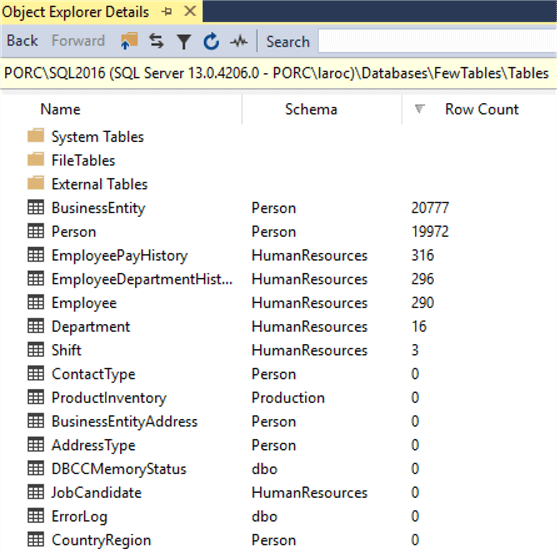
The result will be a new database that has an identical schema to the original, but only a subset of the data:
Now, letís put this together inside a job in SQL Agent.
Create the SQL Server Agent job
We can put our code into one (or more) job inside of SQL Server Agent and automate this process for recovering a subset of tables. The process outline looks like this:
- Export the tables from source database.
- Drop the target database if it exists.
- Import the BACPAC into a new database.
We will create one job, with three steps.
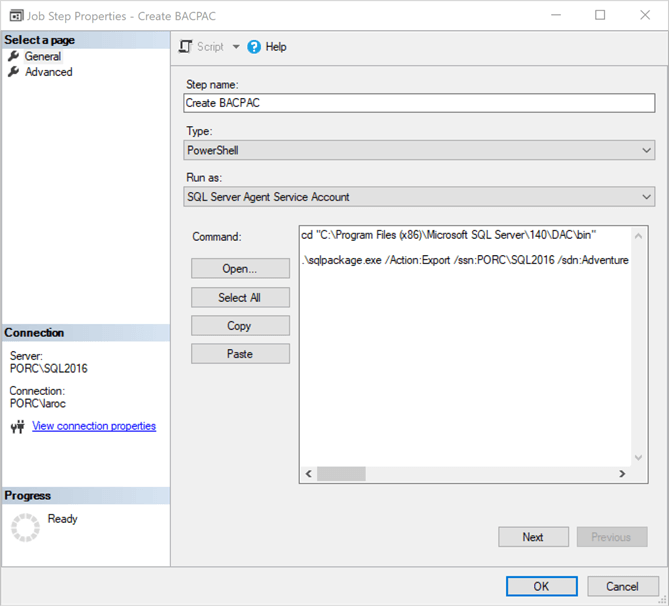
The first step can be accomplished with two lines inside a PowerShell script. The first line will change the working directory to where the SqlPackage.exe file resides, and then we will run the executable:
cd "C:\Program Files (x86)\Microsoft SQL Server\140\DAC\bin"

.\sqlpackage.exe /Action:Export /ssn:PORC\SQL2016 /sdn:AdventureWorks2014 /tf:"C:\TeamData\FewTables.bacpac" /of /p:TableData=HumanResources.Department /p:TableData=HumanResources.Employee /p:TableData=HumanResources.EmployeeDepartmentHistory /p:TableData=HumanResources.EmployeePayHistory /p:TableData=HumanResources.Shift /p:TableData=Person.BusinessEntity /p:TableData=Person.Person
You could put this all on one line if you wish. Or make it dynamic to locate the install directory for your instance. Whatever works for you and your needs. Hereís what the step looks like inside the job I created:
The second step is one line of T-SQL:
DROP DATABASE IF EXISTS [FewTables]
The third step is to do the import:
cd "C:\Program Files (x86)\Microsoft SQL Server\140\DAC\bin"

.\sqlpackage.exe /Action:Import /tsn:PORC\SQL2016 /tdn:FewTables /sf:"C:\TeamData\FewTables.bacpac"
This is what the job looks like when configured:
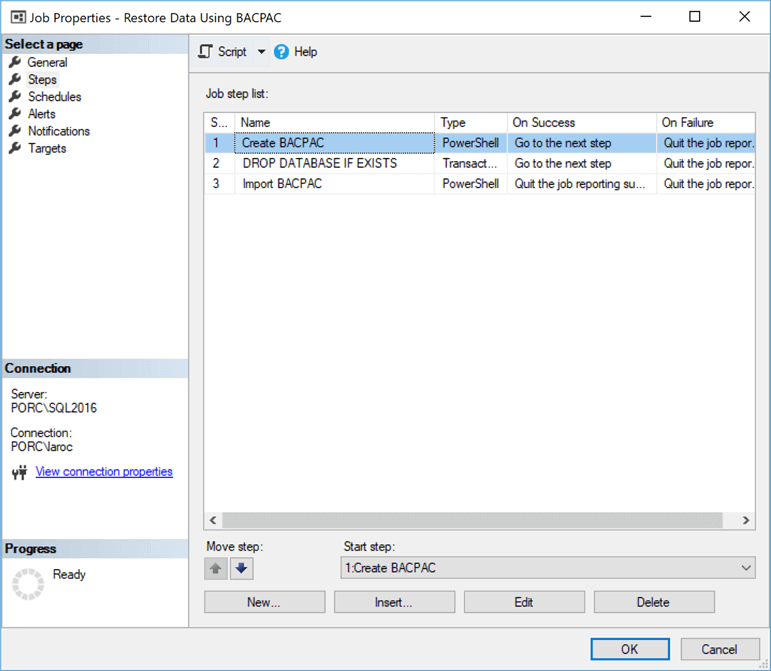
You can now set this job to run at whatever schedule you see fit. With this method, you save time by not having to restore the original database first and then migrate data back into the original database.
Summary
Migrating the data back into the original database can be tricky. You may find that you need to do extra steps (dropping foreign key constraints, then adding them back after the data is migrated) because relations exist between tables. Other things like identity values and indexes can cause you a headache as well. Fortunately, we have more than a handful of options to migrate data between databases.
You could use the SQL Server Import/Export Wizard to move the data. The wizard allows for you to save as an SSIS package, allowing for you to schedule the data migration as part of the process we built above. This might be the best option for most databases.
Another option would be for you to manually create some INSERT statements. This would also allow for you to easily add everything into a job inside of SQL Agent. But you will also need to script out the dropping and creation of constraints, indexes, etc. as well. Sometimes it is easiest to drop the target tables, recreate them, migrate the data, then add indexes and constraints at the end.
Depending on the location of the data, and size, you may want to use BCP or BULK INSERT. Using the one weird trick as I have explained on my blog you could crack open the BACPAC file by renaming it to a *.zip file, expose the table data, and BCP right into the target database. Of course, you would still need to take care of relations, constraints, and indexes, same as doing INSERT statements.
Lastly, I donít need to remind you about the importance of having database backups, but I will anyway. You should make certain you have backups of your databases before you start migrating data around. You have been reminded.
Next Steps
- Take the code examples here and make them dynamic, so that they can be used against any server.
- Examine the SqlpAckage.exe options available for additional functionality.
- Read how to create SSIS packages to remove foreign keys when migrating data.
About the author
 Thomas LaRock is a Head Geek at SolarWinds and a Microsoft Certified Master, Microsoft Data Platform MVP, VMware vExpert, and a former Microsoft Certified Trainer with over 20 yearsí experience.
This author pledges the content of this article is based on professional experience and not AI generated.
View all my tips
Article Last Updated: 2017-08-28


