By: Haroon Ashraf | Updated: 2018-02-22 | Comments (13) | Related: > DevOps
Problem
You work as a lead SQL Server database developer for a company that provides digital services to the clients through their database system. You have been asked to implement basic database continuous integration and delivery (CI/CD) to ease the pressure on your development team and improve performance by automating build and deployment processes and complying with development best practices. In this tip we will look at how this can be done using Visual Studio Team Services.
Solution
The solution is to put your database code in an in-house or cloud-based source control system such as VSTS (Visual Studio Team Services) and configure database continuous integration and delivery pipelines for smooth database development and deployment cycles.
This tip is focused on cloud-based source control system (Visual Studio Team Services) for database continuous integration and delivery.
Basic Concepts of Database CI/CD
Let's first go through some of the basic concepts of database continuous integration and delivery.
Database Continuous Integration (CI)
Database Continuous Integration (CI) is a process of automating builds which means a build is triggered every time you or your development team checks database code into source control.
Since the source code is your single source of truth, database continuous integration encourages your development team to frequently put your work under source control which means there are no long shelvesets left in isolation and all developers work can be joined together using database continuous integration.
Database Continuous Delivery (CD)
Database Continuous Delivery means automating database deployments and replacing manual interventions (as much as possible) when the database is prepared to be delivered to any target environment (Dev, Test, QA, etc.) but ultimately to Production.
Smooth Database Continuous Integration (CI) further leads to a smoother Database Continuous Delivery (CD).
Local Build(s) vs. Debugging
Run a local build in VSTS by pressing Ctrl+Shift+B which compiles the database project successfully or fails in case of errors.
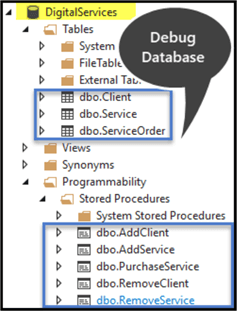
SQL Server Database Projects on a successful build deploys database code to the local debug database which is done by debugging the project (pressing F5).
Therefore, debugging in the context of a SQL Database Project does the following things:
- Complies (builds) the database objects (code) defined in database project
- Deploys the database project to the debug database
Artifacts
Artifacts are the deployment ready files or packages that can be picked up by a Release Manager to deploy to target environments.
DACPAC
DACPAC is a single file (package) which contains all database objects definition ready to be transformed into a database.
In this tip we are going to publish a DACPAC as an Artifact.
Environments
Multiple environments can be setup when automating or semi-automating deployments. The environment can be Test, Pre-Production, Production, QA and even Shared Dev.
Database CI/CD Dependency on Source Control
Please remember that database continuous integration and delivery cannot take place unless you check your database code into source control.
Database CI/CD Setup
Prerequisites
This tip assumes that you already have a Visual Studio Team Services (VSTS) account. If you do not have one, it is very easy to create a free VSTS account using your Microsoft email address.
Please note that you have to comply with the license terms when using Visual Studio Team Services account and similar services by Microsoft or any other vendor.
VSTS Project Creation
Let's begin by logging into the Visual Studio Team Services (VSTS) account and creating a new Project “Digital Services Database CI and CD” choosing Git version control and Scrum work item process (you can choose any other work item process as well) as shown below:

Open Visual Studio Project from VSTS
Next click on the “Code” tab in Visual Studio Team Services and then click on the “Clone in Visual Studio” option to open the project in Visual Studio (you must have Visual Studio 2013+):

Creating Local Repo (Git repository)
Pressing the “Clone in Visual Studio” button is going to open Visual Studio (provided you have Visual Studio 2013+) and you are required to create a local repository by clicking on “Clone” as shown below:

Creating a Database Project
Next you will be asked to create a new project or solution.

Create a new project “DigitalServices” under “DigitalServicesCICDSolution” (solution) as follows:

Creating Database Objects from Script
Let's create database objects to replicate the scenario where you have built these objects in one go. The reason I have mentioned one go, is because we have not put the database objects under source control. The starting point in a Database CI/CD is to build and check your code into source control (TFS/Git).
Please use the digital services (sample) database script as shown below:
-- DigitalServices Database Setup Script
-- Haroon Ashraf (09-Feb-2018)
-- This script can be imported into a SQL Database Project to create the database objects for DigitalServices sample database
-- Please Note: The script is provided "AS-IS" and should be used at your own discretion

-- USE DigitalServices


-- Creating Client Table
CREATE TABLE [dbo].[Client]
(
   [ClientId] INT NOT NULL IDENTITY(1,1) ,
   [Company] VARCHAR(40) NOT NULL,
   [Email] VARCHAR(320) NOT NULL,
   [Phone] VARCHAR(50) NULL,
   [RegistrationDate] DATETIME2,
   [Status] bit,
   CONSTRAINT [PK_Client] PRIMARY KEY ([ClientId])
);
GO

CREATE PROCEDURE [dbo].[AddClient]
   @Company VARCHAR(40) ,
   @Email VARCHAR(320) ,
   @Phone VARCHAR(50) ,
   @RegistrationDate DATETIME2,
   @Status bit -- 1 active, 0 closed
AS
SET NOCOUNT ON
INSERT INTO dbo.Client
(Company,Email,Phone,RegistrationDate,Status)
VALUES
(@Company,@Email,@Phone,@RegistrationDate,@Status)
RETURN 0;
GO

CREATE PROCEDURE [dbo].[RemoveClient]
    @ClientId INT
AS
DELETE FROM dbo.Client WHERE ClientId=@ClientId
RETURN 0;
GO

CREATE TABLE [dbo].[Service]
(
   [ServiceId] INT NOT NULL,
   [Name] VARCHAR(40),
   [Detail] VARCHAR(1000),
   [Pricing] DECIMAL(10,2),
   CONSTRAINT [PK_Service] PRIMARY KEY ([ServiceId])
);
GO

CREATE PROCEDURE [dbo].[AddService]
   @Name VARCHAR(40),
   @Detail VARCHAR(1000),
   @Pricing DECIMAL(10,2)
AS
INSERT INTO Service
(Name,Detail,Pricing)
VALUES
(@Name,@Detail,@Pricing)
RETURN 0;
GO

CREATE PROCEDURE [dbo].[RemoveService]
@ServiceId INT
AS
DELETE FROM Service WHERE
ServiceId=@ServiceId
RETURN 0;
GO

CREATE TABLE [dbo].[ServiceOrder]
(
   [ServiceOrderId] INT NOT NULL ,
   [ClientId] INT,
   [ServiceId] INT,
   [PurchaseDate] DATETIME2,
   [AmountPaid] DECIMAL (10,2),
   [Validity] DATETIME2,
   CONSTRAINT [PK_ServiceOrder] PRIMARY KEY ([ServiceOrderId]),
   CONSTRAINT [FK_ServiceOrder_Client] FOREIGN KEY ([ClientId]) REFERENCES [Client]([ClientId]),
   CONSTRAINT [FK_ServiceOrder_ToTable] FOREIGN KEY ([ServiceId]) REFERENCES [Service]([ServiceId])
);
GO

CREATE PROCEDURE [dbo].[PurchaseService]
   @ClientId INT,
   @ServiceId INT,
   @PurchaseDate DATETIME2,
   @AmountPaid DECIMAL (10,2),
   @Validity DATETIME2
AS
INSERT INTO ServiceOrder
(ClientId,ServiceId,PurchaseDate,AmountPaid,Validity)
VALUES
(@ClientId,@ServiceId,@PurchaseDate,@AmountPaid,@Validity)
RETURN 0;
GO
Next import the script into the Project after downloading it to a folder:

After a few more steps click the “Finish” button and see your project getting populated with database objects from the script:

Please configure the database project using the settings mentioned below:
Target Platform (under Project Settings):
Set the Target Platform as desired. In our case we have set it to SQL Server 2012 it can be any upward version as well such as SQL Server 2014 or SQL Server 2016.
Debug Database:
Also, set the debug database to point to your local SQL instance on a dev machine (if you prefer to do so).

Always Recreate Database Deployment Option:
Please set the “Always recreate database” deployment option to true under Project Settings > Debug.
Debug Database Project to Kick-Off Local Build
Press F5 to debug the project which will kick off the BUILD and then deploy the code to the debug database using local dev settings:
Putting Project under Git Source Control
The next step is to check your code into source control by pressing CTLR+ALT+F7 keys anywhere in the Solution Explorer and then adding a comment “Basic database objects ready” and then clicking on the “Commit All and Push” button as shown below:

Now padlock icons appear next to the project items (stored procedures, tables, etc.) showing they have been checked into source control:

Database CI/CD Implementation
Now that the project is under source control it meets the minimum requirements to implement database continuous integration and delivery (CI/CD).
Creating New Build Definition in VSTS
The first step is to define a new build definition in Visual Studio Team Services to automate the Build Process.
Navigate to the Builds Tab in VSTS and click on “New Definition” as follows:

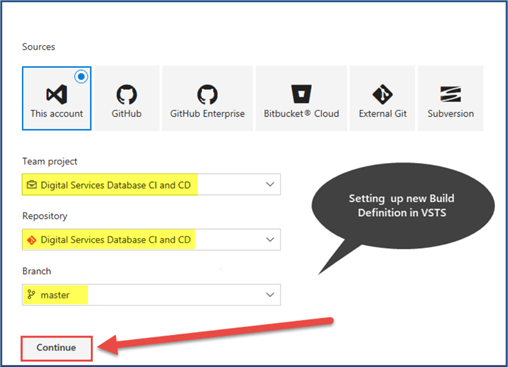
Next, keep the default settings as they are and click on “Continue” as shown in the figure below:
Then in the next step start with an empty template:

Select “hosted” agent queue from the drop-down box as shown below:

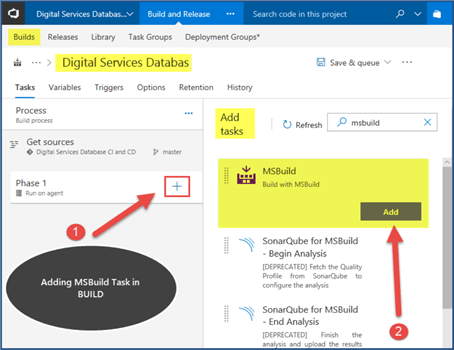
Then add a new task “MSBuild” by clicking the “+” Symbol next to Phase 1 as follows:
Next, locate the Solution file by clicking on the ellipses next to the Project text box as follows:

Then point it to the solution file as follows:

Add MSBUILD arguments “/t:build /p:CmdLineInMemoryStorage=True” as shown below:

Next, add another build task “Copy Files” as shown in the figure below:
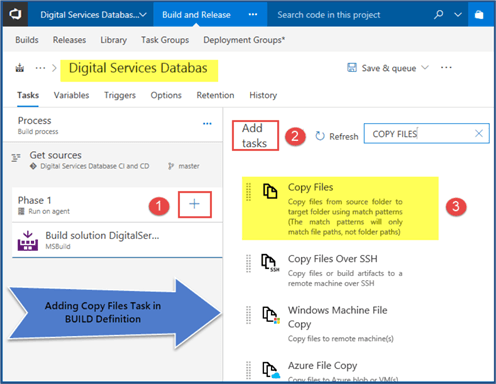
Let us now point to the DACPAC file which is by default produced by a successful build bin/Debug folder under the project folder:

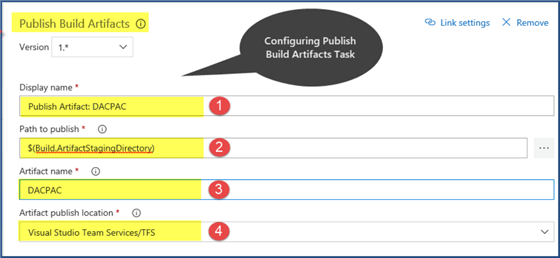
Then add another Task “Publish Build Artifacts” as follows:

Please add the following settings in this task:
Enabling Database Continuous Integration
Next navigate to the “Triggers” tab under VSTS Build and Release and check “Enable continuous integration” and then click on “Save and queue” option as follows:

Next add the following and then click on “Save & queue”:

Queuing and Running Build
Next click on build number and you will see the build getting queued and then up and running in a few seconds:

Test Running Database CI/CD
Now create a view “Clients” in the database project to see all the clients using the following code:
CREATE VIEW [dbo].[Clients]
AS SELECT [ClientId], [Company], [Email], [Phone], [RegistrationDate], [Status]
FROM Client
Put the database code changes under source control as shown below:

Instantly go to the Builds in VSTS as follows:

We can see the build has been triggered automatically as soon as the code was put under source control.
Now after a few seconds, check the status of the build:

Artifacts Check
Finally check the Artifacts to see the DACPAC:

So your Database Continuous Integration (CI) is working and your DACPAC is ready for further Continuous Deployment or Delivery.
A simple scenario for Continuous Delivery (CD) can be automating the task of pushing the Artifact (DACPAC) to the target environment (Test, QA, Pre-Production or Production) to be deployed; however, the detailed steps are beyond the scope of this tip.
Next Steps
- After going through the process, download the published Artifact (DACPAC) and run locally to see if you can create a database from it.
- Please go through my previous Tip and see if you can replicate developing a multi-customer database using database continuous integration and delivery.
- Please have a look at my previous Tip to add salt unit tests to your project and see if you can add those tests in VSTS Build
- Try creating the whole project mentioned in my previous Tip using test-driven development (TDD).
- Learn more about SQL Server Data Tools from the MSDN Library.
- Please explore further Database CI/CD by visiting the VSTS home page.
About the author
 Haroon Ashraf's interests are Database-Centric Architectures and his expertise includes development, testing, implementation and migration along with Database Life Cycle Management (DLM).
This author pledges the content of this article is based on professional experience and not AI generated.
View all my tips
Article Last Updated: 2018-02-22


