By: Pinakin Patel | Updated: 2017-12-26 | Comments | Related: > Amazon AWS
Problem
In a previous tip, Implementing High availability and disaster recovery in Cloud – Part 3, we installed SQL Server 2016 on all of EC2 instances and completed all post installation tasks. In this tip we will look at how to create an Always On Availability Group.
Solution
In this tip of series, we will go thru the steps to configure SQL Server Always On, create an Availability Group, create an Availability Group Listener and failover to a secondary replica.
SQL Server Always On Availability Group Configuration
SQL Server Always On Availability Groups are the high availability and disaster recovery solution introduced in SQL Server 2012. With SQL Server Always On Availability Groups you have more granular control to create highly available databases across multiple server replicas and maintenance task can be off loaded to secondary replicas. In addition, the secondary replica can be used as read only or read intent only for reporting purposes.
SQL Server Always On Availability Groups uses similar database mirroring technologies, but in SQL Server Always On Availability Groups some new features have been added, as groups of database can be failed over to a secondary replica and all transactions are captured in the transaction log before they are sent thru the send/receive queue via an encrypted network.
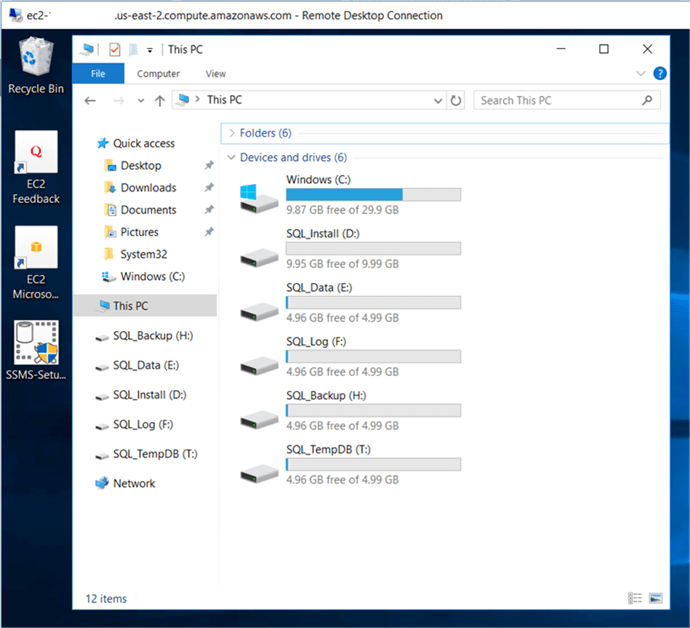
Here I have created five storage volumes thru AWS management console. In AWS adding extra space to the volume is very easy and you will have control to allocate the amount of space and assigning the availability zones. You need to create the storage volume in same availability zone as Elastic Compute Cloud (EC2) server instance. You can create volumes from 1GB to 16TB as per your requirements with just a few clicks.
This is what I have set up on each of the servers.
| C$ - 30GB | OS |
| D$ - 10GB | SQL_Install |
| E$ - 5GB | SQL_Data |
| F$ - 5GB | SQL_Log |
| H$ - 5GB | SQL_Backup |
| T$ - 5GB | SQL_TempDB |
Enable SQL Server 2016 Always On Availability Groups Feature
Once the Windows failover cluster has been created, we can proceed to enabling the Always On Availability Groups feature in SQL Server 2016, this needs to be done on all of the SQL Server instances where you are configuring Always On Availability Group replicas. To enable the SQL Server 2016 Always On Availability Groups feature complete the following steps.
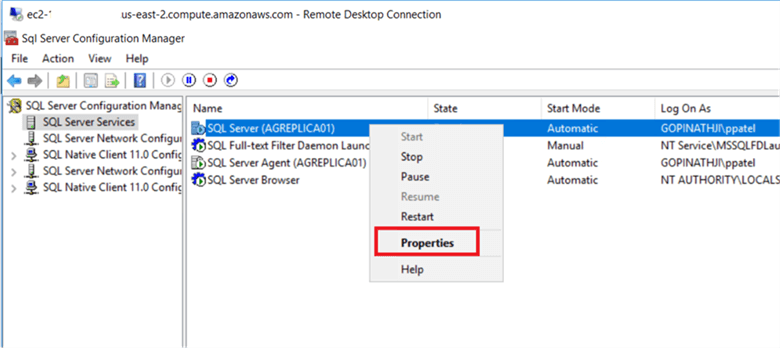
Open SQL Server Configuration Manager. Right click the SQL Server Instance (AGREPLICA01 in this case, but we need to do all three servers) service to open the Properties dialog box.
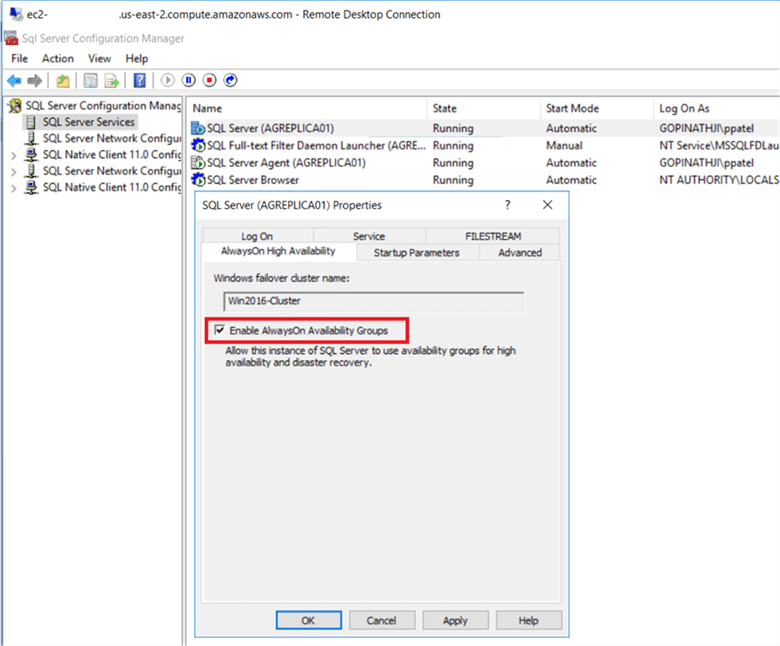
On the SQL Server Properties dialog box, go to the AlwaysOn High Availability tab and check the Enable AlwaysOn Availability Groups check box to enable the AlwaysOn Availability Groups feature and click OK
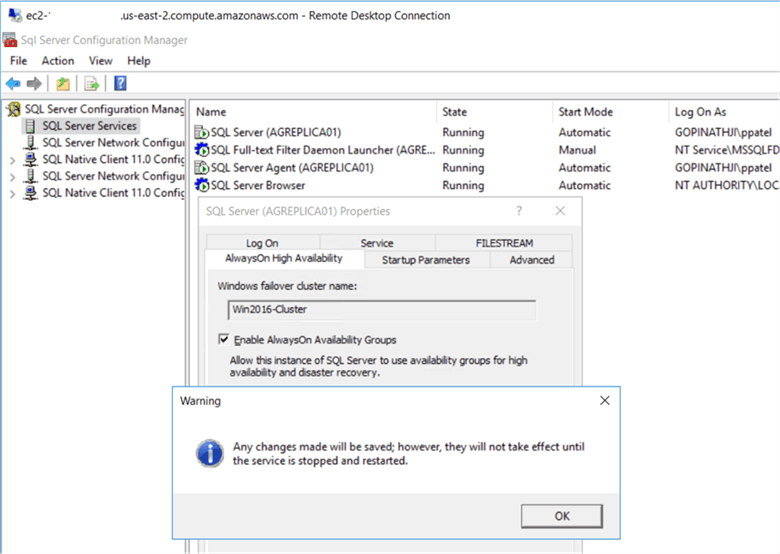
On the SQL Server Properties dialog box, this will prompt you to restart the SQL Server service click OK and restart the SQL Server service.
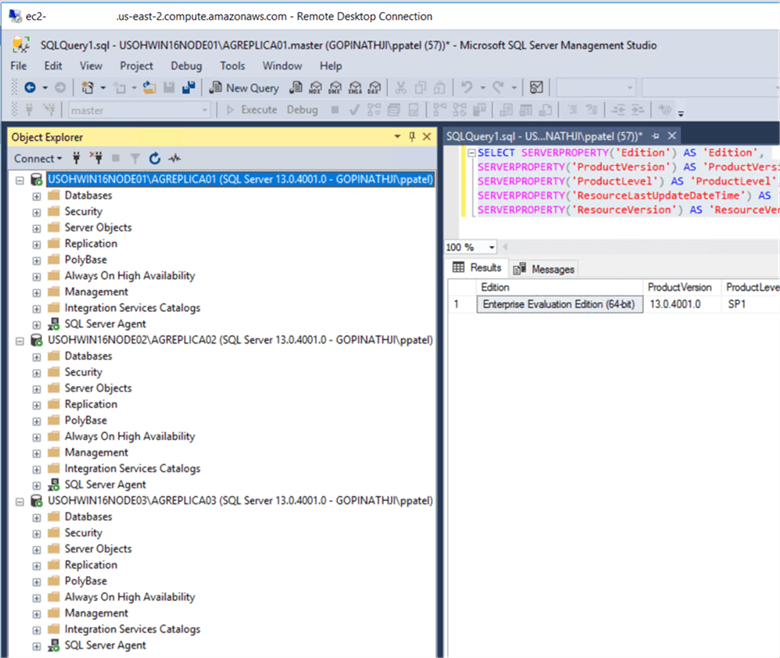
To create and configure a SQL Server 2016 Always On Availability Group, open SQL Server Management Studio and connect to any of the SQL Server replica instances as shown below.
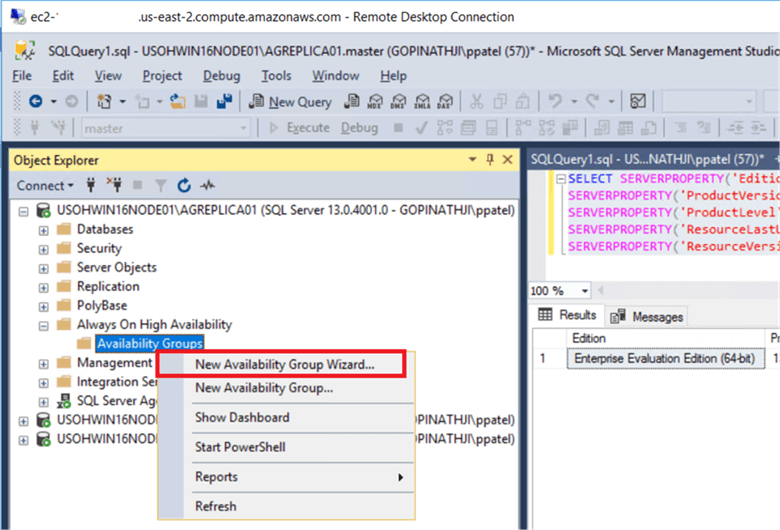
On the Object Explorer, expand the Always On High Availability folder and right click on the Availability Groups folder and select the New Availability Group Wizard… option. This will launch the New Availability Group Wizard.
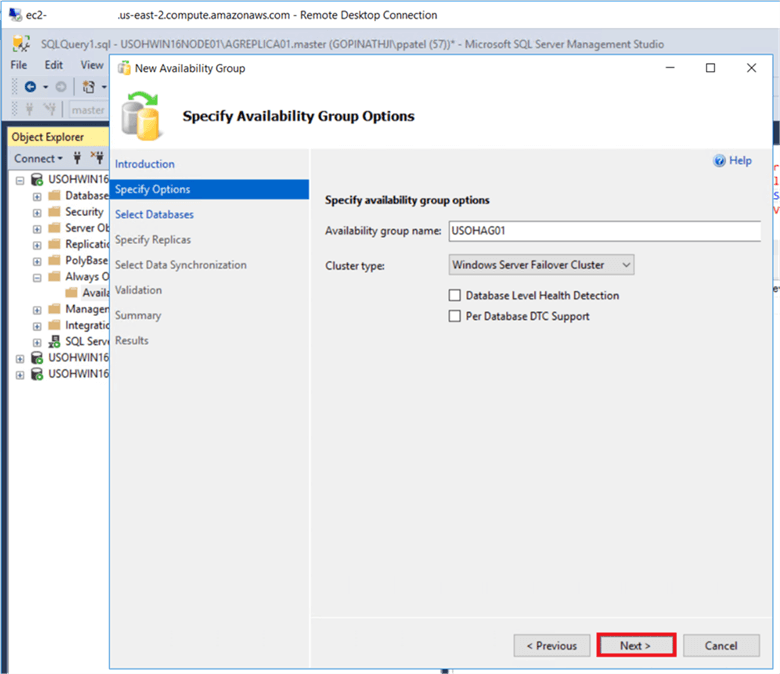
On the Specify Availability Group Options dialog box, enter the Availability group name and click Next.
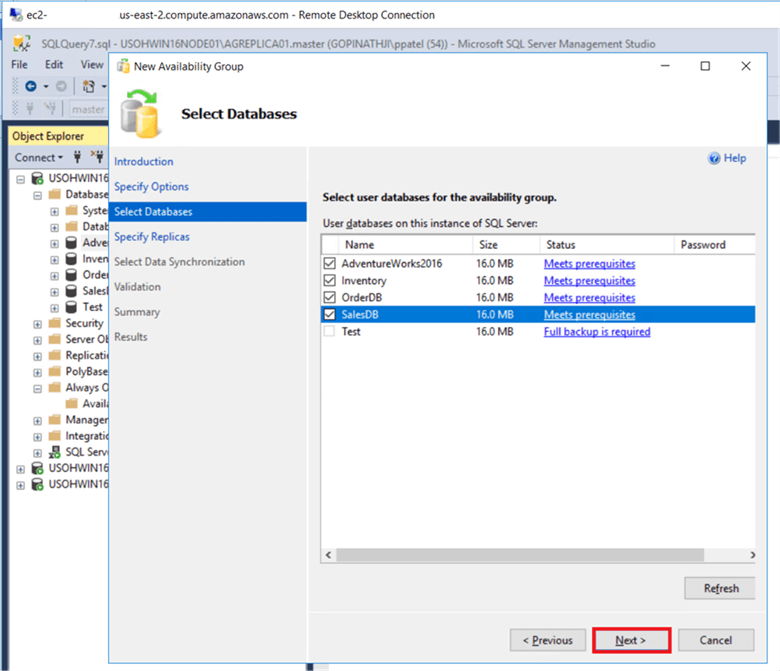
On the Select Databases dialog box, select the check boxes for each database you want to include in your Availability Group. Note – The databases have to use the Full Recovery Model and at least one full backup needs to be completed before joining them in the Availability Group and then click Next.
On the Specify Replicas dialog box, on the Replicas tab, click on Add Replica… to connect to the other SQL Server instances which are part of the Windows Failover Cluster. Note – You can only add nodes that are part of the Windows cluster.
In SQL Server 2016, up to three replicas can be added into Automatic Failover and up to three replicas can use Synchronous Commit, if you want to configure any of the replicas as a readable secondary then select Yes in Readable Secondary column or you can select Read-intent only which allows only read intent traffic provided in the connection string. I show both of these options in the next two screenshots.
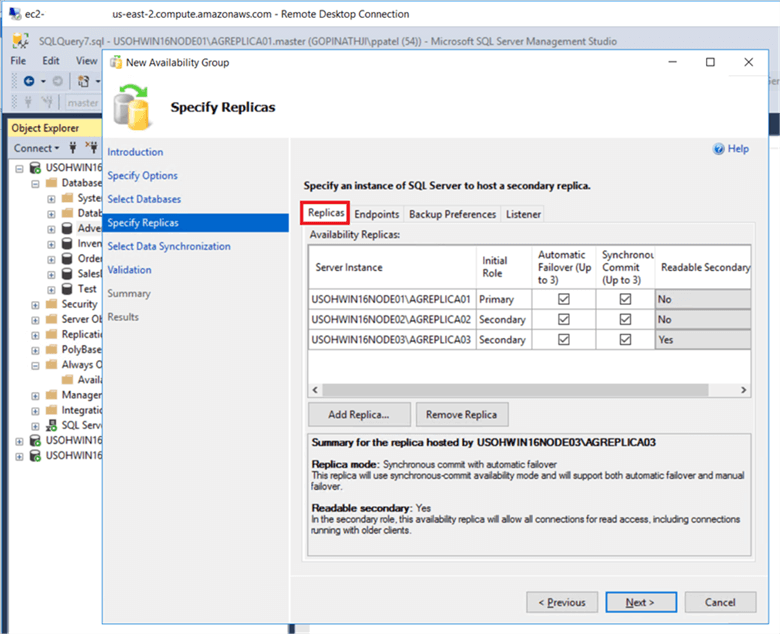
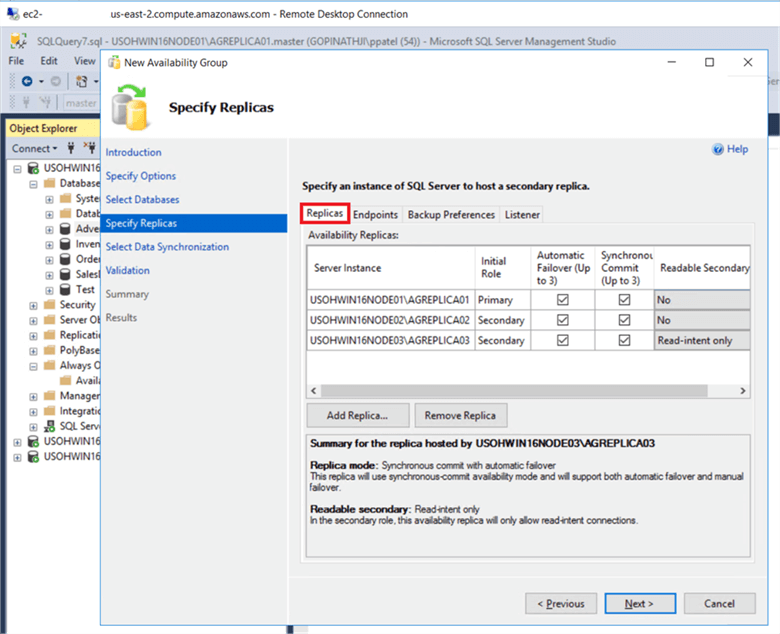
On the Endpoints tab, verify all the information and check the Encrypt Data if you want to encrypt the data that is sent.
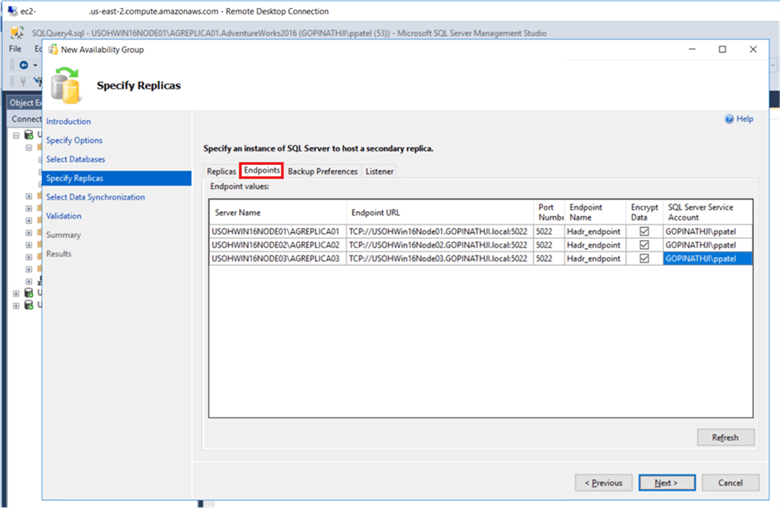
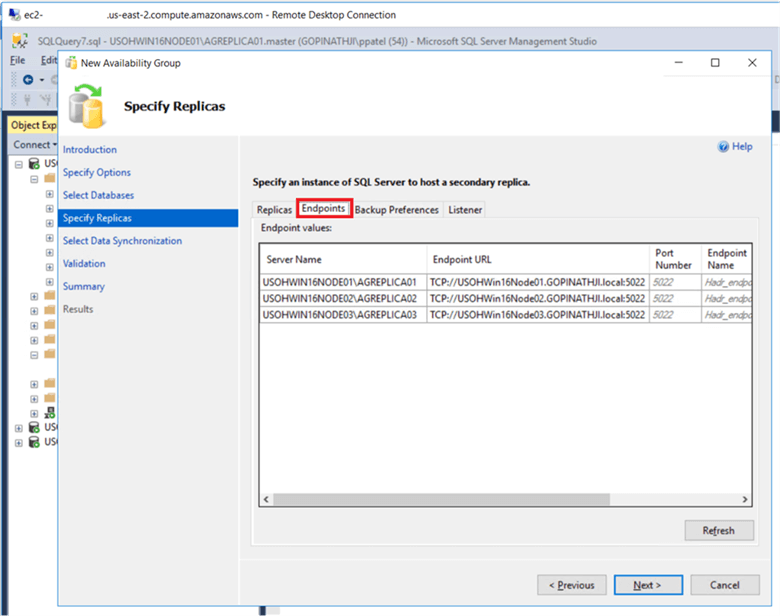
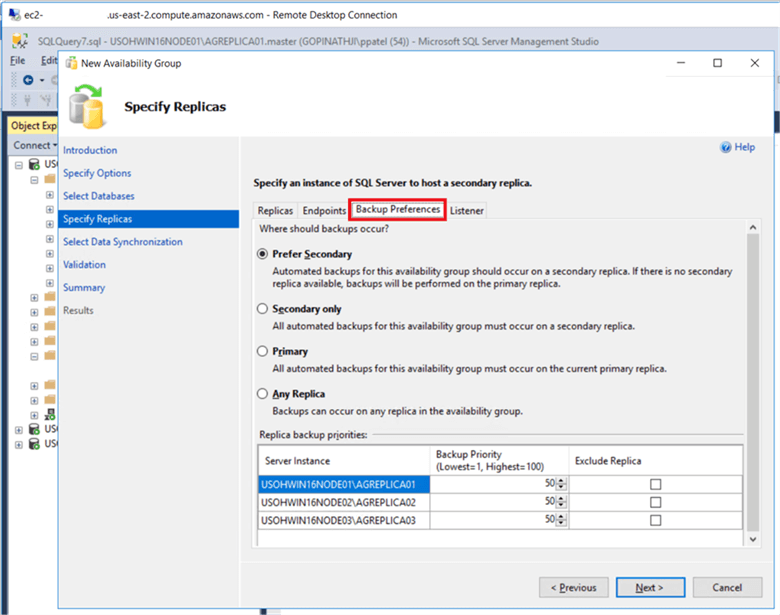
On the Backup Preferences tab, select the appropriate option and click Next.
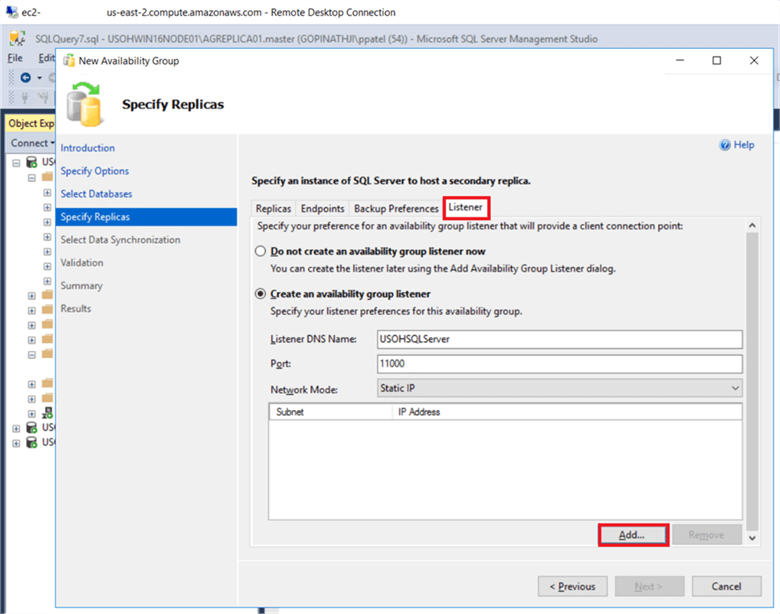
On the Listener tab, select the Create an availability group listener option.
Enter the following details:
- Listener DNS name: Name that you will use in your application connection string when connecting to SQL Server.
- Port: Enter the port number you want to use for communication. I am using port 11000.
Click on the Add… button to provide an IP address.
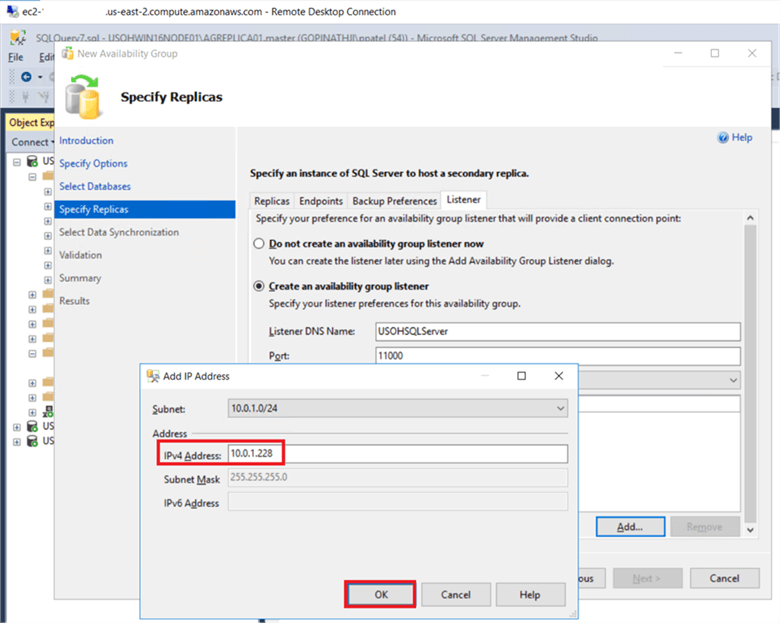
On the Add IP Address dialog box, select the subnet and enter your preferred virtual IP address in the IPv4 Address field and click OK, you need to the IP addresses for all nodes and then click Next.
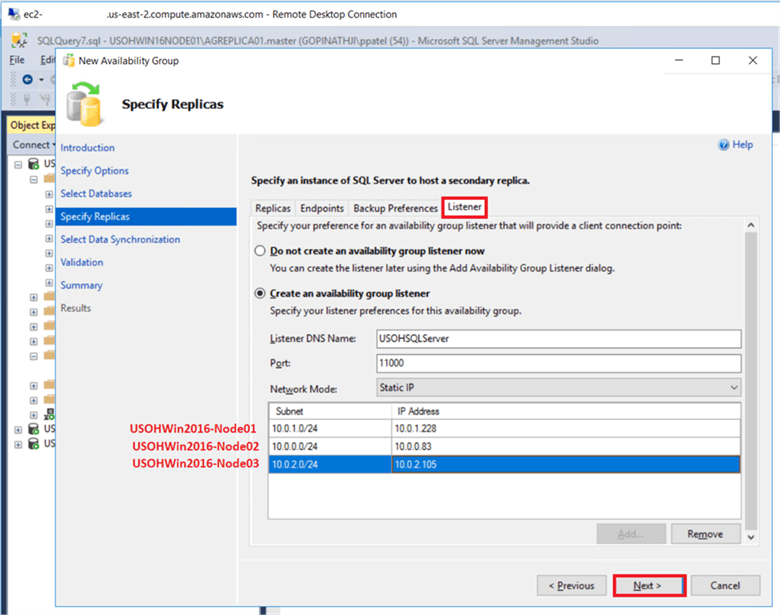
Once you provide the IP addresses for all server nodes, the listener tab will look like the below image and the click Next. Note - I added the names of the servers in red on the screenshot for clarification.
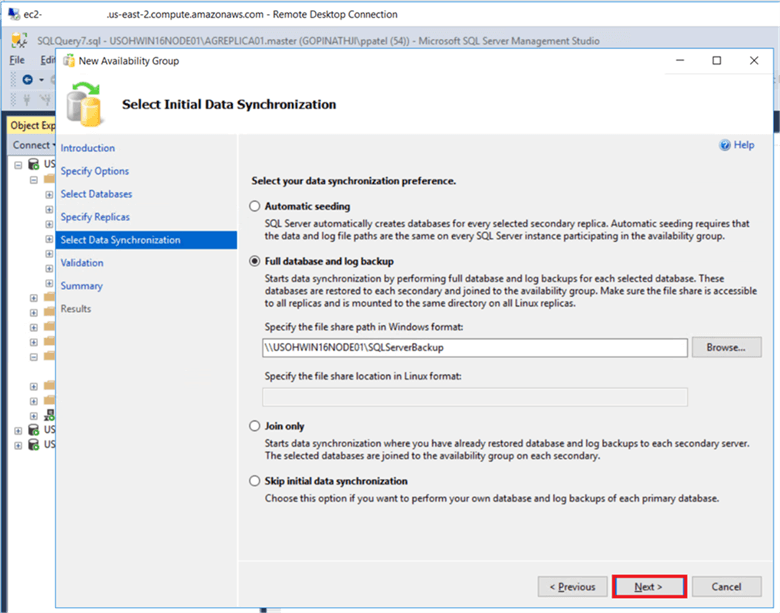
On the Select Initial Data Synchronization dialog box, select the Full database and log backup option or another appropriate option. Provide a shared folder that is accessible from all the server replicas and the SQL Server service account used by all the server replicas that has Write permissions to the share.
Note – This is just temporary file share to store the database backups that will be used to initialize the databases in an Availability Group. If you are dealing with large databases, it is recommended that you manually backup and restore to initialize the databases prior to configuring Always On as your network bandwidth might not be able to accommodate the database backup size. Then click Next.
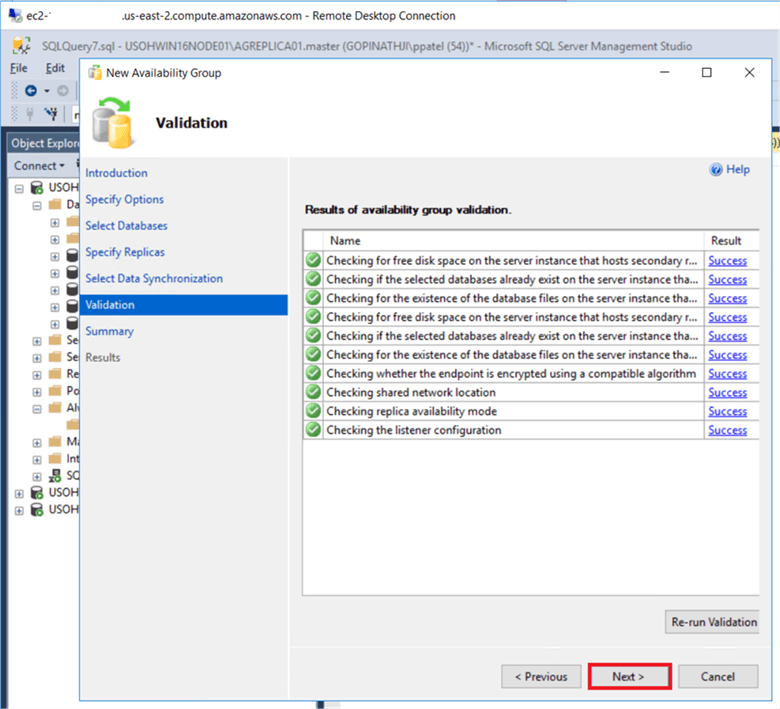
On the Validation dialog box, verify all validations return successful results and click Next.
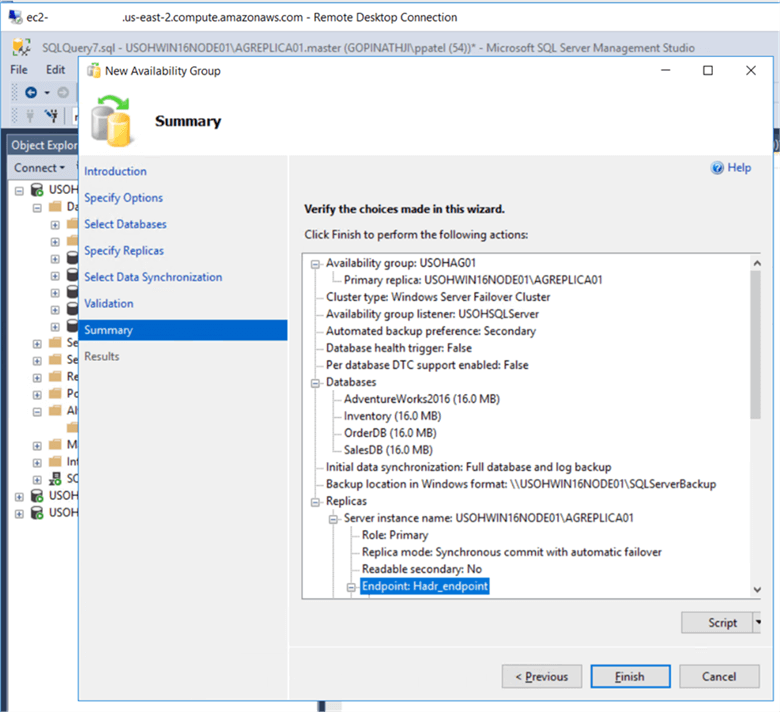
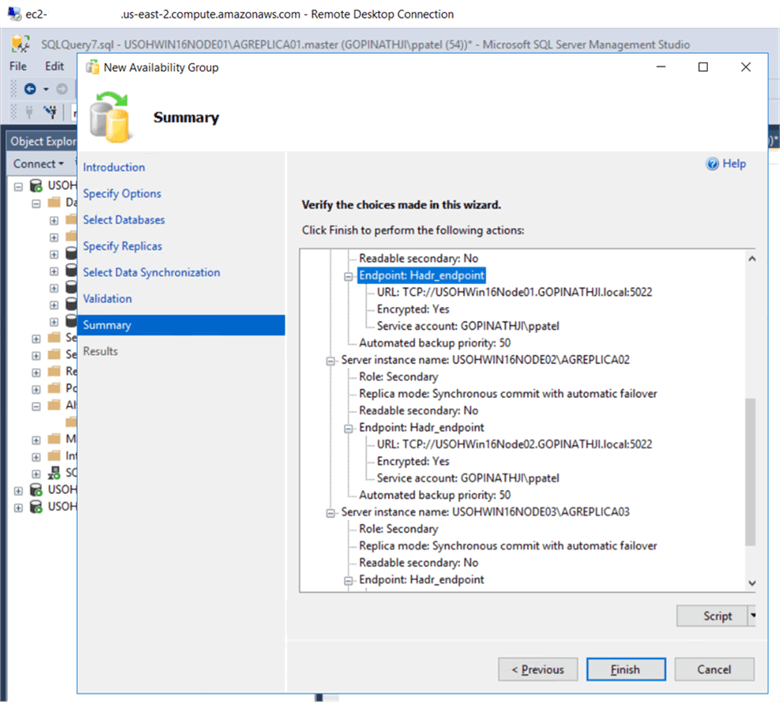
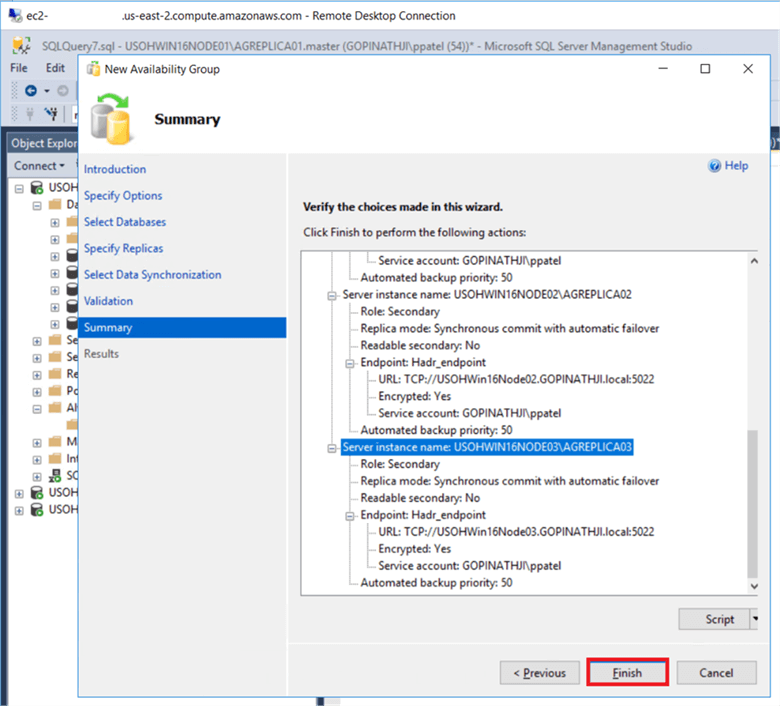
On the Summary dialog box, verify all configuration settings or you can generate a script to be run. Click Finish and this will create and configure the Always On Availability Group and join the databases.
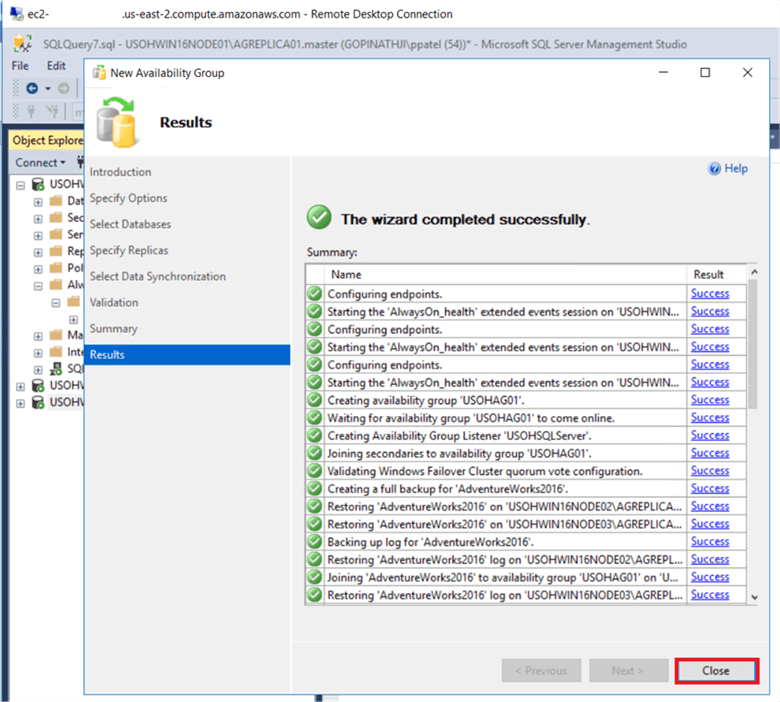
On the Results page, verify all tasks have completed successfully and click Close.
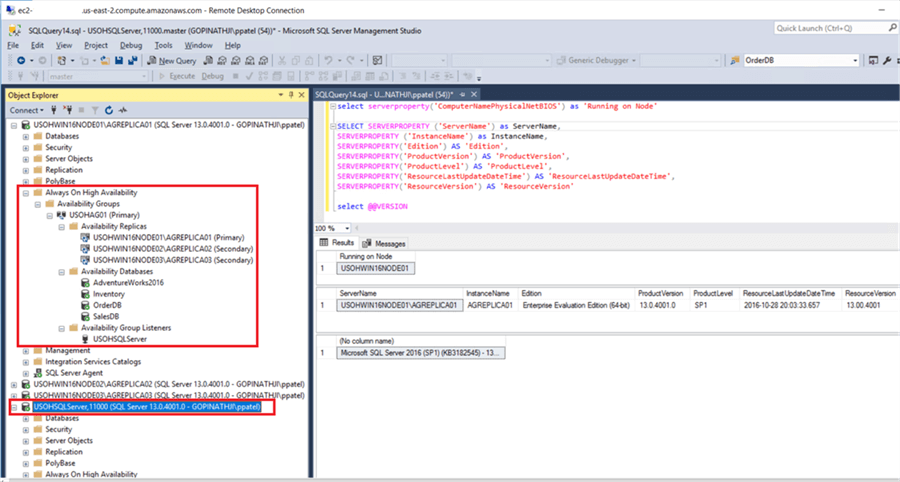
Verify SQL Server Availability Group
In the SQL Server Management Studio, verify that the Always On Availability Group has been created across multiple availability zones and you are able to connect using the listener port number.
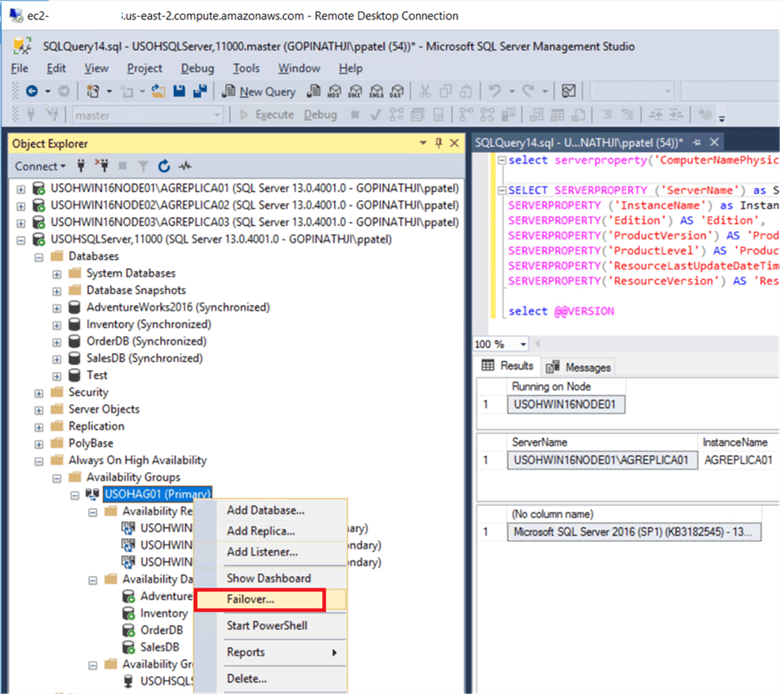
SQL Server Always On Failover
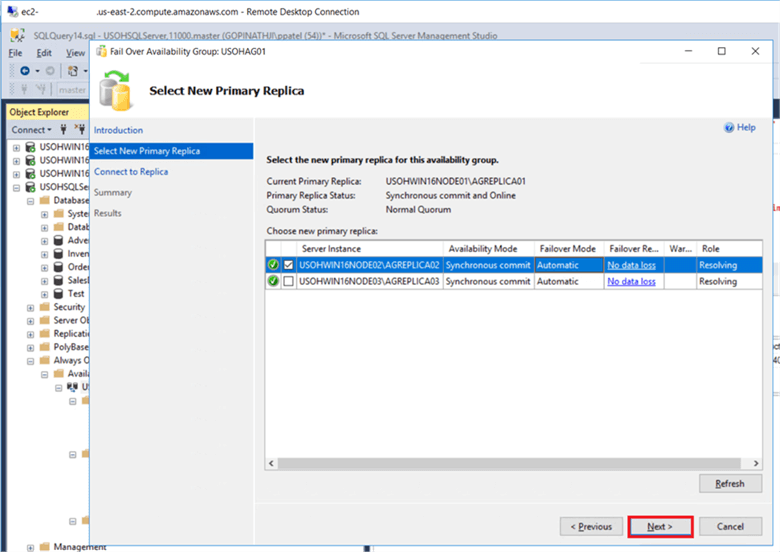
On the Object Explorer, expand the Always On High Availability folder and expand the Availability Groups folder. Right click on the Availability Group (whatever one you want to failover) and select the Failover… option. This will launch the Failover Availability Group Wizard.
On the Select New Primary Replica dialog box, select the server replica where you want to failover your availability group replica and click Next.
Note – These replicas are synchronous commit with automatic failover, so if any issues are discovered by the quorum then the quorum will failover to the Availability Group replica. If you setup asynchronous with manual failover then you need to do failover manually.
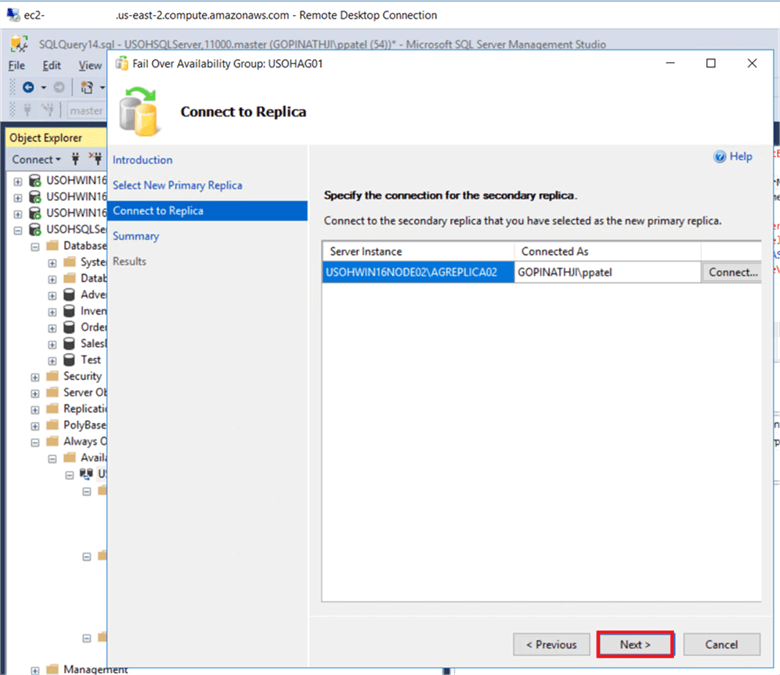
On the Connect to Replica dialog box, connect to the server node to confirm and click Next.
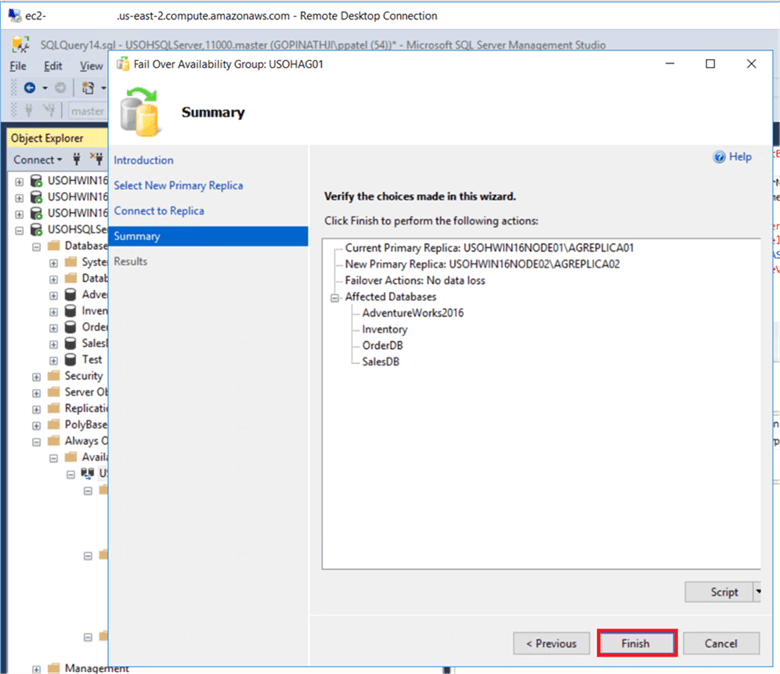
On the Summary dialog box, verify all the information and click Finish.
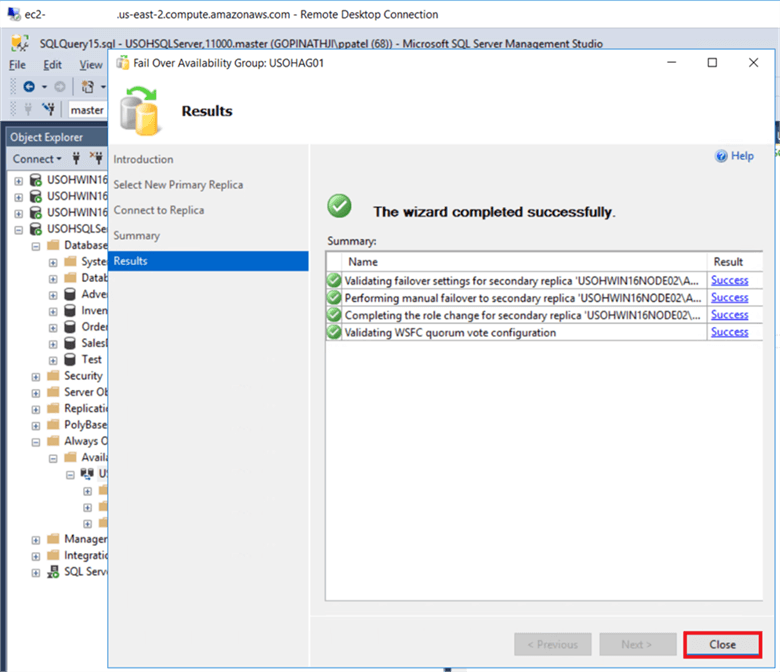
On the Results dialog box, verify it has completed successfully and click Close.
Verify SQL Server Availability Group Failover
In SQL Server Management Studio, we can verify the failover and we can see we have a new Primary server.
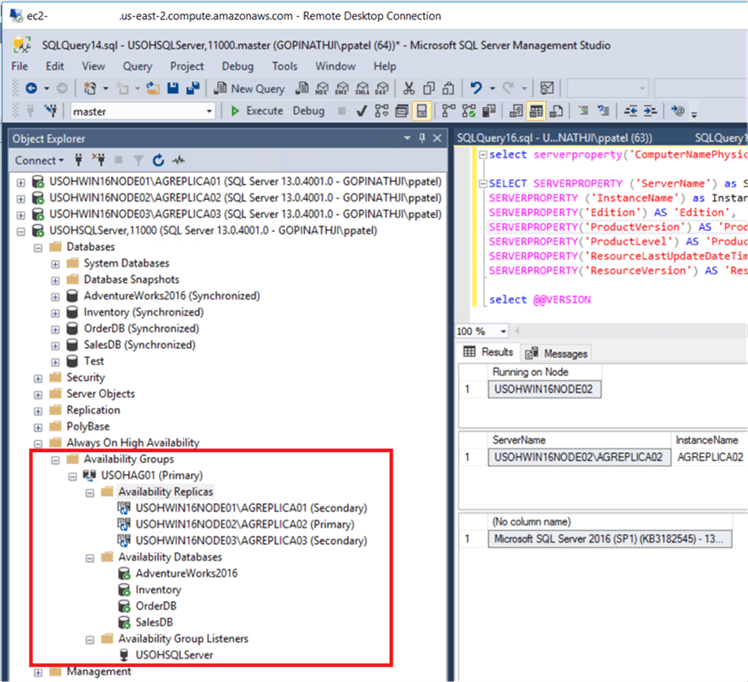
SQL Server Management Studio Dashboard Report
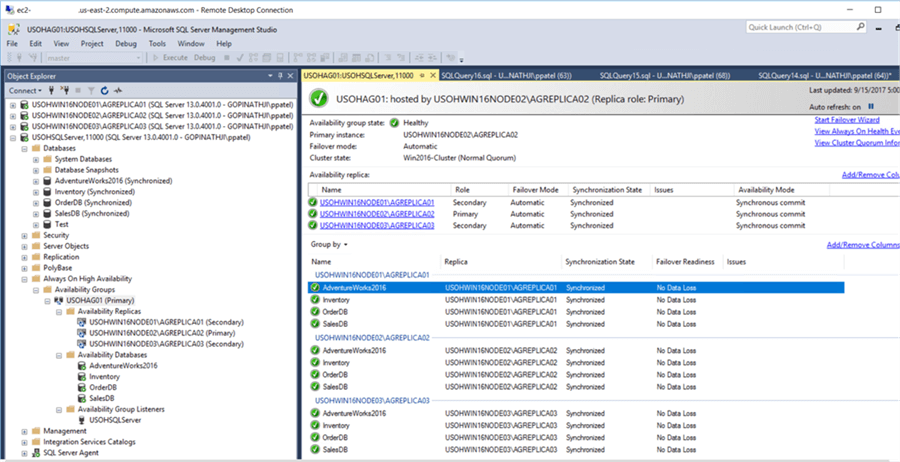
If you right click on the Availability Group, you can select Show Dashboard. From here you can verify the health of all server nodes.
SQL Server Always on Failover Code
You can also do a failover by running a script like the following.
--- YOU MUST EXECUTE THE FOLLOWING SCRIPT IN SQLCMD MODE.
:Connect USOHSQLServer,11000
:Connect USOHWIN16NODE02\AGREPLICA02
ALTER AVAILABILITY GROUP [USOHAG01] FAILOVER;
GO
Conclusion
In this tip we configured SQL Server 2016 Always On Availability Group with multiple databases across multiple availability zone in AWS and failed over to another replica. Now we have a high availability solution for SQL Server running on AWS.
Next Steps
- How to build an Enterprise Environment in AWS for SQL Server check here.
- How to build RDS Environment in AWS for SQL Server click here.
- Check out these other cloud related tips.
About the author
 Pinakin Patel is a SQL Server Admin / AWS Solutions Architect with experience in SQL Server 2000 to 2016.
This author pledges the content of this article is based on professional experience and not AI generated.
View all my tips
Article Last Updated: 2017-12-26


