By: Mohammed Moinudheen | Updated: 2018-03-09 | Comments (12) | Related: > Azure Backup and Restore
Problem
There is a requirement from an application support team to restore the latest version of a production Azure SQL database to an equivalent Azure database in the test environment. Is it possible to accomplish this?
Solution
Yes, the restore of an Azure SQL database can be done to another Azure database server, but it is a slightly different process as compared to regular database restores done on-premises. This tip describes the step by step process to quickly complete the restore.
Identify the Azure databases on the portal
First, log on to the Azure portal: https://portal.azure.com/.
If you don’t have an account already, you can setup a trial edition https://azure.microsoft.com/en-us/free/ and get a $200 credit for 30 days.
Once you are on the portal, click on the “SQL Databases” option on the left to view the Azure databases. From the screenshot below, the requirement is to restore the production database called –“mohammedProd” on to the UAT database “mohammedUAT” which is on a designated Azure UAT server. As a first step, let's back up the production database –“mohammedProd”.

Log on to Azure production server
From the screenshot above, click on the production database name-“mohammedPROD”. This will take you to the screenshot as shown.

Once you hover the mouse pointer over the server name (see above picture), the “Click to copy” option will appear which can be used to copy the full production server name. If you are unsure which login to use to connect to this server, click on the server name to get that information. Once you click on the server name, the below screenshot will appear.

You can use the login on the right under “Server Admin” to connect to your Production SQL instance. Using the login, connect to the production SQL Server using the latest version of SQL Server Management Studio (SSMS). If you don’t have SSMS already installed, you can download the latest version from this link: https://docs.microsoft.com/en-us/sql/ssms/download-sql-server-management-studio-ssms.
Once done, the production database on the Azure server will appear as below.

Backup the production SQL Azure database
Once you have connected to the Azure server as shown above, you can export the database to a BACPAC file and use that for restoring on to another server. In order to export the schema and data to a logical BACPAC file, right click on the database name and follow the steps as shown.

Once you click on the “Export Data-tier Application” option, you will see this.

Review and click on “Next”.

Here, you have the option to save the BACPAC locally or to a storage account within Azure. In this example, we will store the BACPAC file locally. Once you select the location, click on “Next” which will take you to the “Summary” section as shown.

Review the details shown on the screen and click on “Finish”. This will begin the process of exporting the schema and data from the production database. This process will take some time to complete as it depends on factors like size of the database and current activity being performed on the database. Once the export process completes, you will see this confirmation screenshot with the results.

The export process needs to have completed successfully in each of the steps to generate a successful copy of the BACPAC file.
Restore BACPAC file on to the Azure test server
Now that you have saved the production BACPAC file locally, you can import it on the Azure test server. Connect to the Azure test server similar to how you connected to the Azure production server. Once done, right click on the database node and click on “Import Data-tier Application” as shown below.

Once you click on the “Import Data-tier Application” option, you will get this introduction screen.

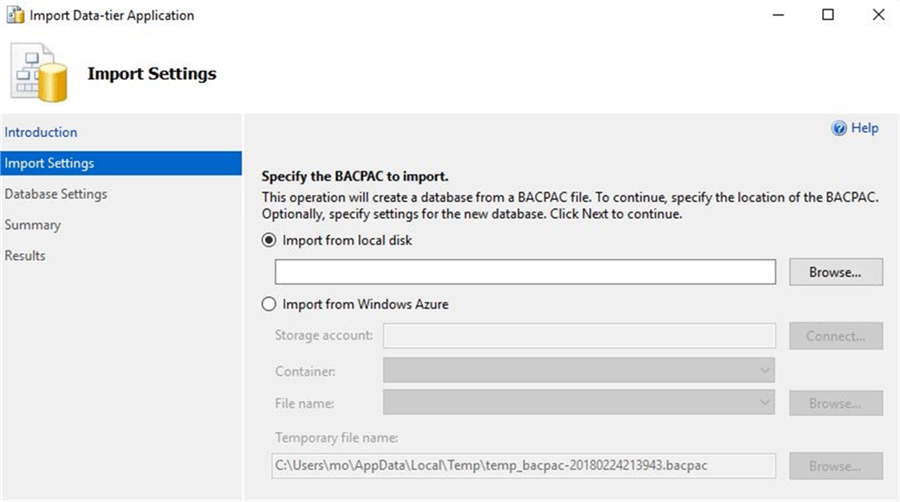
Review the screen and click on “Next”. Once you clicked on “Next”, you will get this option to select the BACPAC file to import.

Here, you have the option to browse for the BACPAC file that you exported from production. Once you have selected the exported BACPAC file, click on “Next” which will take you to the Settings option as shown.

Based on your requirement, you have the option to select the settings which include the below options:
- Edition of Microsoft Azure SQL Database
- Maximum database size (GB)
- Service Objective
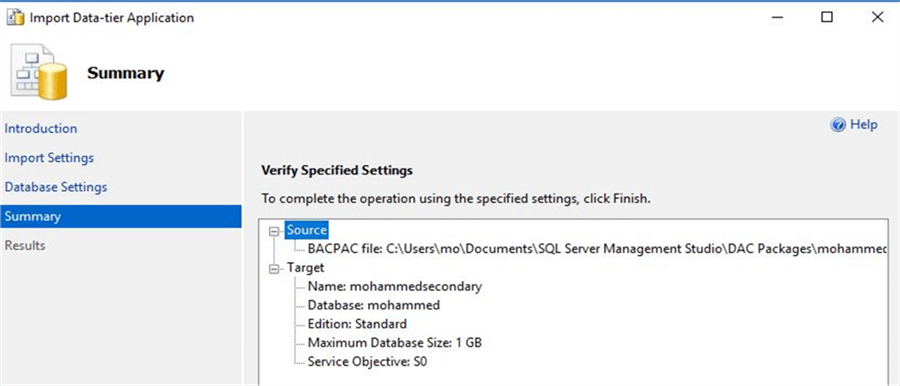
Once the settings are selected, click on the “Next” option which will take you to the “Summary” section as shown.

Review the contents in the “Summary” section and click on “Finish”. Once done, it will start the process of importing the database as shown.

This process will take some time depending on the size of the BACPAC file and the settings you had opted for while importing the BACPAC file. Once the process completes, you will get this status window as shown below.

The import process is successful. You can connect to the Azure test server to confirm that the database has been restored from the BACPAC file.

You can also confirm from the Azure portal that the database is successfully restored on the Test server.

If the requirement was to retain the same database name as was originally present on the test server then you may want to delete the older version of the database on the test server. Once done, rename the newly restored database to that of the old one. This will help to avoid changing any connection strings wherever applicable.
Script out logins from production and transfer to test server
After the restore to the test server, users may still not be able to connect successfully to the database. In order to fix the access issues that may arise on the test server, ensure to grant the required privileges on the test server for the users. You can script out user permissions as shown below and test for access with the users.

Next Steps
- With this tip, you will be able to restore a SQL Azure database from one server to another.
- Try this tip using your own Azure subscription.
- Try this tip using a small test Azure database of a 1GB or smaller.
- To get familiar with Azure, refer to the numerous tips available at this link.
About the author
 Mohammed Moinudheen is a SQL Server DBA with over 6 years experience managing production databases for a few Fortune 500 companies.
This author pledges the content of this article is based on professional experience and not AI generated.
View all my tips
Article Last Updated: 2018-03-09


