By: Rahul Mehta | Updated: 2018-02-26 | Comments (2) | Related: > SharePoint
Problem
SharePoint Online stores information in a repository known as a SharePoint List which are like SQL Server tables. It has the capacity to store millions of records. The challenge is how to use the information to create interactive and visual comparisons within SharePoint Online.
Solution
With the evolution of Power BI, Microsoft provides Power BI as a business analytics service. Microsoft also provides integration of Power BI with SharePoint Online. Power BI allows developers to use SharePoint Lists as a data source and generate interactive reports and publish them on Power BI online. It can then further be embedded into SharePoint Online. In this tip, we will demonstrate step by step on how to perform this process.
Step 1
The first step is to create a data source in SharePoint Online. I have already created a sample data source (from “Financial Sample.xlsx”) of an organization’s finance as a SharePoint List named as “FinanceList”:

Step 2
The next step will be to create a report in Power BI. To do so, I would suggest downloading Power BI Desktop. Though much of the functionality could be achieved via Power BI online, I would recommend downloading the desktop version. It can be downloaded from here . Once downloaded, open Power BI desktop and a similar screen as shown below should appear:

Step 3
Now that we are in Power BI, let's create our data source before we can use it to generate charts. Before we continue, I would suggest to login into Power BI desktop by clicking on the "Sign in" available at the top right corner of the tool. You can use the Power BI account to which you have given access or you have subscribed to.
We need to select a SharePoint List as a data source which is available as a part of Online Services. To do so, click on the Home Tab > Get Data > More > Online Services and a similar screen as shown below should appear:

Step 4
As we can see, there will be various options of data sources to connect to. As we are currently targeting SharePoint Online, select "SharePoint Online List" and click "Connect". A screen shall appear to complete the SharePoint site information. Complete the site name in the box and click "OK".

Step 5
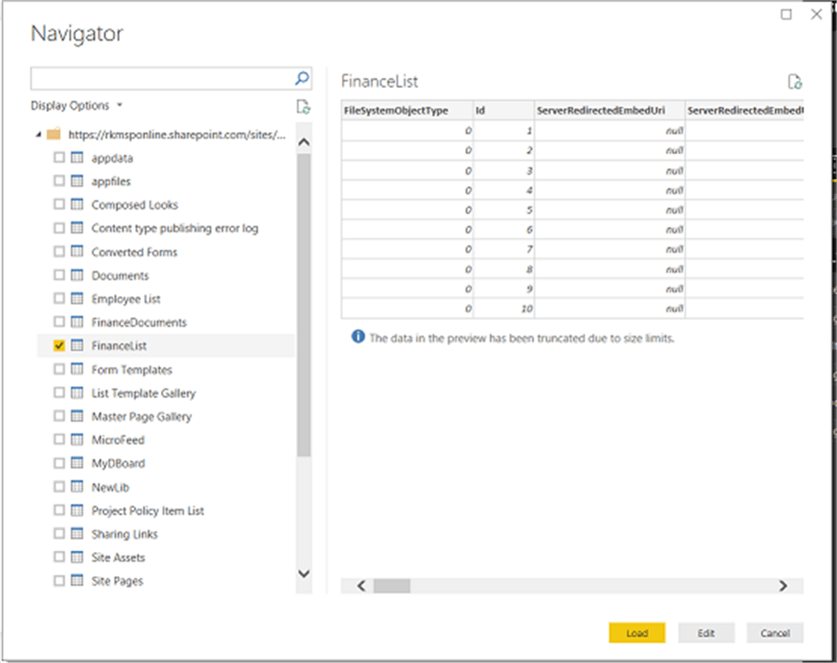
Once the site is identified, a wizard will ask for a data source (in this case a list of all available SharePoint Lists) to be selected. Select the appropriate SharePoint List (in this case “FinanceList”) and click "Load". Also, a preview of the selected list will be shown on the right side of the screen.

Step 6
When the data is successfully pulled, we will be able to see the data/model in Power BI. To see this, click on the "Data" icon on the left panel as shown in the below screen. We will be able to see the data.

Step 7
Now let's start creating a basic report from the data we pulled. Click on the "Report" icon above the "Data" icon on the left panel. There will be a panel on the right side of the screen named "VISUALIZATIONS". For this tip, we will select a "Clustered column chart".

Step 8
A blank chart should appear on the left side of the screen and a few fields will appear in the "VISUALIZATIONS" tab. For this tip, we will concentrate on three fields:
- Axis: This is for information on the horizontal/vertical axis. This will be the field for which all the values will be shown.
- Legend: Used to help readers understand the charted data.
- Values: Will hold the original figure which will be shown against each axis unit.
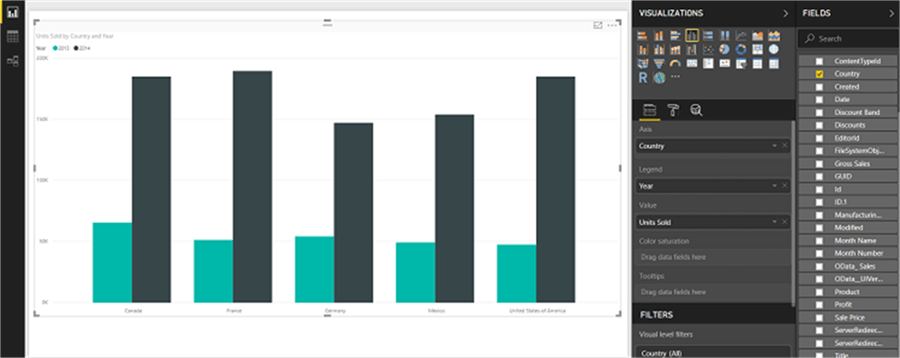
In this case, we are trying to compare units sold by each company for two years. Thus, the Axis will be "Country", Legend will be "Year" and Value will be "Units Sold". We must drag the columns from the "Fields" to the "VISUALIZATIONS" panel. Once configured, it should look like the below screen.

Step 9
Now we need to host this report on SharePoint Online. Before we move ahead if not already saved, save the file. It will be saved with a name like "Filename.pbix". Once saved we need to publish this file to Power BI Online. To do so, go to Home tab and select "Publish".

Step 10
A wizard will start and it will ask for a destination in Power BI to publish the report file. In my case, I will select the default workspace created by Power BI.

Step 11
Once successfully created, it will show a confirmation message with the report link in Power BI Online.


Step 12
Next, we must use this report in SharePoint Online. To do so, let's first copy the report link which we will use later in a Power BI web part. Go to browser address bar and copy the link excluding the last section of “/ReportSection". The reason for excluding the ReportSection is to allow the report on other pages aside from the Power BI report section page.

Step 13
Once copied, go to the SharePoint Online site landing page, click on "Settings > Add a page". This is a modern view page which is supported across all devices and is responsive according to the device. Enter the page name and click on "Create".

Step 14
Once a page is created, simply give a name to your page. Below that section, a "+" sign to add a web part will be available. Click on the + sign, scroll down and select "Power BI".


Step 15
Once the web part is loaded, we must configure to show the report from Power BI Online. To do so, click on "Add Report". Once clicked, a configuration window will appear on the right of the screen.

Step 16
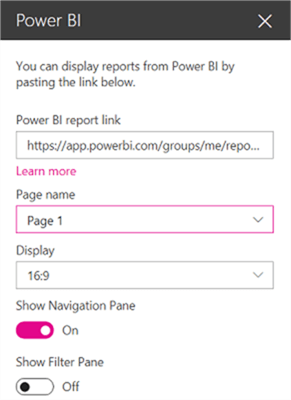
Paste the URL in the "Power BI report link" which we copied in Step 12. If correctly copied, automatically the below properties including "Page name" and "Display" will be auto populated and selected.

Step 17
Click on "Save and close" on the page and you will be able to see the report hosted in Power BI Online in SharePoint Online.

In this way, we can use Power BI to enrich SharePoint by creating interactive and deep analysis reports.
Next Steps
- Integrate SharePoint Online documents like Excel as a data source in Power BI reports.
- Check out these other Power BI tips.
About the author
 Rahul Mehta is a Project Architect/Lead working at Tata Consultancy Services focusing on ECM.
This author pledges the content of this article is based on professional experience and not AI generated.
View all my tips
Article Last Updated: 2018-02-26


