By: Joe Gavin | Updated: 2018-05-18 | Comments (5) | Related: > Restore
Problem
You need to automate refreshing a SQL Server database to refresh test or dev, test backups, etc. In this tip we show how this can be done.
Solution
We can accomplish this with a little PowerShell, a little T-SQL code and SQL Server Agent.
For this tip we have a backup of a database named AutomatedDbRefresh.bak which we will use to automate the restore. Let's say the backup is done on one server and we want to automate the restore do a different server.
We’ll start by copying the following code into the PowerShell editor of your choice, configure $BackupDir and $WorkDir for your environment, run it and verify the file copied from the BackupDir to the WorkDir
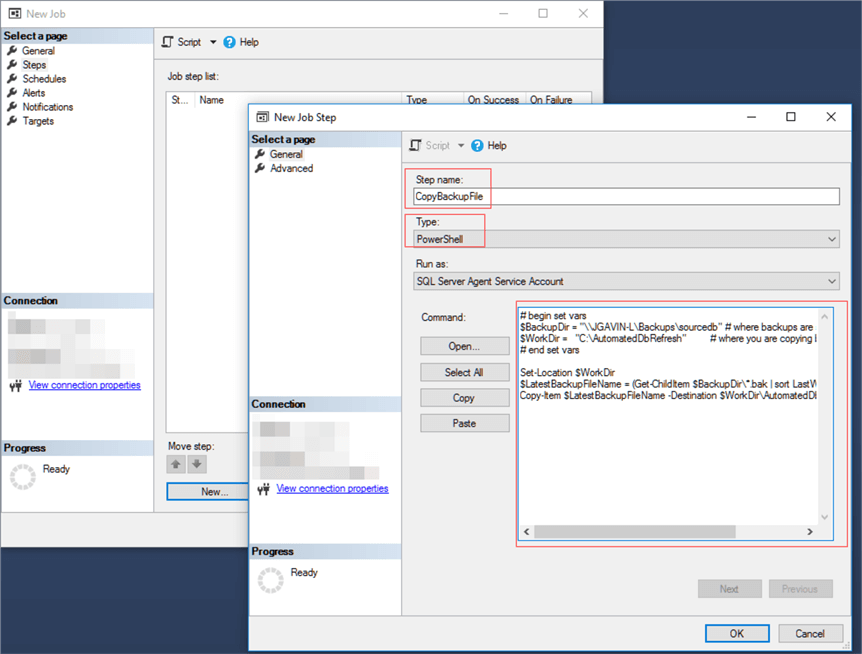
# begin set vars
$BackupDir = "\\JGAVIN-L\Backups\sourcedb" # where backups are stored
$WorkDir =   "C:\AutomatedDbRefresh"       # where you are copying backup to
# end set vars

Set-Location $WorkDir
$LatestBackupFileName = (Get-ChildItem $BackupDir\*.bak | sort LastWriteTime | select -last 1)
Copy-Item $LatestBackupFileName -Destination $WorkDir\AutomatedDbRefresh.bak -Force
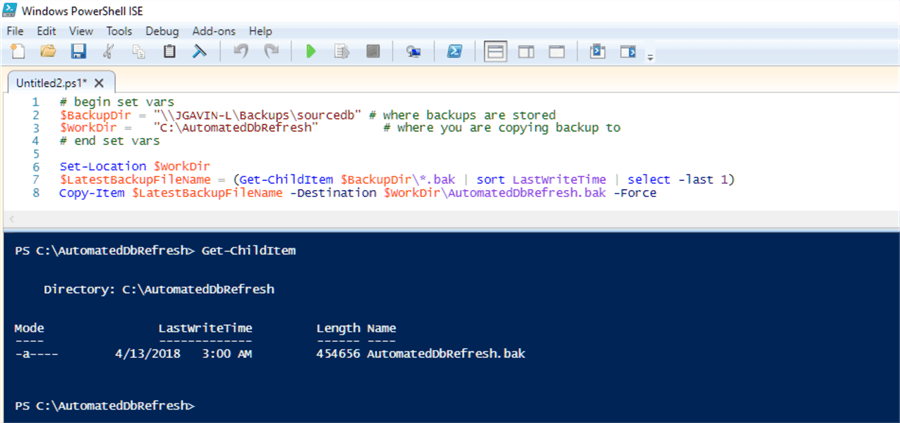
I originally planned to do this all in PowerShell, but found it simpler and more reliable to use a 2-part solution. Also, I found it cleaner to hardcode edits in a few places rather than to use variables, create SQL statement variables, etc. as this would not be something requiring regular edits.
Let’s continue.
Copy the following T-SQL into SQL Server Management Studio (SSMS) and configure it to your environment.
The code will do a few things:
- kill any active connections for the database that we want to restore by putting database in single user mode
- restore the backup file that was copied
- put the restored database back to multi user mode
- change the compatibility of the database if needed
- change the database owner of the database
- rename the logical database files
- set the database to simple recovery
- shrink the database log file
- run a checkdb to make sure there are no issues
-- kill any connections in db
USE [master]
GO
ALTER DATABASE [targetdb] SET SINGLE_USER WITH ROLLBACK IMMEDIATE /* set target db name here */
GO

-- refresh db
RESTORE DATABASE [targetdb] -- set target db name here
FROM DISK = N'C:\AutomatedDbRefresh\AutomatedDbRefresh.bak' -- fully qualified path to backup file to restore
WITH FILE = 1,
MOVE N'sourcedb' TO N'C:\Program Files\Microsoft SQL Server\MSSQL13.SQL2016\MSSQL\DATA\targetdb.mdf', -- logical data file name of source db and fully qualified physical file name of target db data file
MOVE N'sourcedb_log' TO N'C:\Program Files\Microsoft SQL Server\MSSQL13.SQL2016\MSSQL\DATA\targetdb_log.ldf', --   logical log file name of source db and fully qualified physical file name of target db log file
REPLACE
GO

-- return database back to multi user
USE [master]
GO
ALTER DATABASE [targetdb] SET MULTI_USER -- set target db name here
GO

-- set compat level if backup is from an earlier version and you want to set it to current level or you can just comment it out or delete it if not needed
-- 2017=140, 2016=130, 2014=120, 2012=110, 2008 R2=100
USE [master]
GO
ALTER DATABASE [targetdb] SET COMPATIBILITY_LEVEL = 130 -- set target db name and compat level here
GO

-- change owner to sa
USE [targetdb] -- set target db name here
GO
EXEC sp_changedbowner sa

-- rename logical files
USE MASTER
GO
ALTER DATABASE targetdb -- set target db name here
MODIFY FILE (NAME='sourcedb', NEWNAME='targetdb')  -- change sourcedb to logical data file name of source db and targetdb to logical file name of targetdb data file
GO
ALTER DATABASE targetdb -- set target db name here
MODIFY FILE (NAME='sourcedb_log', NEWNAME='targetdb_log') -- change sourcedb_log to logical log file name of source db and targetdb_log to logical file name of targetdb log file
GO

-- set simple recovery and shrink log
USE [master]
GO
ALTER DATABASE [targetdb] SET RECOVERY SIMPLE WITH NO_WAIT -- set target db name here
GO

USE [targetdb] -- set target db name here
GO
DBCC SHRINKFILE (N'targetdb_log', 1024) -- change targetdb_log to logical file name of targetdb log file
GO

-- dbcc checkdb
DBCC checkdb([targetdb]) WITH NO_INFOMSGS -- set target db name here
These are the lines that need to be edited in the highlighted sections:
- ALTER DATABASE [targetdb] SET SINGLE_USER WITH ROLLBACK IMMEDIATE /* set target db name here */
- RESTORE DATABASE [targetdb] -- set target db name here
- FROM DISK = N'C:\AutomatedDbRefresh\AutomatedDbRefresh.bak' -- fully qualified path to backup file to restore
- MOVE N'sourcedb' TO N'C:\Program Files\Microsoft SQL Server\MSSQL13.SQL2016\MSSQL\DATA\targetdb.mdf', -- logical data file name of source db and fully qualified physical file name of target db data file
- MOVE N'sourcedb_log' TO N'C:\Program Files\Microsoft SQL Server\MSSQL13.SQL2016\MSSQL\DATA\targetdb_log.ldf', -- logical log file name of source db and fully qualified physical file name of target db log file
- ALTER DATABASE [targetdb] SET MULTI_USER -- set target db name here
- ALTER DATABASE [targetdb] SET COMPATIBILITY_LEVEL = 130 -- set target db name and compat level here (2017=140, 2016=130, 2014=120, 2012=110, 2008 R2=100)
- USE [targetdb] -- set target db name here
- ALTER DATABASE targetdb -- set target db name here
- MODIFY FILE (NAME='sourcedb', NEWNAME='targetdb') -- change sourcedb to logical data file name of source db and targetdb to logical file name of targetdb data file
- ALTER DATABASE targetdb -- set target db name here
- MODIFY FILE (NAME='sourcedb_log', NEWNAME='targetdb_log') -- change sourcedb_log to logical log file name of source db and targetdb_log to logical file name of targetdb log file
- ALTER DATABASE [targetdb] SET RECOVERY SIMPLE WITH NO_WAIT -- set target db name here
- USE [targetdb] -- set target db name here
- DBCC SHRINKFILE (N'targetdb_log', 1024) -- change targetdb_log to logical file name of targetdb log file
- DBCC checkdb([targetdb]) WITH NO_INFOMSGS -- set target db name here
Execute it and check the errorlog.
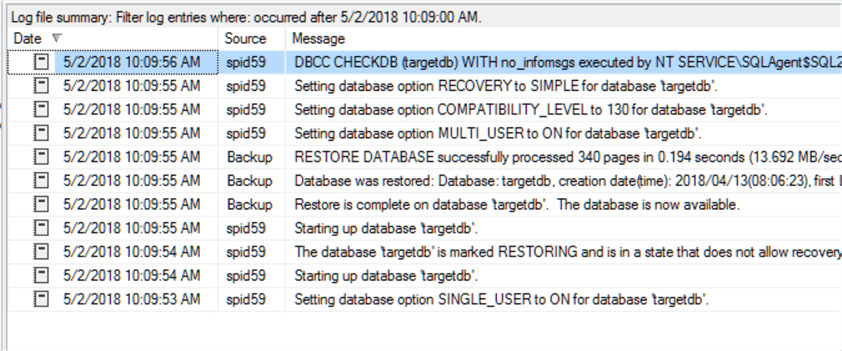
And verify file names and options.

Create SQL Server Agent Job
Now that we’ve configured and tested everything it’s time to put it all together in a SQL Agent job.
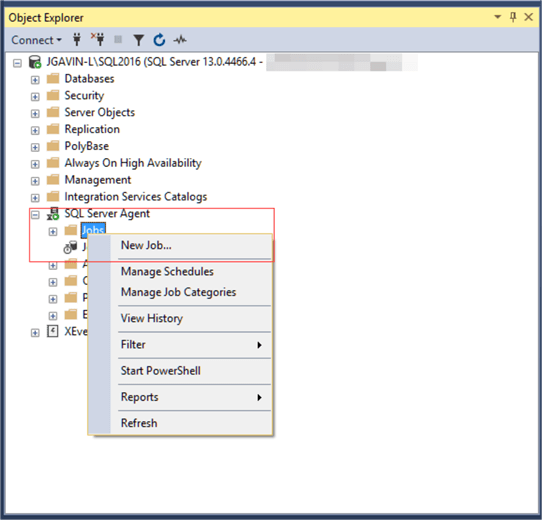
Expand SQL Server Agent > Right click New Job…
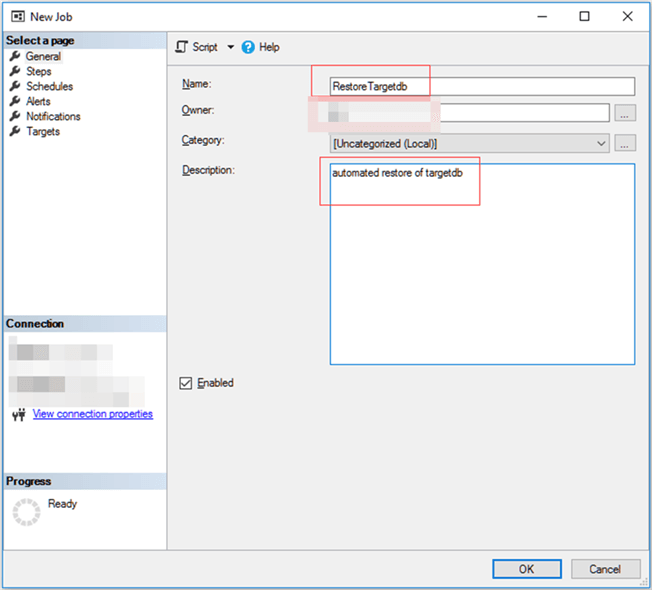
Give it a name and enter a description.
Goto Steps
Give it a step name, select PowerShell as the type from the dropdown and paste your edited PowerShell into the Command window and then click OK.
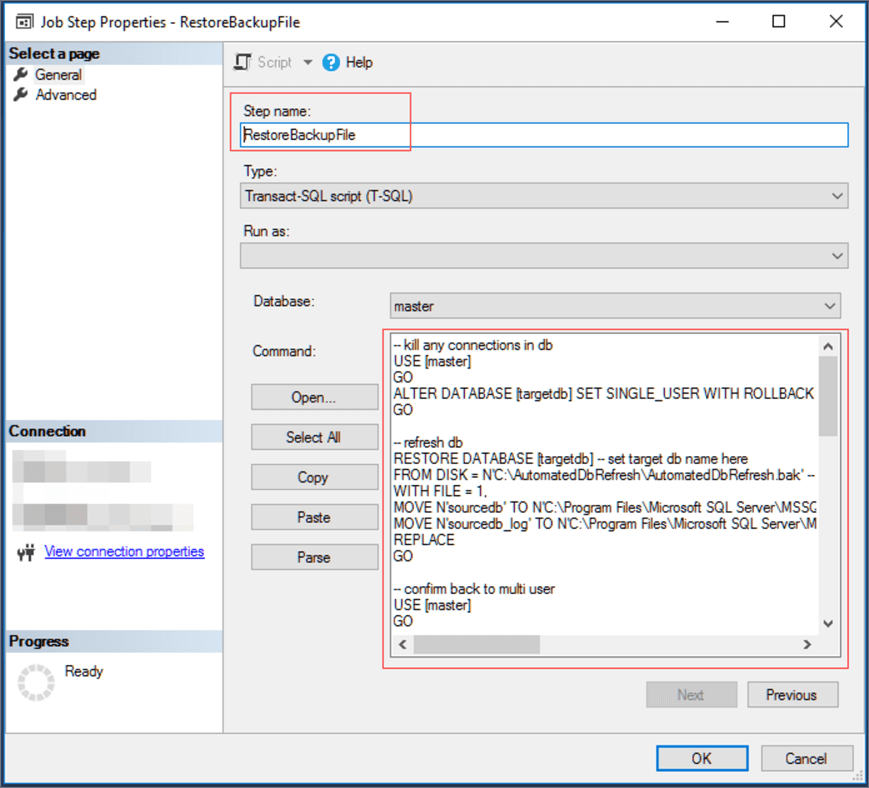
Click New for a new job step. Name the job step, use Transact-SQL script (T-SQL) for type and paste your edited SQL into the Command window and click OK.
Goto Schedules
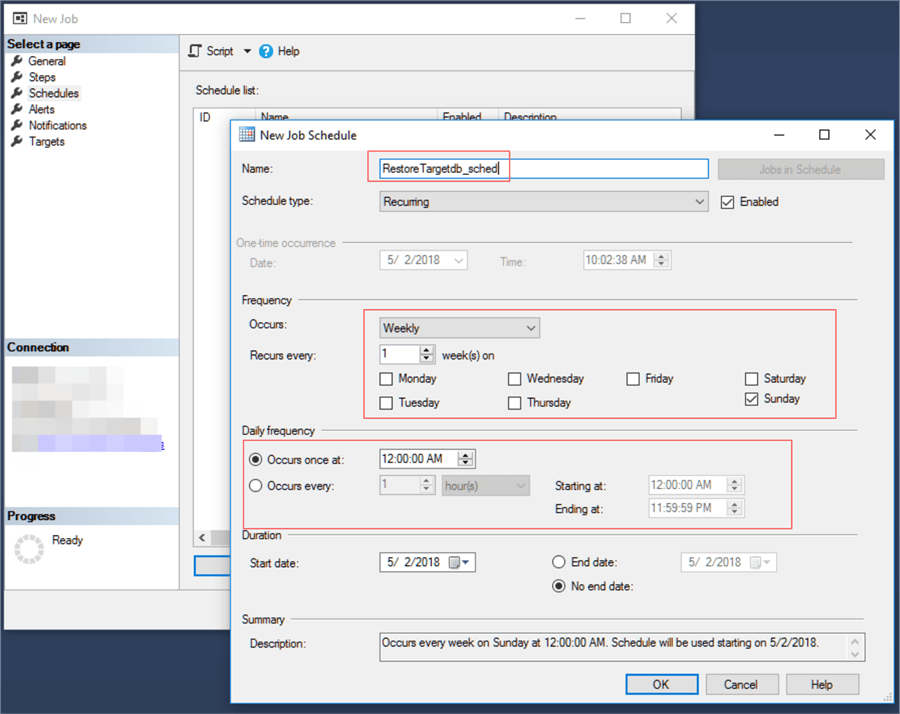
Name it, choose frequency and time and click OK. Then click OK again to save the job.
Run SQL Server Agent Job
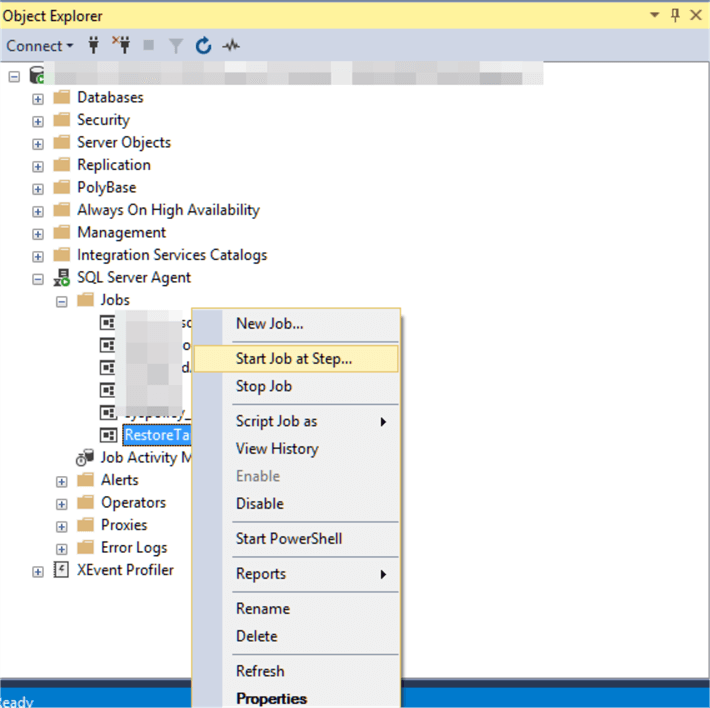
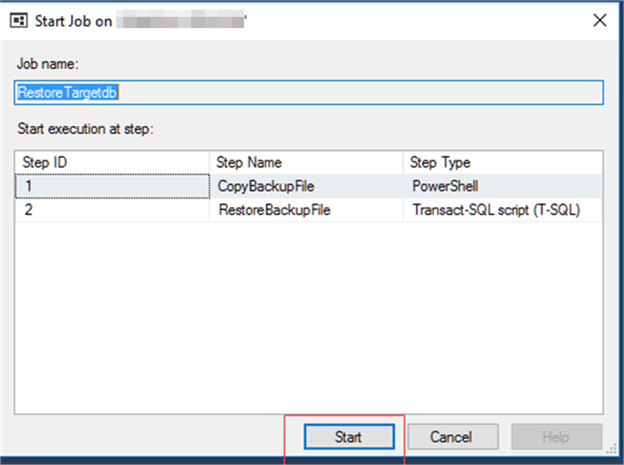
Right click on our new job and choose Start Job at Step…
Then click Start.
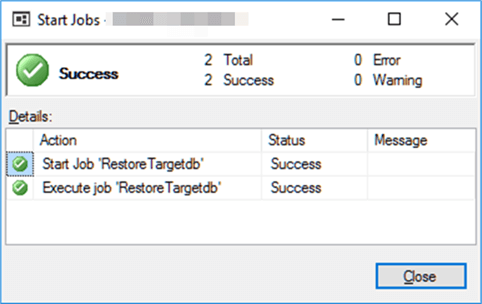
The Start Jobs window should return Success for both Actions.
Verify Process Using SQL Server Error Log
Finally, verify completion by checking out the SQL Server error log.

Next Steps
Now that you have the basic outline of what needs to be done, see if you can this a step further and make this dynamic by passing in just a few parameters.
Here are links to tips with a wealth of information on the topics we covered in this tip:
About the author
 Joe Gavin is from the Greater Boston area. He started working with SQL Server and Sybase in 1998 in the financial services industry and has been a SQL Server Database Administrator for a dairy cooperative since 2011. He graduated from Northeastern University in Boston with a Bachelor of Science in Engineering Technology (BSET) degree in Computer Technology. Joe has spoken at the Boston and Providence SQL Saturday events.
 This author pledges the content of this article is based on professional experience and not AI generated.
View all my tips
Article Last Updated: 2018-05-18


