By: Mohammed Moinudheen | Updated: 2018-08-17 | Comments (7) | Related: > Restore
Problem
We need to restore a database using a backup from a different SQL Server where TDE is enabled for that database. On disabling TDE and then performing a backup, the database backup was copied on to the new SQL Server instance and then restored. The restore failed with this error even though TDE was disabled before performing the database backup on the source server - “Cannot find server certificate with thumbprint '0xA8BE3232B9572D9A57158A7BFE0D69C4A72D589E”. Is there a way by which we can still perform the restore successfully on the new SQL Server instance?
Solution
In order to simulate this error, we can perform a demo by referring to this excellent article authored by Brian Kelly on www.mssqltips.com. In Brian’s article, there is a demo for restoring the database backup of a TDE enabled database from one server to a different server. In our tip, we will perform a couple of demos to complete the process of restoring the database on the destination server. In the first demo, we will just disable TDE and in the next demo, we will also delete the database encryption key associated with the database. The source SQL Server instance is a SQL Server 2016 Developer Edition whereas the destination SQL Server instance is a SQL Server 2017 Developer edition on a different windows server.
Create a TDE Enabled database
For both our demos, we could refer to the scripts that were used in Brian’s article.
Use this script for creating a TDE enabled database on your source server, in our case, it is a SQL Server 2016 Developer Edition. Make sure, you provide correct file paths.
USE [master];
GO

-- Create the database master key to encrypt the certificate
CREATE MASTER KEY
  ENCRYPTION BY PASSWORD = 'FirstServerPassw0rd!';
GO

-- Create the certificate we're going to use for TDE
CREATE CERTIFICATE TDECert
  WITH SUBJECT = 'TDE Cert for Test';
GO

-- Back up the certificate and its private key Remember the password!
BACKUP CERTIFICATE TDECert
  TO FILE = N'C:\SQLBackups\TDECert.cer'
  WITH PRIVATE KEY (
    FILE = N'C:\SQLBackups\TDECert_key.pvk',
  ENCRYPTION BY PASSWORD = 'APrivateKeyP4ssw0rd!'
  );
The following script creates the test database and enables TDE.
-- Create our test database
CREATE DATABASE [RecoveryWithTDE];
GO

-- Create the DEK so we can turn on encryption
USE [RecoveryWithTDE];
GO
CREATE DATABASE ENCRYPTION KEY
  WITH ALGORITHM = AES_256
  ENCRYPTION BY SERVER CERTIFICATE TDECert;
GO

USE [master];
GO

-- Turn on TDE
ALTER DATABASE [RecoveryWithTDE]
  SET ENCRYPTION ON;
GO
Once the above scripts are run, a database [RecoveryWithTDE] gets created and has TDE enabled.
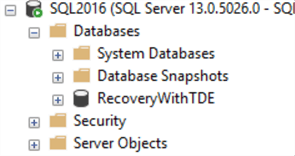
You can confirm TDE is enabled by running this query on the source SQL server.
select name,is_encrypted,* from sys.databases
This query will provide the result as shown. Here it shows that the database [RecoveryWithTDE] is enabled.

Demo 1: Restore the database on destination after disabling TDE on the source database
In this demo, we will perform the following steps to simulate the error.
- Disable TDE for the source database on SQL Server 2016
- Perform a backup of the source database and copy backup to SQL Server 2017
- Restore this database on the destination SQL Server 2017 to generate the error
Disable TDE on the source database
In this step, we will disable TDE on the source database. In order to disable TDE, run this command on the database.
ALTER DATABASE [RecoveryWithTDE]
  SET ENCRYPTION OFF;
GO
Ensure the process has completed by reviewing the SQL Server logs. From the logs, you can confirm that the process has completed.

From the SQL Server logs, we can confirm that the process to disable TDE on the database has completed from this message – “Database encryption scan for database ‘RecoveryWithTDE’ is complete”.
Perform backup of the source database and copy to destination
After confirming that the TDE is disabled, you can start the source database backup. For performing the backup, use this script, update the folder path as required.
BACKUP DATABASE [RecoveryWithTDE]
TO DISK = N'C:\SQLBackups\RecoveryWithTDE_Full.bak';
GO
Once the backup completes, copy the backup across to the other SQL Server. In our case, it is a SQL Server 2017 server.
Restore Database on Destination
In order to restore the database, use this restore command on the destination SQL instance. Update the folder locations appropriately.
RESTORE DATABASE [RecoveryWithTDE]
  FROM DISK = N'C:\SQLBackups\RecoveryWithTDE_Full.bak'
  WITH MOVE 'RecoveryWithTDE' TO N'C:\SQLData\RecoveryWithTDE_2ndServer.mdf',
       MOVE 'RecoveryWithTDE_log' TO N'C:\SQLData\RecoveryWithTDE_2ndServer_log.mdf';
GO
This restore command will fail with the following error – “Cannot find server certificate with thumbprint '0xAF9A21DC478129443FE50F32FAF77DAE7B07EAA3”
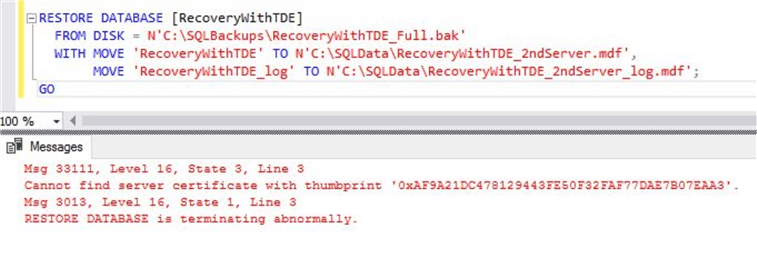
You just noticed that the restore of the database is not possible on a different server even after disabling TDE. This is because the database encryption key that you used before is still existing on the database and SQL server is looking for the certificate that is used for encrypting the database encryption key. In order to complete a successful restore of the database, you need to copy the certificate and the private key that you backed up earlier on the source server to the destination server. However, you need to make sure that a master key is already created on the destination server. If a database master key doesn’t exist on the destination server, you will get this error message when you try to create the certificate.

You can query the sys.symmetric_keys catalog view to confirm if a database master key exists on the SQL Server instance. Output of this catalog view is shown. This is from the source server.

Steps to make restore successful
When I ran the same command on the destination server, it returned only one output and there was no row for database master key.
Run this command to create the database master key on the destination server if it doesn’t exist already.
--Run this on destination server to create the database master key
CREATE MASTER KEY
  ENCRYPTION BY PASSWORD = 'SecondServerPassw0rd!';
GO
Once the database master key is created, you can run the command to create the certificates and the private keys on the destination server. But first, make sure that you copied the certificates and the private key from the source server to the appropriate folders on the destination server. This command will create the certificate and the private key on the destination server. In this demo, the certificate and private key was copied to ‘C:\SQLBackups’ folder on the destination server.
-- Restoring the certificate and the private key on destination server
CREATE CERTIFICATE TDECer
  FROM FILE = N'C:\SQLBackups\TDECert.cer'
  WITH PRIVATE KEY (
    FILE = N'C:\SQLBackups\TDECert_key.pvk',
  DECRYPTION BY PASSWORD = 'APrivateKeyP4ssw0rd!'
  );
GO
After this, try to restore the database again. The restore will complete successfully.
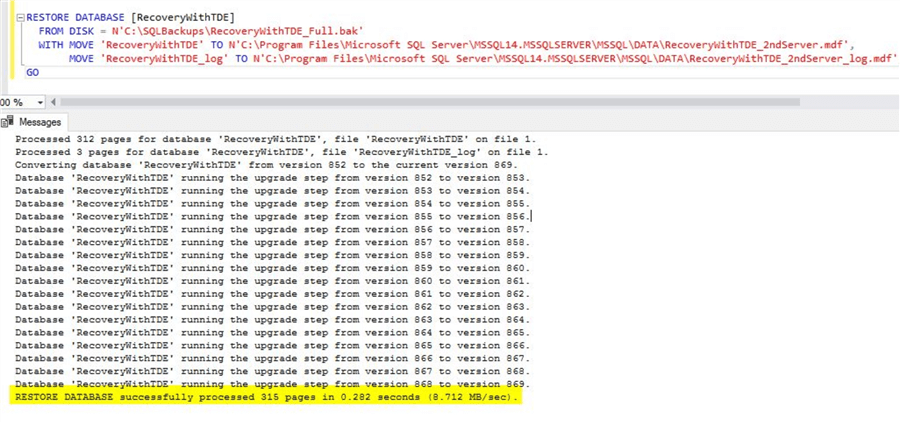
With this method, you were able to successfully restore the database from the source to destination. You can check the status of TDE on the restored database on the destination server by using this command.
SELECT DB_Name(database_id) AS 'Database', encryption_state
FROM sys.dm_database_encryption_keys;

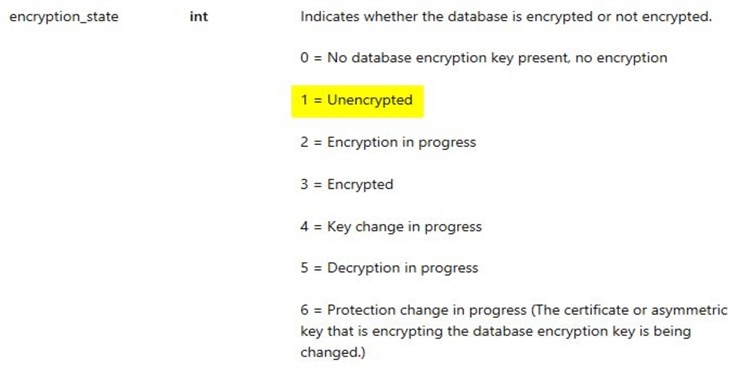
Encryption_state of 1 is “Unencrypted”. You can refer to this link for more details on this view. You can get details on the encryption status from the encryption_state value in this view.
Demo 2: Steps to restore the database after disabling TDE and deleting the database encryption key
First, we will drop the databases on the source and destination servers to start all over again if they were created from demo 1. The master key and certificate already exist on the source server, so we don't need to recreate.
Run this on source server.
-- run on source server
USE [master];
GO

--DROP database so we can start again
DROP DATABASE [RecoveryWithTDE];
GO

-- Create our test database
CREATE DATABASE [RecoveryWithTDE];
GO

-- Create the DEK so we can turn on encryption
USE [RecoveryWithTDE];
GO
CREATE DATABASE ENCRYPTION KEY
  WITH ALGORITHM = AES_256
  ENCRYPTION BY SERVER CERTIFICATE TDECert;
GO

USE [master];
GO
-- Turn on TDE
ALTER DATABASE [RecoveryWithTDE]
  SET ENCRYPTION ON;
GO
Run on destination server.
-- run on destination server
USE [master];
GO

--DROP database so we can start again
DROP DATABASE [RecoveryWithTDE];
GO

-- drop the certificate that was previously created in demo 1
DROP CERTIFICATE TDECert
In the previous demo, you noticed that you had to restore the certificates and private key associated with the source database even after disabling TDE on the source database in order to perform a successful restore of the database on the destination server. In this demo, we will perform the following steps and complete the restore of the database on the destination.
- Disable TDE for the source database on SQL Server 2016
- Drop the source database encryption key on the source database on SQL Server 2016
- Perform a backup of the source database and copy backup to the destination SQL Server 2017
- Restore this database on the destination SQL Server 2017
Disable TDE on the source database
In this step, we will disable TDE on the database. In order to disable TDE, run this command on the database.
ALTER DATABASE [RecoveryWithTDE]
  SET ENCRYPTION OFF;
GO
Drop Database Encryption Key on source
In order to delete the database encryption key, run this script on the source database.
USE [RecoveryWithTDE]
GO
DROP DATABASE ENCRYPTION KEY
This will delete the database encryption key that was still present on the source database.
Perform backup of the source database and copy to destination
Once done, perform a backup of the source database again using the command that was used previously.
BACKUP DATABASE [RecoveryWithTDE]DE]
TO DISK = N'C:\SQLBackups\RecoveryWithTDE_Full.bak'
GO
Copy the backup file over to the destination server.
Restore Database on Destination
On the destination server, perform the restore of the database using the command used previously.
RESTORE DATABASE [RecoveryWithTDE]
  FROM DISK = N'C:\SQLBackups\RecoveryWithTDE_Full.bak'
  WITH MOVE 'RecoveryWithTDE' TO N'C:\SQLData\RecoveryWithTDE_2ndServer.mdf',
       MOVE 'RecoveryWithTDE_log' TO N'C:\SQLData\RecoveryWithTDE_2ndServer_log.mdf';
GO
You will see that the restore command completed successfully.
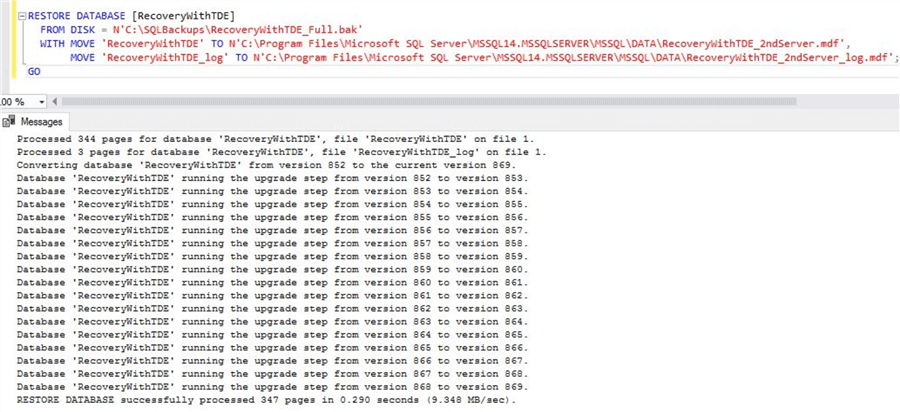
This restore was just like a normal restore from one server to another as you had already disabled TDE on the database and deleted the associated database encryption key.
Next Steps
- In this tip, in the first demo, you saw in detail the steps to follow in order to complete the restore of a SQL database on a different server after disabling TDE.
- In the second demo in the tip, you saw how to complete the restore of a SQL database on a different server after disabling TDE and deleting the database encryption keys.
- Try this tip on your own test environments.
- Just reuse the scripts from this tip on your own test servers.
- As shown in this tip, you could try this tip on a source SQL Server 2016 server and perform the restore on a destination SQL Server 2017 server.
- For more information regarding TDE, you may refer the numerous tips available at this link.
About the author
 Mohammed Moinudheen is a SQL Server DBA with over 6 years experience managing production databases for a few Fortune 500 companies.
This author pledges the content of this article is based on professional experience and not AI generated.
View all my tips
Article Last Updated: 2018-08-17


