By: Koen Verbeeck | Updated: 2018-10-03 | Comments (8) | Related: > Azure Integration Services
Problem
We have an existing business intelligence environment on-premises. We wish to migrate everything to the Azure cloud. Is it possible to deploy our existing Integration Services projects and packages to Azure? How do we set-up a managed environment to run our packages?
Solution
With the release of Azure Data Factory v2, the Integration Runtime (IR) has been introduced. The IR is the compute infrastructure for Azure Data Factory and it allows for several data integration capabilities:
- Data movement between different network environments
- Activity Dispatch
- SSIS package execution
There are three types of Integration Runtime: Azure, Self-Hosted and Azure-SSIS. In this tip we’re interested in the last type. More information about the IR can be found in the documentation.
With the Azure-SSIS IR, we can lift & shift existing SSIS projects and packages to the Azure cloud. There you can natively run your SSIS packages in a managed environment. The Azure-SSIS IR is a managed cluster of Azure VMs where you can execute SSIS packages. With the creation of the IR, you can specify the compute power of a node (scale up) and also how many nodes your cluster will have (scale out).
In the Azure-SSIS, you have access to an Integration Services catalog, just like you have on-premises. You have two options for storing your SSIS catalog:
- An Azure SQL database
- A SQL Server Managed Instance
In this tip, we’re going to configure an Azure-SSIS IR using an Azure SQL database. The advantages of using Azure SQL DB is that it is lightweight and easy to set-up. The disadvantage is that it doesn’t have SQL Server Agent, but Managed Instance does.
Setting Up Azure – SQL Server Integration Services Integration Runtime
Prerequisites
Let’s start with configuring some prerequisites. The first one is creating a new SQL Server instance in Azure. You can use an existing one as well, but it is important there is no existing SSISDB (the database behind the SSIS catalog)! In the Azure Portal, add a new resource and search for SQL Server.

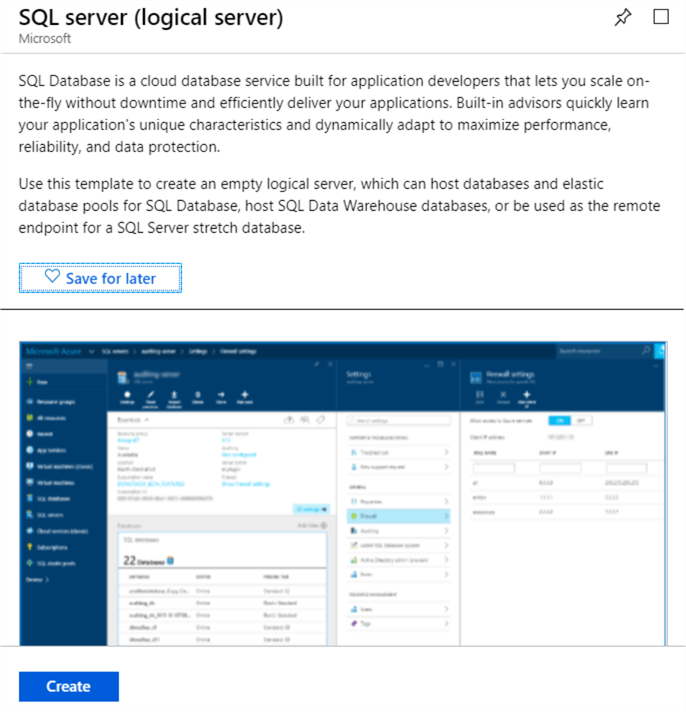
In the results, select SQL Server (logical server).

In the next blade, click Create.

Specify a name for your server (keep in mind that Azure has strict naming guidelines for most objects), an admin account and a resource group. You can either create a new resource group or use an existing one. Choose a location for the server that is relevant to your environment. Important is that the checkbox for “Allow Azure services to access server” is selected, as the Azure Data Factory will need to communicate with the SQL Server instance.

The next prerequisites are certain PowerShell cmdlets:
Follow both links to the documentation on how to install both modules on your machine (make sure the PowerShell interface is launched with administrator privileges).
Configure Azure Data Factory
Now we’re adding an instance of Azure Data Factory to the environment. Create a new resource and in the Analytics section click on Data Factory.

In the New data factory blade, enter a name, choose a subscription and a resource group (the same one as you used for the SQL Server logical server). Make sure to choose version 2 of data factory, as this is needed for the Azure-SSIS IR. Finally, choose the same location as your SQL Server.

After the data factory has been created, click on Author & Monitor in the Overview section. This will launch the Data Factory portal in a separate tab or window in your browser.

In the Azure Data Factory, click on Configure SSIS Integration Runtime.

SQL Server Integration Services Integration Runtime Setup
Specify a name for your IR and a description. Choose the same location as the data factory and SQL Server.

There are several options available for the node size:

In this set-up, we choose the smallest node size for our cluster (to save money) and two as the number of nodes. As edition, Standard is chosen. Only chose Enterprise if you need advanced SSIS features. You can find an overview of those features here. If you already have a valid SQL Server license with software assurance, you can save extra money by using the Azure Hybrid Benefit. Click on Next to go to the next part of the set-up.
Here you configure the database for hosting the SSIS catalog. Choose a subscription and a location (again, the same location we used before). For the Catalog Database Server Endpoint, choose the logical SQL Server we configured (this should be auto-populated). You can either choose to use the admin account with SQL Server authentication, or Windows Authentication.

If you want to use Windows Authentication, addition steps are necessary. Open up the PowerShell IDE and create a new group:

The new group is stored in the &Group variable as we need this later on. First we need to find the service identity ID of the Azure Data Factory. In the Azure Portal, go to the Data Factory and then to the properties section. There you can find the ID. Copy it to the clipboard.

Back in PowerShell, add a new user with the service identity ID to the group we just created.
We can verify the user has been added in Azure AD:

The same information can be checked in PowerShell, where it is clearer we added the Data Factory application to the group:

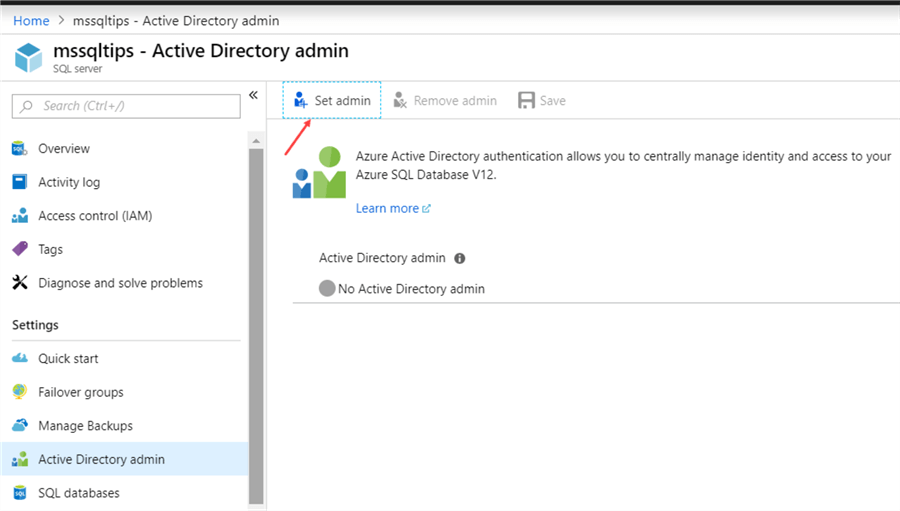
Now we have to add this group to SQL Server. If you haven’t already, set yourself up as an admin to the SQL Server instance. You can do this by going to the SQL Server in the Azure Portal and then by clicking Set Admin in the Active Directory Admin section.

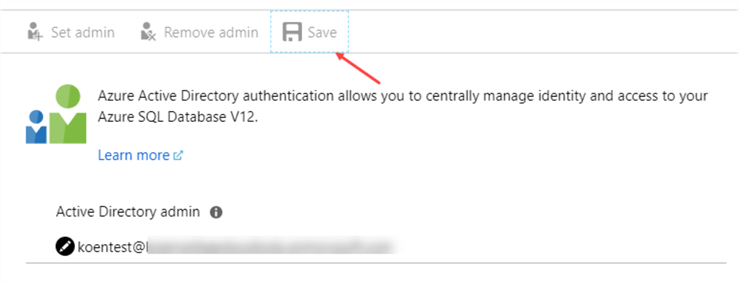
From the list of available users, select a user that will be made admin of the SQL Server logical server:

Don’t forget to click on Save in the previous screen!

With the admin account, log into the SQL Server instance. Choose Active Directory – Password to log in. If you don’t see those options, make sure you upgrade SSMS to the latest version.

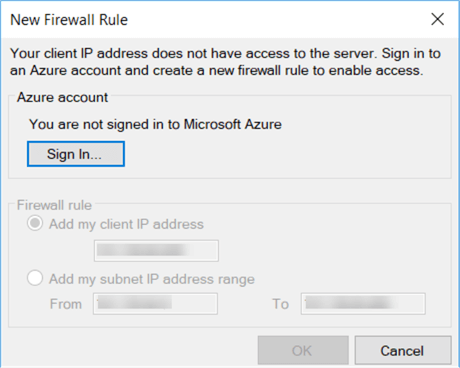
If it’s the first time logging in, it’s possible you have to add your IP address to the firewall:

If you’ve logged in successfully, you should see the master database:

Open up a new query window in the master database and run the following script to add the group to the server:
CREATE USER [SSISIrGroup] FROM EXTERNAL PROVIDER;
Then assign this group to the dbmanager role:
ALTER ROLE dbmanager ADD MEMBER [SSISIrGroup];
This will allow the Data Factory to create the SSISDB database in the Azure SQL Server. If you followed all the steps, you can now choose to use Windows Authentication in the Azure-SSIS IR set-up:

Make sure to test the connection! Click on Next to go to the next part of the configuration. In the advanced settings, you can set-up the number of maximum parallel executions per node. With this setting, you can choose to run a single package with multiple cores (if the number of parallel executions is low), or to run multiple packages within a single core.

For now, we’re going to leave the other options blank. Click on Create to finish the set-up. Keep in mind that this can take quite some time (up to 20-30 minutes)!

During this process, the Azure Data Factory will create the SSISDB, the SSIS catalog and the cluster that will run your SSIS packages. Once the creation is done, you can see the SSISDB when you refresh your connection in SSMS:

To see the Integration Catalog itself, you need to log into the SSISDB with SSMS. In the connection screen, go to Options.

There enter the SSISDB database name in the connection properties:

When you now connect to the Azure SQL database, the SSIS catalog will be shown in the tree:

Keep in mind you need at least version 17.2 of SSMS. When you’re done, don’t forget to stop the Azure-SSIS runtime, since running a scale out SSIS cluster in the cloud can get quite expensive. In the next tips, we’ll explain how you can deploy and execute your SSIS packages in the Azure-SSIS IR.
Next Steps
- Try it out yourself! Follow the steps in this tip to configure your Azure-SSIS IR. If you don’t have a subscription, you can try the trial.
- Stay tuned for more tips about using the Azure-SSIS IR.
- More tips about SSIS and Azure:
About the author
 Koen Verbeeck is a seasoned business intelligence consultant at AE. He has over a decade of experience with the Microsoft Data Platform in numerous industries. He holds several certifications and is a prolific writer contributing content about SSIS, ADF, SSAS, SSRS, MDS, Power BI, Snowflake and Azure services. He has spoken at PASS, SQLBits, dataMinds Connect and delivers webinars on MSSQLTips.com. Koen has been awarded the Microsoft MVP data platform award for many years.
This author pledges the content of this article is based on professional experience and not AI generated.
View all my tips
Article Last Updated: 2018-10-03


