By: Koen Verbeeck | Updated: 2018-10-31 | Comments (5) | Related: > Azure Integration Services
Problem
With the release of Azure Data Factory v2, it is possible to lift & shift your existing Integration Services project to the Azure Cloud. The packages are stored in an SSIS catalog, just like in an on-premises environment, and are executed in the Azure-SSIS Integration Runtime. In this tip, we’ll explain how you can deploy, execute and schedule your SSIS packages in the Azure cloud.
Solution
In the tip Configure an Azure SQL Server Integration Services Integration Runtime, it explained how you can set-up and configure your Azure-SSIS IR in the Azure cloud, using an Azure SQL database to host the SSISDB database. If you haven’t read that tip yet, it is recommended to do so since the examples in this tip will continue to use that set-up.
Deploying your SSIS Project to the Azure-SSIS IR
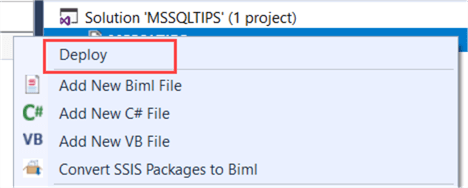
After you have finished creating and debugging your SSIS packages in SQL Server Data Tools, you need to deploy your project to the SSIS catalog. Deploying to a catalog in the Azure cloud is no different than deploying to your on-premises server. Right-click the project in Visual Studio and choose Deploy.

The deployment wizard will start and after validating your project (for example checking if the project and all the packages have the same protection level), it will ask you to which server to deploy the project.

Enter the name of the database server hosting your SSIS catalog. When in doubt, you can find it in the Azure Portal. Go to your SQL Server instance and to the properties section:

Depending on your set-up, you can use different authentication mechanisms:

It’s possible users with two-factor authentication (MFA) have issues authenticating through the wizard. In that case, use a service account without MFA to deploy your projects. After authenticating and connecting to the catalog, you need to choose a folder to deploy your project to. In the next step, the project is validated to check if there are issues deploying to Azure Data Factory. For normal SSIS projects, several warnings can be returned, as you can see in the screenshot:

Most warnings deal with windows authentication (which might break if deployed to the cloud) and referring to on-premises host names (which might not resolve when running the package in the cloud). In the last step, you can review everything and start the deployment.

After deployment, you can connect to the SSIS catalog with SSMS as described in the tip Configure an Azure SQL Server Integration Services Integration Runtime.

Some remarks about deploying SSIS project to the Azure-SSIS IR:
- You can also use other deployment methods, such as the wizard in SSMS or PowerShell. More info and examples can be found in the tutorial Deploy and run a SQL Server Integration Services (SSIS) package in Azure.
- You cannot deploy individual packages to the IR. The catalog in Azure only supports the project deployment model (like in SQL Server 2012/2014).
Executing a Package in the Azure-SSIS IR
Just like deploying a project, executing a package is the same as in your normal projects. In the catalog, you can right-click any package and choose Execute.

Here you can configure additional properties, like the environment, the logging level, connections, parameters et cetera.

When hitting OK, an execution will be created and started on one of the nodes of your Azure-SSIS IR. You don’t have any control over which node is selected, so the Azure-SSIS IR sort of functions as a load balancer. When the package has started, you have the option to open a monitor report in SSMS. More information about the build-in catalog reports can be found in the tip Reporting with the SQL Server Integration Services Catalog.
Some remarks about executing packages:
- Depending on where the source data comes from (or where you want to write data or perform tasks), you might have to do some additional set-up. Connecting to cloud sources within the same tenant is usually not a problem, but for example for connecting to an on-premises database you need to set up a virtual network.
- There are other methods of starting a package in the Azure-SSIS IR, such as using the SSISDB stored procedures, PowerShell or an Execute SSIS Package task in an ADF v2 pipeline.
Scheduling Packages in the Azure-SSIS IR
Every tool that can schedule the execution of a stored procedure (for example the ones in the SSISDB catalog), can schedule an SSIS package. You can use PowerShell and any of the automation features in Azure (such as elastic jobs for example). The most used (and commonly known) option to schedule SSIS packages is SQL Server Agent. There are three options for using SQL Server Agent to schedule your packages in the Azure-SSIS IR:
- You have a managed SQL Server instance in Azure. Such an instance has a full-blown SQL Server Agent and you can use it to schedule SSIS packages like you have always done.
- You use the SQL Server Agent of an on-premises SQL Server instance, if you have any. In this case, you have to set-up a linked server. More information can be found in the article Schedule the execution of SQL Server Integration Services (SSIS) packages deployed in Azure.
- If you have an Azure SQL database hosting the SSIS catalog, you can use SSMS (version 17.7 or higher) to schedule your packages. It has a lightweight SQL Server Agent which you can use to configure the schedule. Behind the scenes, it creates an ADF v2 pipeline with a trigger.
In this tip, we’ll explore the last option a bit more. Right-click the package you want to schedule and choose Schedule…

This will open a schedule editor with the look and feel of SQL Server Agent:

In the package pane, you can configure the logging level, the runtime bitness and the retry attempts. If there are environments configured in the catalog, you can choose them there as well.

In the schedule pane, you can configure the schedule just as you can with SQL Server Agent.

When you hit OK, an ADF pipeline will created with the Execute SSIS Package activity. This pipeline will have a trigger corresponding with the schedule you just configured:

You can also inspect the trigger. Hit the little play button in the right top corner.

There you can view the existing triggers and add new ones if you want to.

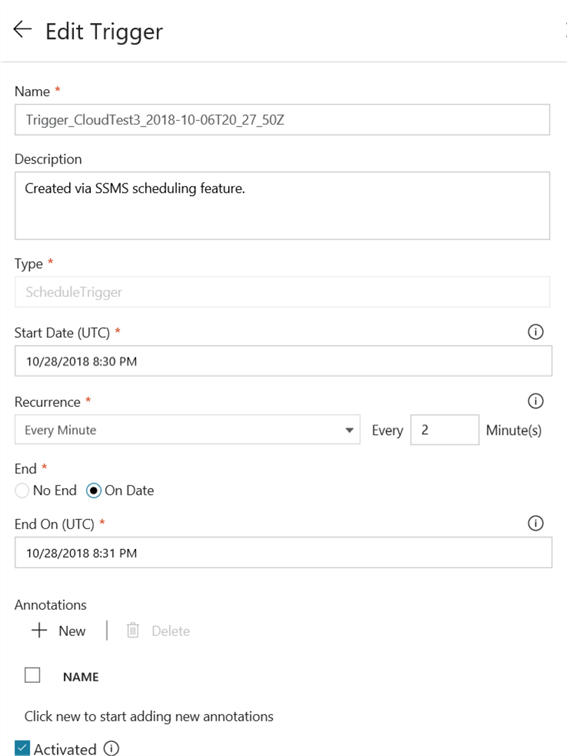
Clicking the existing trigger will bring you to an edit page.

When the trigger is executed, the pipeline will run the Execute SSIS Package activity, which will execute the SSIS package on one of the nodes of the Azure-SSIS IR. So make sure it is running at the time of the schedule!
Some remarks about scheduling:
- When you right-click the same package again to schedule it, the wizard will not edit the current pipeline and trigger, but rather create a new pipeline with corresponding trigger. If you want to edit a schedule, either remove the old pipeline or modify its trigger.
- In the current release, there’s a small bug when you configure the schedule with a catalog environment. The Execute SSIS Package activity expects the path of the environment with a forward slash, for example myfolder/myenvironment. However, the scheduling wizard creates the activity with an environment reference using a backslash, which will error out with the error "Invalid environment path format" when the pipeline runs. For the moment, you can work around this by manually changing the backslash into a forward slash.
- If you get the following error when trying to schedule a package, you might want to retry restarting SSMS and making sure the IR is up and running.

Next Steps
- If you haven’t already, check out the tip Configure an Azure SQL Server Integration Services Integration Runtime for how to set up your Azure-SSIS IR environment.
- If you want to try it out yourself, you can get a free Azure trial here.
- You can find more Azure tips in this overview.
About the author
 Koen Verbeeck is a seasoned business intelligence consultant at AE. He has over a decade of experience with the Microsoft Data Platform in numerous industries. He holds several certifications and is a prolific writer contributing content about SSIS, ADF, SSAS, SSRS, MDS, Power BI, Snowflake and Azure services. He has spoken at PASS, SQLBits, dataMinds Connect and delivers webinars on MSSQLTips.com. Koen has been awarded the Microsoft MVP data platform award for many years.
This author pledges the content of this article is based on professional experience and not AI generated.
View all my tips
Article Last Updated: 2018-10-31


