By: Eduardo Pivaral | Updated: 2018-12-12 | Comments (1) | Related: More > Database Administration
Problem
If you work with SQL Server, it is very likely you have a lot of custom scripts you execute frequently. Maybe you have stored them in a folder and you open them manually as you need them or have a custom solution to load them when you load your favorite IDE. If you already have your IDE open and want to use a block of T-SQL code without opening your script files or you need to access them quickly, you need a way to load pieces of code into the IDE, this is where code snippets come into play.
Solution
Code Snippets, are blocks of reusable code that can be loaded into your work environment via a menu or a combination of hotkeys. There are several applications where you can use snippets (SSMS, VS, SSDT, Azure Data Studio to name some). Each application has a lot of built-in snippets with common code sets that you can use by default, but in this tip, we will learn how to load frequently used T-SQL code via snippets as needed. We will use Azure Data Studio IDE for this tip.
Loading Default Snippets in Azure Data Studio
If you have not used the default snippets yet, the following is the way to load them in an open document.
In a new query window, just type SQL and the list will open, after that you just must navigate with the UP/DOWN arrows to locate the snippet you want to load.
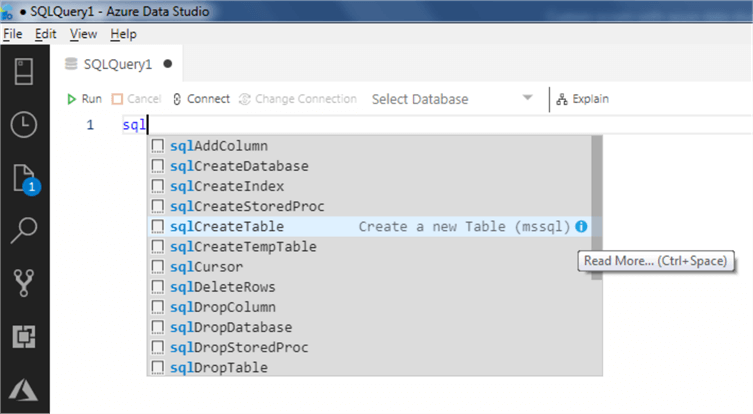
Select the item you want to load, and press ENTER, and the code snippet will load into the window:

Then just must replace the default values with the values you want.
Creating Custom Code Snippets
Go to View > Command Palette…
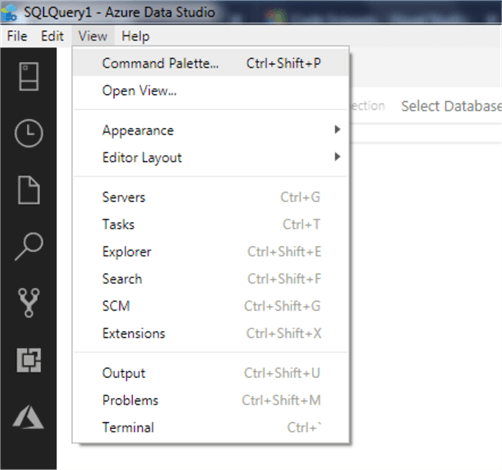
In the new open window type snippet, and select Preferences: Configure User Snippets

Type or locate SQL and click on it:

If you don’t have custom snippets defined, a new sql.json window will open with commented code that you can edit:

The basic template to add a new snippet is:
"<name of the snippet>": {
"prefix":"<sqlNameOfthePrefix>",
"body":[
"<your T-SQL code line 1 ${1:DefaultValue1}>",
"<your T-SQL code line 2 ${2:DefaultValue2}>"
"<your T-SQL code line N>"
],
"description":"<Snippet description>"
}
You can add the number of snippets you want separating each by commas.
For this tip, let's add 2 custom snippets. For the first snippet we will update all statistics on any given table:
UPDATE STATISTICS <table name>;
GO
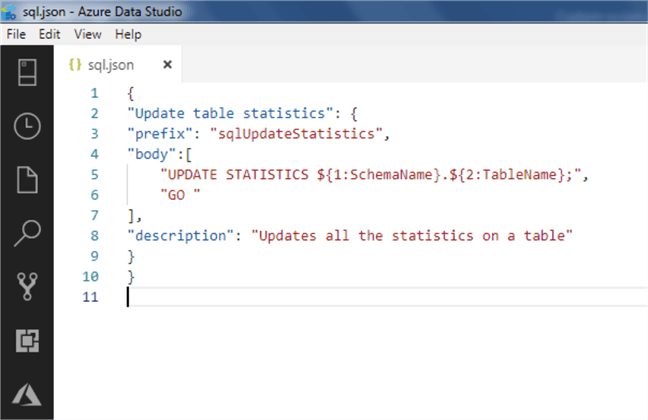
Our first snippet will look like this:
{
"Update table statistics": {
"prefix":"sqlUpdateStatistics",
"body":[
"UPDATE STATISTICS ${1:SchemaName}.${2:TableName};",
"GO "
],
"description":"Updates all the statistics on a table"
}
}
Note that the variables are Schema Name and Table name, indicated by a ${n:defaultValue} so they are highlighted when you insert it in your code.
And the SQL.JSON file will look like this at this point:
We will add a second snippet, this time to verify the status of a running Extended Event. The T-SQL code is this:
SELECT
 ES.name,
 iif(RS.name IS NULL, 0, 1) AS running
FROM sys.dm_xe_sessions RS
RIGHT JOIN sys.server_event_sessions ES ON RS.name = ES.name
WHERE es.name = '<YOUR XE SESSION NAME>'
So, the code for our second snippet will be this:
"Extended Event Status": {
"prefix":"sqlXEStatus",
"body":[
"SELECT ",
"ES.name, ",
"iif(RS.name IS NULL, 0, 1) AS running ",
  "FROM sys.dm_xe_sessions RS ",
  "RIGHT JOIN sys.server_event_sessions ES ON RS.name = ES.name ",
  "WHERE es.name = '%${1}%'"
],
"description":"Show the status for any extended event"
}
For this one we did not define a default value for text to search, so this will check all your XE sessions.
Our SQL.JSON code looks like this:
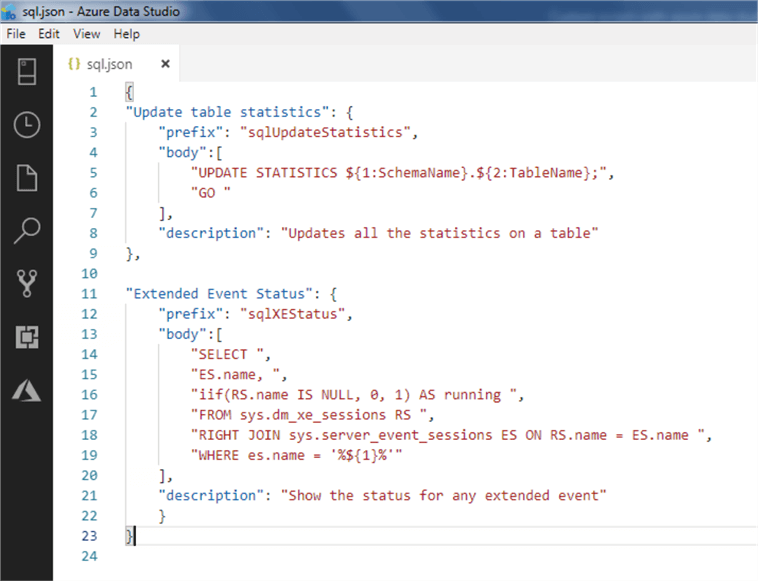
And this is the code:
{
"Update table statistics": {
    "prefix": "sqlUpdateStatistics",
    "body":[
        "UPDATE STATISTICS ${1:SchemaName}.${2:TableName};",
        "GO "
    ],
    "description": "Updates all the statistics on a table"
},

"Extended Event Status": {
    "prefix": "sqlXEStatus",
    "body":[
        "SELECT ",
        "ES.name, ",
        "iif(RS.name IS NULL, 0, 1) AS running ",
        "FROM sys.dm_xe_sessions RS ",
        "RIGHT JOIN sys.server_event_sessions ES ON RS.name = ES.name ",
        "WHERE es.name = '%${1}%'"
    ],
    "description": "Show the status for any extended event"
    }
}
Now, just save it and it is ready to test in a new query window.
Testing the Custom Code Snippets in Azure Data Studio
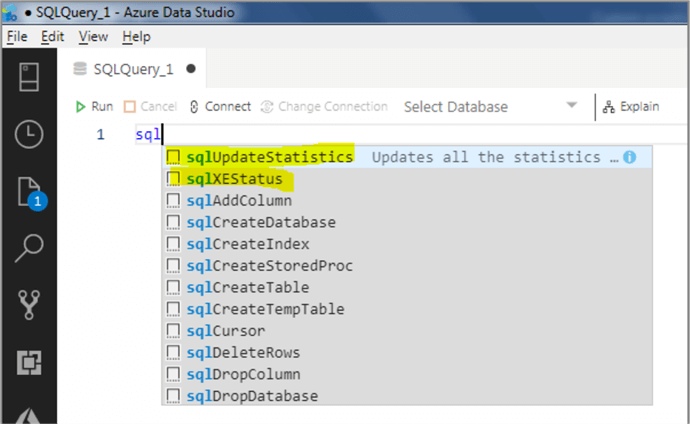
As with the default snippets, just open a new query window and type sql, the 2 new snippets will show in the list:
Select one of them to load into your query window:

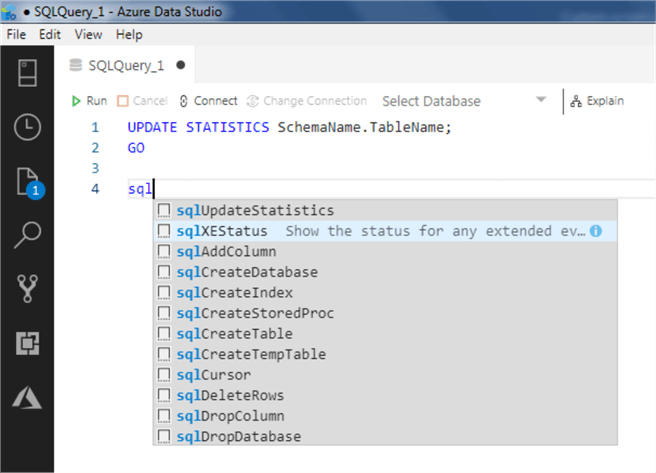
We can type sql again to load the second one:
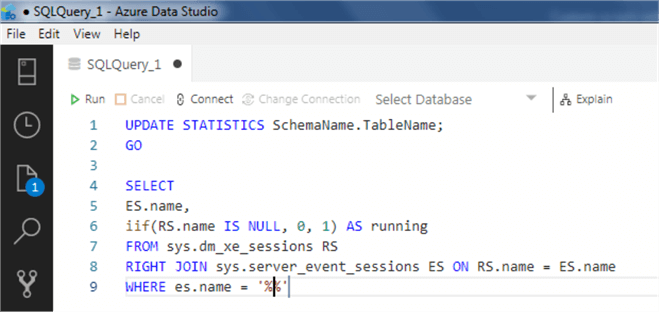
We can see the code loaded in our environment:
Advanced Options for Code Snippets
In the previous two examples, we showed some basic options for the snippets, but you can customize them even more. I will show you some other options you can make.
Let’s go back to our first custom snippet. The table statistics update with the defaults, but you can customize the code to allow sample size and by percent or rows. Let’s go back to the SQL.JSON file and replace the update table statistics snippet with this code:
"Update table statistics": {
"prefix":"sqlUpdateStatistics",
"body":[
"UPDATE STATISTICS ${1:<Schema>}.${2:<Table>} WITH SAMPLE ${3:100} ${4|PERCENT,ROWS|};",
"GO "
],
"description":"Updates all the statistics on a table"
}
The ${3:100} variable puts the value of 100 by default, and the ${4|PERCENT,ROWS|} allows you to choose between the two values of PERCENT or ROWS when inserted, to specify more values, you must separate it by commas.
If we save the updated file and then load in a new query window and insert the snippet again, we can see how these options work:

We can see that the default value of 100 is in place and we can choose between 2 values of PERCENT and ROWS.
For our last example we will use the database consistency check (DBCC) function.
Open the SQL.JSON file and add the following snippet to the end:
"Database Consistency check": {
"prefix":"sqlDBCC",
"body":[
"DBCC ${1|CHECKDB,CHECKALLOC,CHECKCATALOG|}(${2:DBNAME}) ${3| ,WITH NO_INFOMSGS|};",
"GO "
],
"description":"Perform Database consistency check tasks"
}
- The first variable ${1|CHECKDB,CHECKALLOC,CHECKCATALOG|} will allow you to choose between CHECKDB, CHECKALLOC and CHECKCATALOG.
- The second variable ${2:DBNAME} is to enter the database name to check.
- The third variable will let you choose if you want the WITH NO_INFOMSGS option or an empty string at the end.
Your code with the 3 snippets should look like this:
{
    "Update table statistics": {
        "prefix": "sqlUpdateStatistics",
        "body":[
            "UPDATE STATISTICS ${1:<Schema>}.${2:<Table>} WITH SAMPLE ${3:100} ${4|PERCENT,ROWS|};",
            "GO "
        ],
        "description": "Updates all the statistics on a table"
    },

    "Extended Event Status": {
    "prefix": "sqlXEStatus",
    "body":[
        "SELECT ",
        "ES.name, ",
        "iif(RS.name IS NULL, 0, 1) AS running ",
        "FROM sys.dm_xe_sessions RS ",
        "RIGHT JOIN sys.server_event_sessions ES ON RS.name = ES.name ",
        "WHERE es.name = '%${1}%'"
    ],
    "description": "Show the status for any extended event"
    },

    "Database Consistency check": {
        "prefix": "sqlDBCC",
        "body":[
            "DBCC ${1|CHECKDB,CHECKALLOC,CHECKCATALOG|}(${2:DBNAME}) ${3| ,WITH NO_INFOMSGS|};",
            "GO "
        ],
        "description": "Perform Database consistency check tasks"
    }

}
Save the SQL.JSON file and open a new query window to test it.
If you type dbcc the snippet will also load:

The first option is to select the dbcc command to run with the checkdb as default:

Then we can put the database name to check:
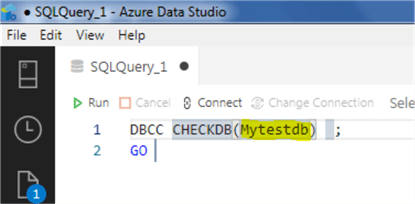
If we press Tab again, we can select if we want to include WITH NO_INFOMSGS or not:

And this will be the result:

You can load any number of custom T-SQL queries you use frequently using Azure Operations Studio.
Next Steps
- You can enforce programming conventions in your development team by using snippets (for example: author, date of creation, changes done, object naming, or datatypes to use).
- More complex procedures can be added as well.
- Check Azure data studio official documentation here.
- Check the official Visual Studio Code documentation for Snippets documentation here.
- If you prefer SSMS, you can check this tip on how to load custom snippets here.
About the author
 Eduardo Pivaral is an MCSA, SQL Server Database Administrator and Developer with over 15 years experience working in large environments.
 This author pledges the content of this article is based on professional experience and not AI generated.
View all my tips
Article Last Updated: 2018-12-12


