By: Sergey Gigoyan | Updated: 2018-12-17 | Comments (2) | Related: More > Database Administration
Problem
Sometimes it's necessary to move SQL Server tables between filegroups or create a copy of a table in a different filegroup. Reasons for having a copy of a table in a different filegroup could be for archiving historical data, using a copy of the table for reporting or for testing purposes. In this tip we will look at both scenarios and how it can be done using T-SQL.
Solution
This article will show methods of copying tables to another filegroup in SQL Server 2016/2017 and in older versions of SQL Server. It will also show how to use SELECT…INTO in SQL 2016 ((13.x) SP2) and 2017 to create tables in a different filegroup.
To illustrate the solution, a test environment is needed, so let's start with the creation of a test database.
Creating the test environment
The script below creates the TestDB database with two tables – UserData and UserLog that stores login information. Both of these tables will be place in the default (primary) filegroup.
USE master
GO

 --Database
CREATE DATABASE TestDB
GO

USE TestDB
GO

--Tables
CREATE TABLE UserData
(
  UserID INT NOT NULL,
  LoginName NVARCHAR(50),
  PRIMARY KEY (UserID)
)
GO

CREATE TABLE UserLog
(
  UserLogID INT NOT NULL IDENTITY(1,1),
  UserID INT NOT NULL,
  LoginDate DATETIME DEFAULT GETDATE(),
  PRIMARY KEY (UserLogID)
)
GO

--Data
INSERT INTO UserData(UserID,LoginName)
VALUES(1,'[email protected]'),
      (2,'[email protected] '),
      (3,'[email protected]'),
      (4,'[email protected]')

INSERT INTO UserLog(UserID)
VALUES(1),(2)

WAITFOR DELAY '00:00:10'

INSERT INTO UserLog(UserID)
VALUES(1),(3),(4)

WAITFOR DELAY '00:00:10'

INSERT INTO UserLog(UserID)
VALUES(2),(3),(1)
Now, we'll create a new filegroup to store historical data related to user logins. In other words, the UserData table (or some filtered data from that table) should be moved to a new filegroup.
So, let's create a new filegroup.
USE master
GO

ALTER DATABASE TestDB ADD FILEGROUP HISTORY
ALTER DATABASE TestDB
ADD FILE
(
NAME='History_Data',
FILENAME = 'D:\Microsoft SQL Server\MSSQL14.MSSQLSERVER\MSSQL\DATA\TesDB_2.mdf'
)
TO FILEGROUP HISTORY
GOGO
Running the query below, we can see that we have two filegroups for the database.
USE TestDB
GO

SELECT * FROM sys.filegroups

However, both tables in our database are in the PRIMARY filegroup:
USE TestDB
GO

SELECT o.[name] AS TableName, i.[name] AS IndexName, fg.[name] AS FileGroupName
FROM sys.indexes i
INNER JOIN sys.filegroups fg ON i.data_space_id = fg.data_space_id
INNER JOIN sys.all_objects o ON i.[object_id] = o.[object_id]
WHERE i.data_space_id = fg.data_space_id AND o.type = 'U'

Now, suppose we have a task to move the UserLog table to the HISTORY filegroup.
Moving a SQL Server table with data to a different filegroup
Moving table with a clustered index
One solution to move a table to another filegroup is by dropping the clustered index and using the MOVE TO option as follows. We can see the IndexName in the above screenshot.
USE TestDB
GO

ALTER TABLE UserLog
DROP CONSTRAINT PK__UserLog__7F8B815172CE9EAE WITH (MOVE TO HISTORY)
As one of our readers pointed out, if we want to keep a clustered index on the table, we could use the following method. This will drop the existing clustered index and create a new clustered index in the specified filegroup without having to create the clustered index in separate step.
USE TestDB
GO

CREATE UNIQUE CLUSTERED INDEX PK__UserLog__7F8B815172CE9EAE ON UserLog (UserLogID)
    WITH (DROP_EXISTING = ON)
    ON HISTORY
We can now run this query to see which filegroup is being used.
USE TestDB
GO

SELECT o.[name] AS TableName, i.[name] AS IndexName, fg.[name] AS FileGroupName
FROM sys.indexes i
INNER JOIN sys.filegroups fg ON i.data_space_id = fg.data_space_id
INNER JOIN sys.all_objects o ON i.[object_id] = o.[object_id]
WHERE i.data_space_id = fg.data_space_id AND o.type = 'U'
We can see the UserLog table is now in the HISTORY filegroup. However, the table no longer has a clustered index. If you need a clustered index, you would need to create one for the UserLog table.

Moving table without a clustered index
If we do not have a clustered index on the table, we can create a clustered index and specifying which filegroup to use.
For instance, if we want to move the UserLog table that we just moved to the HISTORY filegroup back to the PRIMARY filegroup, we could issue the following command.
USE TestDB
GO

CREATE UNIQUE CLUSTERED INDEX UIX_UserLogID
ON UserLog(UserLogID) ON [PRIMARY]
Run the following again.
USE TestDB
GO

SELECT o.[name] AS TableName, i.[name] AS IndexName, fg.[name] AS FileGroupName
FROM sys.indexes i
INNER JOIN sys.filegroups fg ON i.data_space_id = fg.data_space_id
INNER JOIN sys.all_objects o ON i.[object_id] = o.[object_id]
WHERE i.data_space_id = fg.data_space_id AND o.type = 'U'
We can see the UserLog table is back in the PRIMARY filegroup and has an index.

If we do not need the clustered index, we would need to run additional code to drop it as follows.
USE TestDB
GO

DROP INDEX UserLog.UIX_UserLogID
Hence, if we are moving a heap to another filegroup, we first need to create a clustered index in order to move it to another filegroup and then we could drop the clustered index.
Creating a Copy of a SQL Server Table and Data on Different Filegroup
What if we don't want to move the table, but just create a copy in another filegroup.
Prior to SQL Server 2016 SP2
We could do this as follows where we use SELECT INTO, then create a clustered index and specify the filegroup, then drop the clustered index if we don't want the clustered index.
USE TestDB
GO

SELECT * INTO UserLogHistory FROM UserLog

CREATE UNIQUE CLUSTERED INDEX UIX_UserLogID
ON UserLogHistory(UserLogID) ON [HISTORY]

DROP INDEX UserLogHistory.UIX_UserLogID
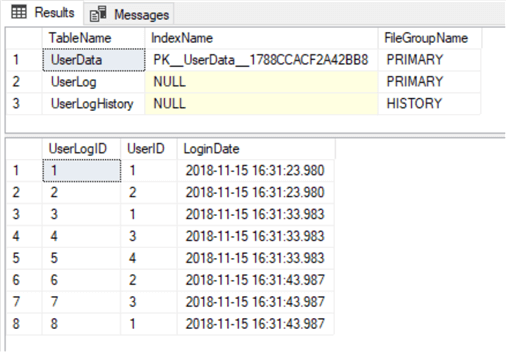
As a result, we have a new table UserLogHistory in the HISTORY filegroup:
USE TestDB
GO

SELECT o.[name] AS TableName, i.[name] AS IndexName, fg.[name] AS FileGroupName
FROM sys.indexes i
INNER JOIN sys.filegroups fg ON i.data_space_id = fg.data_space_id
INNER JOIN sys.all_objects o ON i.[object_id] = o.[object_id]
WHERE i.data_space_id = fg.data_space_id AND o.type = 'U'

SELECT * FROM UserLogHistory

SQL Server 2016 SP2 and later
Starting with SQL Server 2016 SP2, SELECT…INTO allows you to specify a filegroup when creating the new table.
USE TestDB
GO

-- Create copy of the table and all data in different filegroup
SELECT * INTO UserLogHistory1 ON HISTORY
FROM UserLog
We can also use a WHERE clause to minimize the amount of data we want to move to the new table.
USE TestDB
GO

-- Create copy of the table and filtered data in different filegroup
SELECT * INTO UserLogHistory2 ON HISTORY
FROM UserLog
WHERE LoginDate > '2018-11-15 16:31:33.983'
To create an empty table in another filegroup we can set the WHERE clause in such a way to not return any data.
USE TestDB
GO

--Creating the copy of table without data
SELECT * INTO UserLogHistory3 ON HISTORY
FROM UserLog
WHERE 1=4
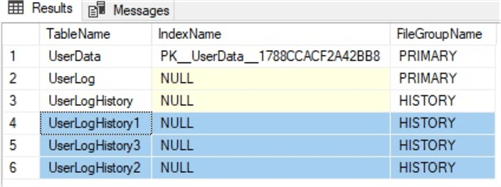
Now we have 3 new tables in the HISTORY filegroup:
USE TestDB
GO

SELECT o.[name] AS TableName, i.[name] AS IndexName, fg.[name] AS FileGroupName
FROM sys.indexes i
INNER JOIN sys.filegroups fg ON i.data_space_id = fg.data_space_id
INNER JOIN sys.all_objects o ON i.[object_id] = o.[object_id]
WHERE i.data_space_id = fg.data_space_id AND o.type = 'U'

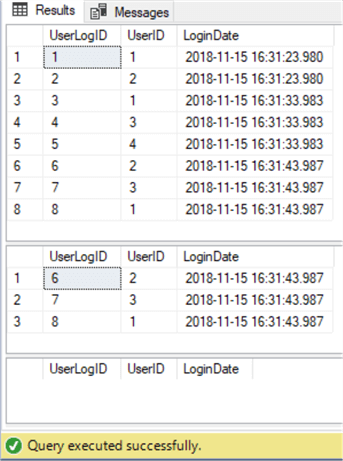
The data in the first table is the same as the source table, the second table is filtered according to the criteria in the WHERE clause and the third is an empty table.
USE TestDB
GO

SELECT * FROM UserLogHistory1
SELECT * FROM UserLogHistory2
SELECT * FROM UserLogHistory3

Conclusion
To sum up, these are different ways to copy tables between filegroups. The new feature, SELECT…INTO in SQL Server 2016 SP2 and later facilitates this process by making it more flexible.
Next Steps
You can find additional information about this topic below:
- https://docs.microsoft.com/en-us/sql/t-sql/queries/select-into-clause-transact-sql?view=sql-server-2017
- https://docs.microsoft.com/en-us/sql/relational-databases/indexes/move-an-existing-index-to-a-different-filegroup?view=sql-server-2017
- https://docs.microsoft.com/en-us/sql/relational-databases/databases/database-files-and-filegroups?view=sql-server-2017
- https://docs.microsoft.com/en-us/sql/t-sql/statements/drop-index-transact-sql?view=sql-server-2017
About the author
 Sergey Gigoyan is a database professional with more than 10 years of experience, with a focus on database design, development, performance tuning, optimization, high availability, BI and DW design.
This author pledges the content of this article is based on professional experience and not AI generated.
View all my tips
Article Last Updated: 2018-12-17


