By: John Miner | Updated: 2019-01-18 | Comments | Related: > Azure
Problem
The human race has been saving valuables in either chests or vaults for many centuries. Here are some stories about mishaps to stored valuables in the past.
One famous ship wreck was the Akerendam, a sail ship of the Dutch East India Company (VOC). It sank with 19 chests of silver and gold in 1725 after encountering a winter snow storm. The majority of the gold was recovered years later in 1972 off the Norwegian West Coast.
The most famous bank robbery was Banco Central Burglary in 2005. The gang spent three months digging a tunnel that was 256 feet long. During one weekend in August, the gang broke through the reinforced concrete bank vault to extract 3.5 tons of Brazilian notes with an estimated value of 70 million dollars.
It is not surprising that people use key vaults to save our important computer information or secrets. How can we leverage Azure Key Vault to save our valuable secrets?
Solution
The PowerShell scripting language has cmdlets that can be used to manage the Azure Key Vault. The key vault has the following enterprise features: access control lists to ensure correct usage, firewalls & virtual networks to reduce access points and alerting & monitoring to keep an eye on changes.
Business Problem
Our boss has asked us to learn how to manage an Azure Key Vault to save secrets used by our business processes that deal with SQL Server. The vault can be used to save keys, secrets and certificates. In this proof of concept, we are going to learn how save and retrieve secrets from a key vault. To wrap things up, we will learn out how to give access to the correct users.
Creating Vaults
This article assumes you already have an Azure subscription and know how to log into the portal. I am going to continue working with the resource group named rg4wwi2.
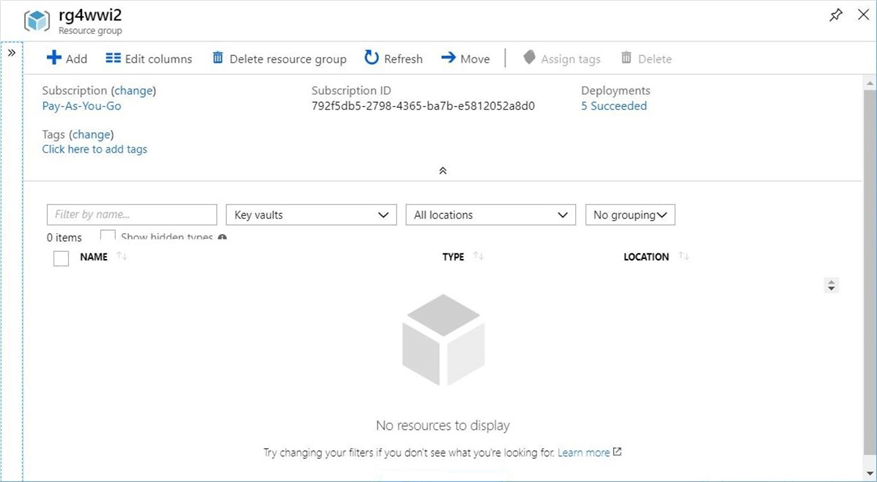
There are two ways to create the key vault: one way is to use the Azure Portal, and the other is to write and execute a PowerShell script. The image below shows the resource group viewed from the Azure Portal and filtered by key vaults resource type.
To date, there are no existing vaults in this resource group.
We can use the new command from the dashboard menu to create the vault. Search the Azure Market Place for Key Vault. Choose the create button on the informational screen.
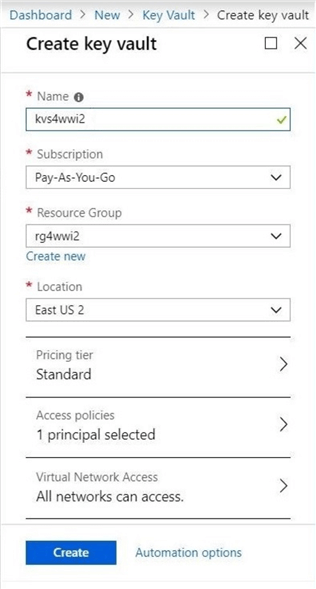
The next step is to fill in the blanks of the dialog box. Choices such as object name, subscription, resource group, location and pricing tier need to be decided. By default, the user creating the object will be the owner. The screen shot below shows the key vault named kvs4wwi2 being deployed into the rg4wwi2 resource group.
After some time, you will be notified that the requested vault was successfully deployed.
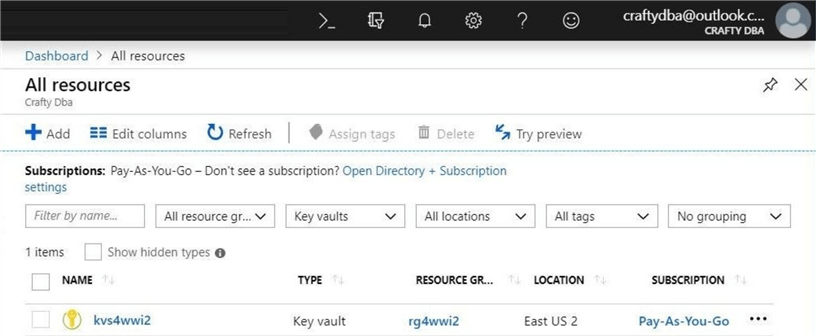
If we perform a search of all resources, we can see that the kvs4wwi2 key vault was deployed to the East US 2 region.
To make this section complete, let us deploy the key vault again using a Power Shell Script.
The first task is to log into the subscription using an account and password. The Add-AzureRmAccount cmdlet can be used to accomplish this task.
# # 1 Log into Azure # # Prompts you for azure credentials Add-AzureRmAccount
After a successful login, information about your subscription is displayed in the output window of the PowerShell Interactive Scripting Environment (ISE).

The second task is to create the resource group named rg4wwi2 if it does not exist. Most azure resources have the three basic cmdlets to create, list and delete the named object. See the table below for details related to resource groups cmdlets.
| No | Description | Link |
|---|---|---|
| 1 | List any existing resource groups. | Get-AzureRmResourceGroup |
| 2 | Create a new resource group. | New-AzureRmResourceGroup |
| 3 | Delete an existing resource group. | Remove-AzureRmResourceGroup |
Be careful with the delete command. Since a resource group is a logical container, any objects inside the container will also be permanently deleted.
Executing the script below ensures the existence of the resource group.
#
# 2 - Create a resource group
#

# Variables
$region = "East US 2"
$group = "rg4wwi2"

# Does the group exist
$present = Get-AzureRmResourceGroup -Name $group -ErrorAction SilentlyContinue

# Only create if does not exist
if (! $present)
{
    Write-Host "`nCreating resource group"
    New-AzureRmResourceGroup -Name $group -Location $region
}
else
{
    Write-Host "`nResource group already exists"
    Get-AzureRmResourceGroup -Name $group
}
The output from the PowerShell script is shown below.

The third task is to create the key vault named kvs4wwi2 if it does not exist. Again, the table below shows the three main cmdlets used to manage the key vault object.
| No | Description | Link |
|---|---|---|
| 1 | List any existing key vaults. | Get-AzureRmKeyVault |
| 2 | Create a new key vault. | New-AzureRmKeyVault |
| 3 | Delete an existing key vault. | Remove-AzureRmKeyVault |
Be careful with the delete command. Since a key vault is a logical container, any keys, secrets or certificates saved inside the vault will also be permanently deleted. Executing the script below ensures the existence of the key vault.
# 3 - Create a key vault
#

# Variables
$vault = "kvs4wwi2"

# Does the vault exist
$present = Get-AzureRMKeyVault -Name $vault -ErrorAction SilentlyContinue

# Only create if does not exist
if (! $present)
{
    Write-Host "`nCreating key vault"
    New-AzureRmKeyVault -VaultName $vault -ResourceGroupName $group -Location $region
}
else
{
    Write-Host "`nKey vault already exists"
    Get-AzureRMKeyVault -Name $vault | `
    Select-Object vaultname, resourcegroupname, location, resourceid, vaulturi, tenantid, sku
}
The output from the PowerShell script is shown below.

In a nutshell, we now have an empty key vault named kvs4wwi2. In the next section, I will be focusing on how to manage the vault using PowerShell. However, the Azure Portal is a quick way to verify the execution results.
Random Passwords
Before we can procedure, we need to have a secret to store, alter and view in the key vault. Many times, you are provided with the user name and password to access a system from the administrator. For those cases, we do not need to generate a password.
Sometimes we are the administrator of the system and we need to generate a random password. If you are manually creating secrets via the Azure Portal, you will need to provide the text (secret) to store.
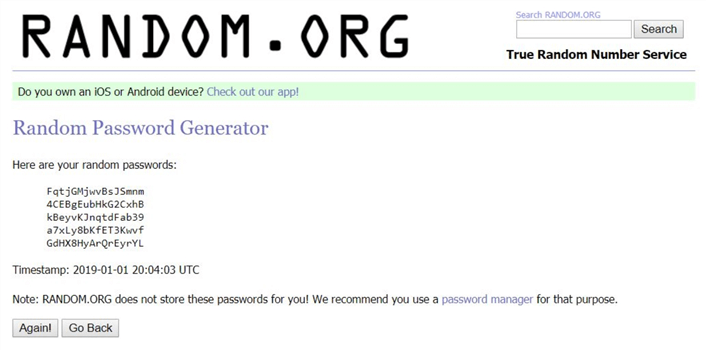
There are many free web sites that generate random passwords. I have used random.org in the pass to grab a new password. The screen shot below shows 5 passwords ready for use.
This is great for manually entry of secrets into the vault. For automated PowerShell scripts, how do we generate a random password?
Do not fret my friend. The .Net library is a vast landscape of classes and methods. The System.Web assembly has a class named Security.Membership. The method named GeneratePassword can be used to solve our problem.
If you look at the documentation for this method, there are a bunch of punctuation marks that might not be valid for the passwords you are trying to create.
We can use the –replace parameter of the string class to eliminate unwanted characters. The regular expression pattern in the script below allows only alpha numeric characters, the pound sign, dollar sign and the exclamation mark to remain in our resulting string.
# # 4 Generate a random password # # Generate password ~ length = 50 Add-Type -Assembly System.Web $password = [System.Web.Security.Membership]::GeneratePassword(50, 1) # Remove unwanted characters $pattern = '[^a-zA-Z0-9#$!]' # Trim password ~ length = 16 $password = ($password -replace $pattern, '').Substring(1, 16) # Show the password Write-Host "`n Generated password`n" Write-Host $password Write-Host "`n"
A sample execution of the above script creates the following password.

Let’s now create and save an administrative password for our existing logical Azure SQL Server named svr4wwi2.
Managing Secrets
The complete cmdlet reference to Azure Key Vault is quite large. However, there are four main cmdlets that are used to manage key vault secrets. The table below shows the details of each cmdlet.
| No | Description | Link |
|---|---|---|
| 1 | Gets the secret from a key vault. | Get-AzureKeyVaultSecret |
| 2 | Create or update secret in a key vault. Makes a new version of the secret. | Set-AzureKeyVaultSecret |
| 3 | Delete a secret from a key vault. | Remove-AzureKeyVaultSecret |
| 4 | Update secret in a key vault. Preserves version of the secret. | Update-AzureKeyVaultSecret |
For a given key value pair, we want to create a secret in the key vault. In the code below, the key is the account name used to access Azure SQL Server and the secret is the password text associated with that account. This secret is assumed to be in a secure string format. We can use the ConvertTo-SecureString cmdlet to correctly format the parameter.
The number of entries in a key vault can become unmanageable. Therefore, the adoption of a naming convention might be wise. This decision is more political than scientific. I leave this exercise up to you.
#
# 5 - Save secret 1 to key vault
#

# define variables
$key1 = 'sql-admin-4-wwi2'
$secret1 = '0uWPMR4cxH9uy2HP'

# Does key exist?
$present = Get-AzureKeyVaultSecret -VaultName $vault -Name $key1 -ErrorAction SilentlyContinue

# Only create if does not exist
if (! $present.id)
{
    Write-Host "`nCreating new secret - $key1"
    $value = ConvertTo-SecureString -String $secret1 -AsPlainText -Force
    Set-AzureKeyVaultSecret -VaultName $vault -Name $key1 -SecretValue $value
}
else
{
    Write-Host "`nSecret already exists - $key1"
    Get-AzureKeyVaultSecret -VaultName $vault -Name $key1
}
The above script creates a new secret named sql-admin-4-wwi2. The image below shows the output displayed in the PowerShell ISE.

Why is there version information associated with the secret?
You can create multiple versions of a secret by using the set instead of the update cmdlet. Maybe your company wants to keep track of the current as well as prior secret values.
Azure Key Vault now supports soft deletes for both the vault and vault objects (certificates, keys and secrets). This option is not set on by default. The default retention period for this feature is 90 days. I leave this advance feature as a future tip for me to write.
The image below shows our new secret stored in the vault.
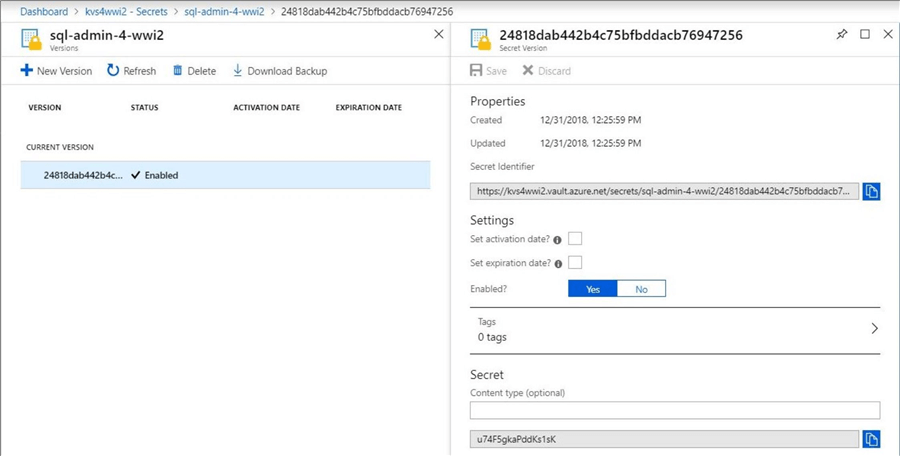
Naming conventions might be able to manage the chaos of a large number of secrets that your company might use. On the other hand, users of the vault might want more information about each secret. This will help when looking for information. How can we enrich the objects in the vault?
Azure supports the use of tagging new and existing objects. We will explore that feature in the next section.
Tagging Secrets
There are four additional pieces of information that you can associate with each stored secret. The activation date and expiration data are informational only. You can still view a secret that is expired or not enabled. The content type describes the format of the secret.
Last but not least is the tag parameter, which is a PowerShell hashtable. I decided to add three additional pieces of information to my secret: project, area and type. Tagging is a very valuable technique since it can be added to almost all objects in Azure. The PowerShell script below updates the existing secret with four additional pieces of information.
#
# 6 - Update secret 1 in key vault
#

# Change properties
$expdate = (Get-Date).AddYears(1).ToUniversalTime()
$nbfdate = (Get-Date).ToUniversalTime()
$tags = @{ 'Project' = 'MSSQLTIPS'; 'Area' = 'AZURE SQL SERVER'; 'Type' = 'ADMIN'}
$contenttype= 'text'

# Update secret
Update-AzureKeyVaultSecret -VaultName $vault -Name $key1 -Expires $expdate -NotBefore $nbfdate `
    -ContentType $contenttype -Enable $True -Tag $tags -PassThru
The output shown below is captured from the PowerShell ISE environment. If you do not want this output, direct the pipeline to Out-Null.

I like to verify the results of executing a PowerShell script using the Azure Portal. The image below shows the same information in a web browser.
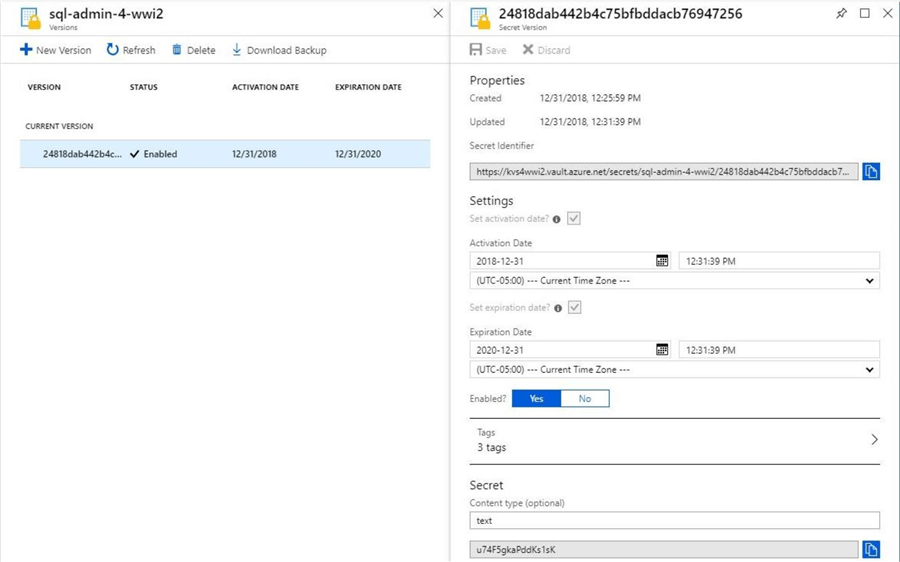
The value of the secret is a secure string which has a maximum length of 64 Kilobytes. This means we can also store and secure small files.
Storing Important Files
The Linux version of SQL Server has been around for almost two years. When deploying an IAAS instance of the server, you can specify a secure connection using an RSA key. See my prior article for details on how to generate a private and public key combination using Putty. Saving these files in the key vault is a great idea.
#
# 7 - Store private linux ssh key
#

# load private key
$path = 'C:\MSSQLTIPS\MINER2018\ARTICLE-2018-13-AZURE-KEY-VAULT\KEYS\private-key.ppk'
$value = ConvertTo-SecureString (Get-Content $path -Raw) -Force -AsPlainText

# save to vault
$key2 = 'dev-ssh-linux-prv'
$tags = @{ 'Project' = 'MSSQLTIPS'; 'Area' = 'LINUX IAAS'; 'Type' = 'PRIVATE' }
Set-AzureKeyVaultSecret -VaultName $vault -Name $key2 -SecretValue $value -Tag $tags
The output below was generated when saving the private key to the vault.

Let us repeat this task for the public key.
#
# 8 - Store public linux ssh key
#

# load private key
$path = 'C:\MSSQLTIPS\MINER2018\ARTICLE-2018-13-AZURE-KEY-VAULT\KEYS\public-key.ppk'
$value = ConvertTo-SecureString (Get-Content $path -Raw) -Force -AsPlainText

# save to vault
$key3 = 'dev-ssh-linux-pub'
$tags = @{ 'Project' = 'MSSQLTIPS'; 'Area' = 'LINUX IAAS'; 'Type' = 'PUBLIC' }
Set-AzureKeyVaultSecret -VaultName $vault -Name $key3 -SecretValue $value -Tag $tags
The output below was generated when saving the public key to the vault.

Now that we have three secrets in the vault, let us take a look at the text value that was stored for the public key. The image below lists the secrets stored in the vault.

A detailed examination of the secret shows the SSH key has the carriage returns and line feeds removed. This is not in a format that we can cut and paste into a new file without a lot of manual manipulation.
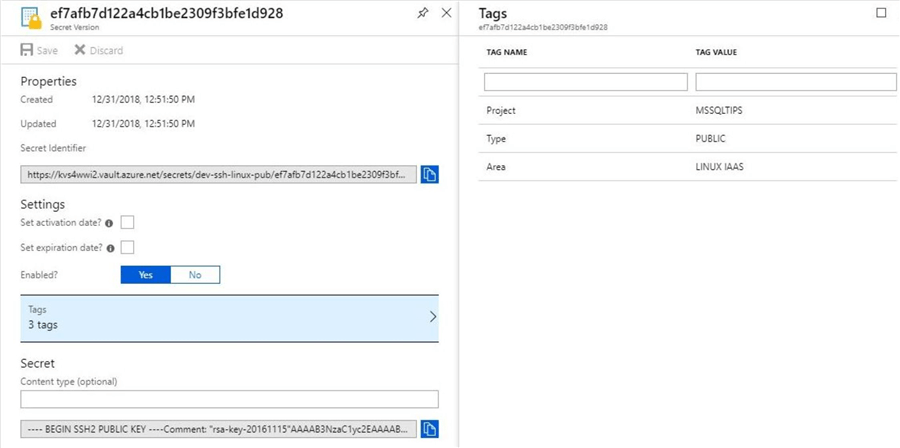
There are two ways to access the value of the secret in the Azure Key Vault. One is using a PowerShell script and the other is using the Azure portal.
The PowerShell script below uses the Get-AzureKeyVaultSecret to retrieve our secure string. The secure string class encrypts the text in memory, does not inherit the string class and implements its own destructor. These characteristics prevent the string from hacking.
Therefore, we need to use the System.Runtime assembly and the InteropServices.Marshall class to unpack the data into a byte string in memory and save the characters in memory to a normal string (managed code).
You do not need to know the details behind SecureStringToBSTR and PtrToStringAuto functions. The import fact is that executing the two lines of code in order returns the text value of a secure string.
# # 9 Read key and unsecure the string # # Get the secure string $secret = Get-AzureKeyVaultSecret -VaultName $vault -Name $key3 # Unsecure the string $bytestr = [System.Runtime.InteropServices.Marshal]::SecureStringToBSTR($secret.SecretValue) $plaintext = [System.Runtime.InteropServices.Marshal]::PtrToStringAuto($bytestr) # Show the results Write-Host " " $plaintext
The image below shows the public SSH key with carriage returns and line feeds. In short, this technique will work for any PowerShell script that wants to store and retrieve secrets from a key vault.

If you choose to copy the secret from the Portal, you will have to replace the normal carriage returns (\r) and line feeds (\n) with another delimiter that will not be removed.
Let us create a second version of the public key used by our SQL Server on Linux IAAS machine. We can use the replace method of the string class performs the required replacements.
#
# 10 Store public linux ssh key with ~ delimiter
#
# Convert \r\n to ~
$path = 'C:\MSSQLTIPS\MINER2018\ARTICLE-2018-13-AZURE-KEY-VAULT\KEYS\public-key.ppk'
$file = (Get-Content $path Raw).Replace("`r", "").Replace("`n", "~")
$value = ConvertTo-SecureString $file -Force -AsPlainText
# Save file to vault
$key4 = 'dev-ssh-linux-pub-2'
$tags = @{ 'Project' = 'MSSQLTIPS'; 'Area' = 'LINUX IAAS'; 'Type' = 'PUBLIC' }
Set-AzureKeyVaultSecret -VaultName $vault -Name $key4 -SecretValue $value -Tag $tags
The above code stores a tilde delimited string in our key vault. We can the notepad++ application to perform a replacement of the tilde (~) with a carriage return (\r) and line feed (\n). Now we can save the file for use with our putty application.
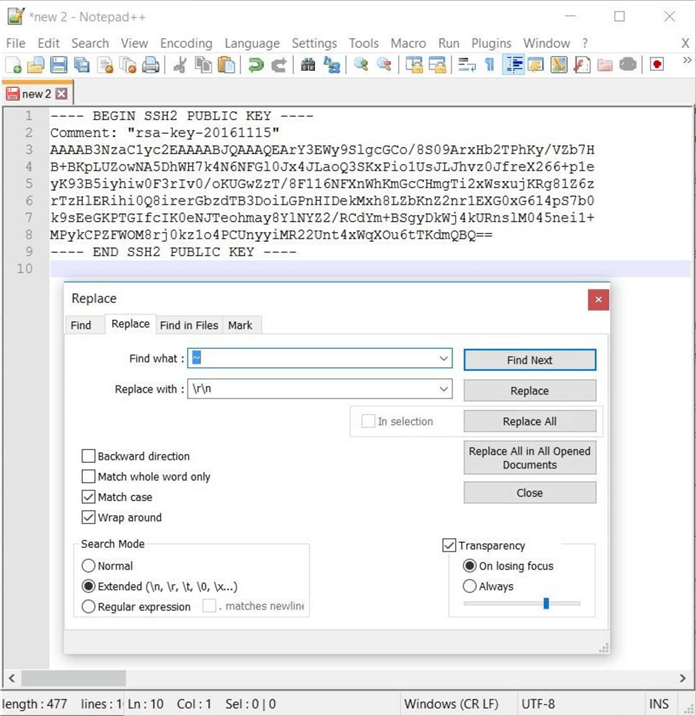
To recap this section, we can store up to 64K of text as a secret value in the vault. Just remember that the portal does not handle carriage returns and line feeds.
Assigning Permissions
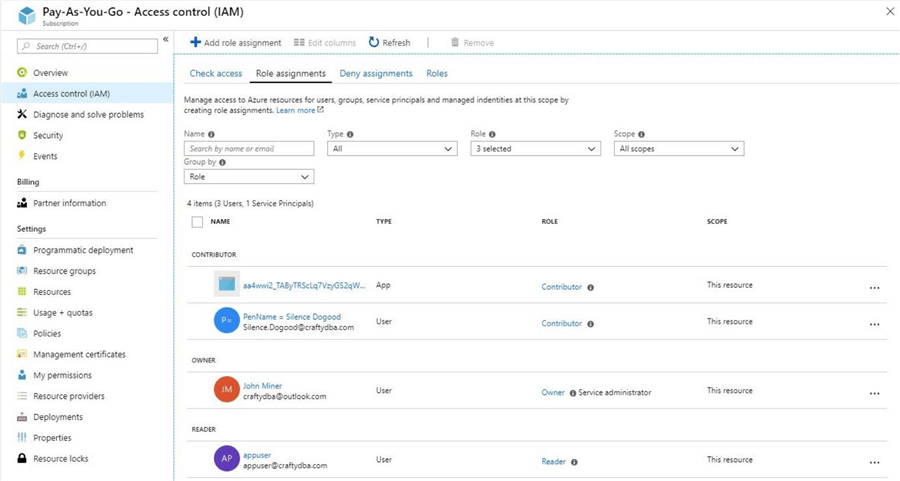
By default, the Azure Key Vault is only accessible to the owner of the vault or any subscription owners. I am going to add a new user to the subscription. The account associated with the user is named [email protected].
The image below shows the new user with reader rights to the subscription. These rights will allow the user to log into the Azure portal.
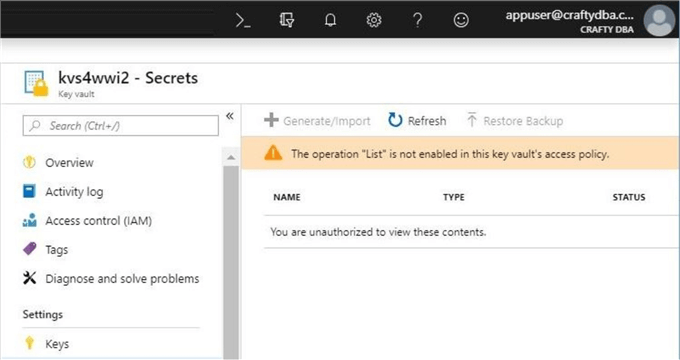
If we try to browse the secrets stored in the key vault using this account, we will get an access violation. This is great news since we want our secrets stored securely.
We can use PowerShell to give the user rights to the vault. First, we need to use the Get-AzureRmADUser cmdlet to obtain the object id for the user from Azure Active Directory. Second, we need to create an array of permissions. These permissions can be viewed in the documentation for the Set-AzureRmKeyVaultAccessPolicy cmdlet. Third, we need to call the cmdlet to set the access policy.
Executing the script below will give permissions to the appuser account to access the secrets section of the key vault.
#
# 11 - Give permissions to vault
#
# Grab users AD Id
$obj = Get-AzureRmADUser | Where-Object {$_.DisplayName -eq "appuser"} | Select-Object Id
# Permission list
$secrets= ('get', 'set', 'list, 'delete', 'backup', 'restore', 'recover', 'purge')
# Give permissions
Set-AzureRmKeyVaultAccessPolicy -VaultName $vault -ResourceGroupName $group `
-ObjectId $obj.Id -PermissionsToSecrets $secrets
We now can see the four secrets stored in the key vault.

Like any good administrator, we should clean up the key vault by removing these test secrets. Running following script result in an empty key vault.
# # 12 Remove test secrets # # Assumes variables are still in memory Remove-AzureKeyVaultSecret -VaultName $vault -Name $key1 Remove-AzureKeyVaultSecret -VaultName $vault -Name $key2 Remove-AzureKeyVaultSecret -VaultName $vault -Name $key3 Remove-AzureKeyVaultSecret -VaultName $vault -Name $key4
The output of the script shows no secrets are left in the vault.

Summary
Today, I explained how to manage an Azure Key Vault using PowerShell. Azure Key Vault is capable of storing certifications, keys and secrets. If you are a Data Platform Designer, you will typically store secrets for various Azure services in the key vault. The secret is a key value pair. The key can be the account name or a description of the secret and the value can be a password or a text file.
Deploying a key vault for each environment in Azure might be a good idea. In most cases, you do not want developers having access to the secrets for the upper environments such as test or production. Using some type of naming convention when creating the key (account or description) might keep the vault in order. For large volumes of secrets, the use of tagging will supply additional information to the users of the vault.
The secrets section of the key vault can be used to store files up to 64K in size. This is handy for storing SSH private and public keys for Azure Virtual Machines installed with SQL Server on Linux. Unfortunately, carriage returns and line feeds are stripped away when viewing the text value from the portal. A way around these issues is to define your own row delimiter that does not naturally occur in the data.
Last and most important, the key vault is secured by Access Control policies. A newly defined user might be able to see the vault, but not the information in the vault. Both the Azure Portal and PowerShell scripting can be used to assign rights to Azure Active Directory users.
In summary, Azure Key Vault has been very handy when I have stepped away from a project for a long time. I only need access to the vault to retrieve accounts and passwords to the Azure Resources.
Next Steps
- Storing certificates with Azure Key Vault
- Storing keys with Azure Key Vault
- Enabling soft delete with Azure Key Vault
About the author
 John Miner is a Data Architect at Insight Digital Innovation helping corporations solve their business needs with various data platform solutions.
This author pledges the content of this article is based on professional experience and not AI generated.
View all my tips
Article Last Updated: 2019-01-18


