By: John Miner | Updated: 2019-02-06 | Comments | Related: > DevOps
Problem
Agile software development is based upon adaptive planning, early delivery, continuous improvement, and flexible response to change. Microsoft Azure DevOps is the next generation of Visual Studio Team Services in the cloud. This product combines sprint planning, task assignment, version control, testing, continuous deployment and continuous integration into one service.
Many companies are using the tools like Azure DevOps to collaborate and be more productive. The key goal of these tools it to deliver quality software on time and on budget.
Grady Booch first suggested the use of continuous integration in 1991 when designing object-oriented C++ programs. Each developer is working on coding a task for a new feature. At the start of the day, each developer pulls from the working branch. Changes are made and tested during the day. At the end of the day, each developer pushes to the working branch. Issues might occur when more than one developer changes the same file. Theoretically, the working branch should be deployable if no code-breaking changes were made.
How can we take an existing Visual Studio database project and get it ready for continuous integration?
Solution
An Azure Repository is the standard offering of the Git version control software. Visual Studio 2017 integrates nicely with the Repository you defined in your Azure DevOps project. Now, we just need to learn how clone, pull and push code to/from the cloud.
Business Problem
Our boss has asked us to investigate how a Repository within Azure DevOps can be used to setup continuous integration. I will be continuing with the Adventure Works Data Warehouse sample.
Moving Existing Work
There are times in which the development of the code has started before the project has been created in Azure DevOps. This usually happens in larger companies in which the turnaround time for a simple task is longer. Because the clone action destroys an existing folder, I suggest you move all the Visual Studio code to a temporary directory.
Prior to this article, we have reverse engineered the [Adventure Works DW] database. I took the liberty of moving the AdvWrks sub-directory under c:\projects to the c:\temp directory.

Now that we have our working code in a safe directory, let us create and clone a new repository.
New Repository
I am using the Azure Dev Ops account that is associated with my [email protected] account. After logging into the service at dev.azure.com, I noticed we do not an existing project.

Use the create project button to define a new project named advwrks4tips19. I am keeping this project private since I do not want anyone on the internet looking at the code.

At this point, we can start inviting existing users to our project. I linked my Azure DevOps account to my Azure Subscription at the Active Directory level. Any users that are defined in Azure AD can be invited to the project.
Our next task is to create a new Visual Studio solution that is based upon the Azure DevOps or Visual Studio Team Services repository. Please note that the old name of the product is being used. The cloud is changing faster than the on premises development tools.
Drill into the repository to choose the correct project. My development operations account is called craftydba0785 and my project is named advwrks4tips19. The image below is a combination of the startup screen and the connect to project dialog box.

The team explorer is where all Git actions can be executed. We want to clone the repository to a local directory.

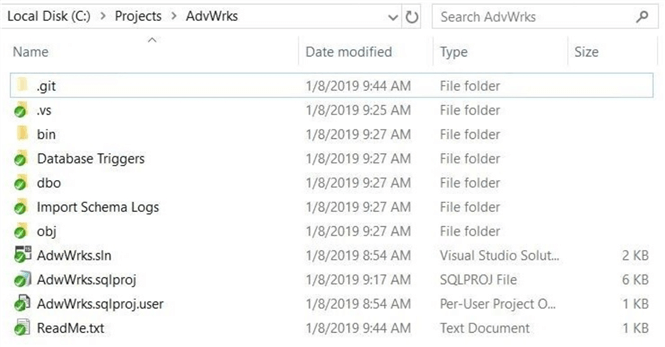
The new directory shown below in Windows explorer is empty. Copy all files from the c:\temp\AdvWrks to this directory. Please skip the .vs directory since the old version is not in sync with this new directory. Also, it is worth noting that a .git directory appears when a folder is linked to version control software.

Now that we have made changes to our project, we should commit the modified code to the repository.
Pushing Changes
The Git version control software is designed with the idea of a remote and local branch. When you create a new repository, you start off with the master branch. Start with the team explorer window and click the changes button.

This action asks Visual Studio to find all file and folder changes that have occurred since the last pull. There are 47 new files to commit to both the local and remote master branches. A comment for the change is required to proceed. I added the comment that reflected our recent work. Click the commit all button to proceed.

Commits are tracked with a hexadecimal number. The changes are now stored in the local repository. Use the Sync hyperlink to push the changes to the remote repository.

Again, repeat the same comment since the code has not changed during this process. The message below in the team explorer shows when the outgoing commit was created.

After clicking the Push hyperlink, the database project will be committed to both the local and remote repositories for the master branch. In a nutshell, use the commit action to save to the local branch and the push action to synchronize the branches.
Making Changes
This section of the tip reminds me of the song from David Bowie, Changes. "Time may change me, but I can't trace time."

In reality, we can trace all the changes that happened in time to our Azure DevOps repository via the commit menu. The above image shows the code that was check in from Visual Studio. Changes to repository can come from another user or from the cloud itself. I just created a readme.txt file on my desktop.
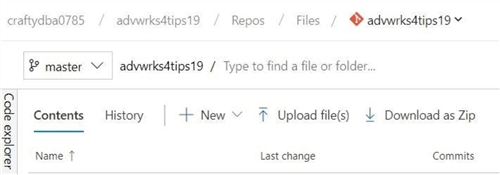
The upload files link from the code explorer can be used place this new file to the root directory of the repository.

Of course, the version control software asks for a comment to be added for the commit action.

If we take another look at the directory, we can see the new file, the new comment, and the new commit number.

We may have different commits from different users. How do we track the lineage of the changes? The Commits section of the Source explorer shows that two users made changes. My [email protected] account checked in the first code base and [email protected] checked in the most recent change.

Pulling Changes
To synchronize our on premises project with the cloud repository, we need to pull in the most recent changes. From the team explorer window, we can see a change logged as "Added wicked cool read me file" is ready to apply to our local branch. Use the Fetch or Pull command to move the new file from the cloud to our laptop workspace.

If we look at the files in the project directory, we can see the new file exists.

To recap this section, use the pull action to bring changes from the working branch to your workspace.
Requested Feature
End users are always asking for more ways in which software can make their life easier. At the Adventure Works company, users are asking for GPS coordinates to add added to the DimGeography table. A quick look at the data seen below shows a city, state or province, and a country or region name. We can use the google geocoding to add the center most location of a given city as the GPS coordinates (longitude, latitude).

This means we have to add a longitude and latitude fields to the table definition. What data type should we use?

The new spatial data types that can be used with geography coordinates are considered common language runtime (CLR) types. We are not really gaining any value by using them since we are not doing calculations.
Therefore, we should define the fields as decimal (9,6) to have the best precision. See this stack overflow thread debating data type choice for GPS coordinates in detail.

We also need to create a post deployment script that updates the fields after adding the two new columns. Right now, there are 655 rows to update in this dimensional table.
There must be a way to track the development, testing, and deployment of this change?
Azure Boards, which contains tools for agile project management, can be linked with source code commits within the repository.
Summary
Continuous Integration for team development can be easily implemented with Azure DevOps. The code repository (repos) is key to this concept. For a new user or project, the developer must clone the repository to their local Visual Studio environment.
Each day, the developer should fetch or pull the most recent working branch to their local workspace. In my next article, I will show how users can notify the project manager of which tasks they are currently working on change changing the status. At the end of the day, developers should push the code back to the remote branch.
The hardest part of continuous integration is resolving issues when two or people work on the same file. Careful planning by the team members can avoid this situation. Otherwise, the remote and local files will have to be inspected and one file has to be chosen over another.
Git is a real pain when working with SSIS projects. The XML code is modified by the software to show where an issue needs to be resolved. This change makes the XML file invalid. This can be overcome by using notepad++ application to remove the added text.
The worst-case scenario when resolving a complex Git issue is checking in one person's changes. The other person moves the workspace to a temporary folder and re-clones from the current working branch.
In short, software development today is moving at a rapid pace. Look at how fast changes are occurring in the Azure ecosystem. Tools like Azure DevOps allow for continuous integration of the code during a two-week agile sprint. If you are not using Azure DevOps right now, I suggest you give it a try.
Next time, I will be talking about how Azure Boards can aid in tracking of a new feature. Features are composed of stories or work items. Each work item can have multiple tasks. This is the hierarchy that can describe a new project.
Next Steps
- Leveraging pre-deployment and post deployment scripts
- Plan, track and execute work using Azure Boards
- Continuous Database Deployment with Azure DevOps
About the author
 John Miner is a Data Architect at Insight Digital Innovation helping corporations solve their business needs with various data platform solutions.
This author pledges the content of this article is based on professional experience and not AI generated.
View all my tips
Article Last Updated: 2019-02-06


