By: Fikrat Azizov | Updated: 2019-05-29 | Comments | Related: > Azure Data Factory
Problem
In these series of posts, I am going to explore Azure Data Factory (ADF), compare its features against SQL Server Integration Services (SSIS) and show how to use it for real-life data integration problems. In the previous post, we learned how to create a pipeline to transfer CSV files between an on-premises machine and Azure Blob Storage. In this post, I’ll explain how to create ADF pipelines to transfer CSV files from Blob Storage into Azure SQL Database.
Solution
Before getting started, I recommend reading the previous tip Transfer On-Premises Files to Azure Blob Storage.
Data Exchange Architecture
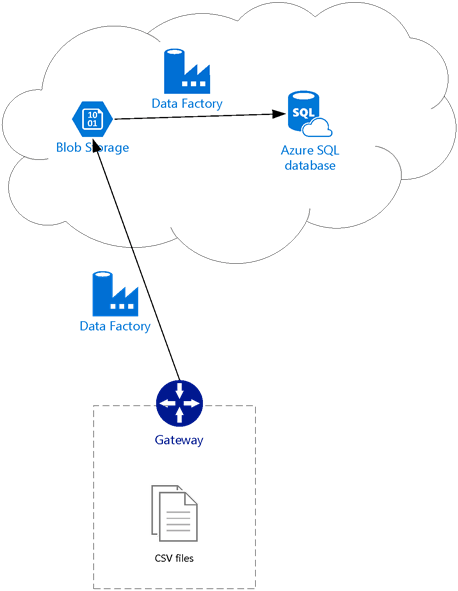
Since we have already built a pipeline to transfer CSV files from an on-premises machine into Azure Blob Storage, the next step is to create a pipeline to push these files into Azure SQL Database, see reference architecture below:
Preparing Destination Tables
ADF will not create tables in the destination database by default, so I have created a FactInternetSales table with the same structure as my source table, in the destination Azure SQL Database (DstDb), using the below script:
CREATE TABLE [dbo].[FactInternetSales](
   [ProductKey] [int] NOT NULL,
   [OrderDateKey] [int] NOT NULL,
   [DueDateKey] [int] NOT NULL,
   [ShipDateKey] [int] NOT NULL,
   [CustomerKey] [int] NOT NULL,
   [PromotionKey] [int] NOT NULL,
   [CurrencyKey] [int] NOT NULL,
   [SalesTerritoryKey] [int] NOT NULL,
   [SalesOrderNumber] [nvarchar](20) NOT NULL,
   [SalesOrderLineNumber] [tinyint] NOT NULL,
   [RevisionNumber] [tinyint] NOT NULL,
   [OrderQuantity] [smallint] NOT NULL,
   [UnitPrice] [money] NOT NULL,
   [ExtendedAmount] [money] NOT NULL,
   [UnitPriceDiscountPct] [float] NOT NULL,
   [DiscountAmount] [float] NOT NULL,
   [ProductStandardCost] [money] NOT NULL,
   [TotalProductCost] [money] NOT NULL,
   [SalesAmount] [money] NOT NULL,
   [TaxAmt] [money] NOT NULL,
   [Freight] [money] NOT NULL,
   [CarrierTrackingNumber] [nvarchar](25) NULL,
   [CustomerPONumber] [nvarchar](25) NULL,
   [OrderDate] [datetime] NULL,
   [DueDate] [datetime] NULL,
   [ShipDate] [datetime] NULL,
 CONSTRAINT [PK_FactInternetSales_SalesOrderNumber_SalesOrderLineNumber] PRIMARY KEY CLUSTERED
([SalesOrderNumber] ASC,[SalesOrderLineNumber] ASC)
)
GO
Creating Copy Pipeline
If you have followed the previous posts, you should be able to create linked services, datasets and pipelines, so I will skip these screenshots for some of the minor steps, to save space here. Furthermore, since we have already created datasets and linked services for Blob Storage, we can use them as source components for the new pipeline.
Please follow the below steps to create the pipeline:
- Linked services - In the previous tips we have already setup linked services for both source and destination, so we’ll proceed to the next step.
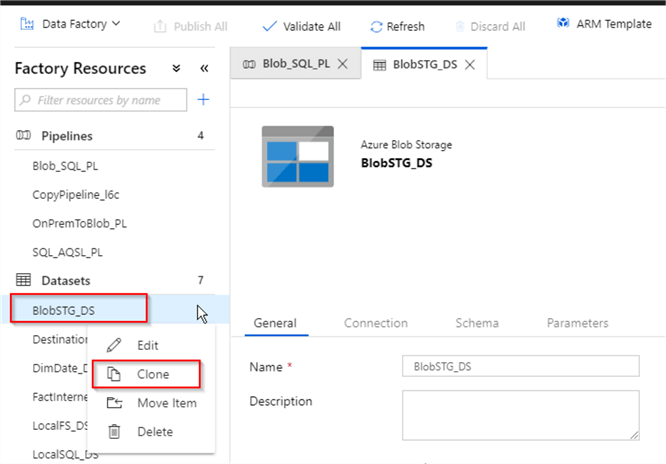
- Datasets - We need blob storage as a source and Azure SQL Database as destination datasets. Here are the required steps to add source and destination datasets. Since the source dataset for this pipeline is going to be similar to the blob storage dataset BlobSTG_DS we created in the previous post, let’s select it and create a duplicate using the clone command.
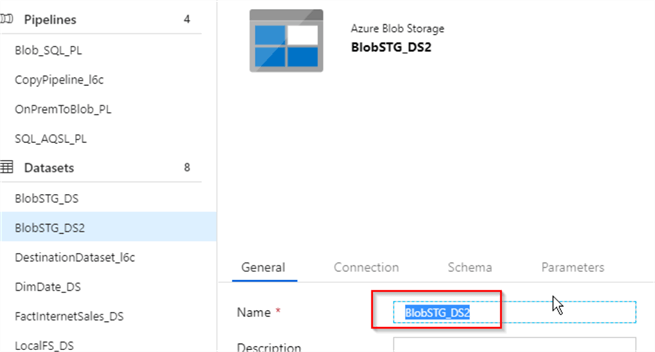
- I named the new dataset BlobSTG_DS2:
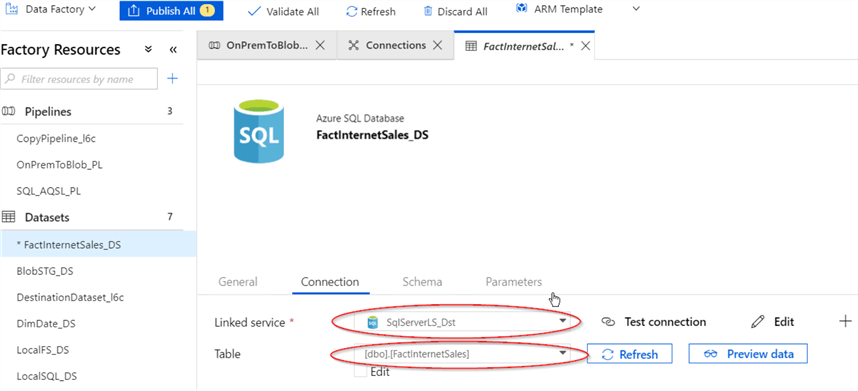
- To create destination dataset, let’s add a new dataset object of Azure SQL Database type from the Factory Resources panel, assign the name FactInternetSales_DS and switch to the Connection tab
- Select the SqlServerLS_Dst linked service for Azure SQL Database we created earlier and select the FactIntenetSales table from the drop-down list:
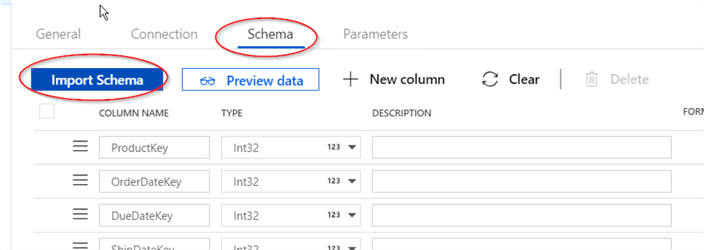
- Switch to the Schema tab and import the table structure using the Import Schema button:
- Pipeline and activity. The last step in this process is
adding the pipeline and activity. Here are the steps:
- Add new Pipeline object from the Factory Resources panel and assign the name (I named it Blob_SQL_PL)
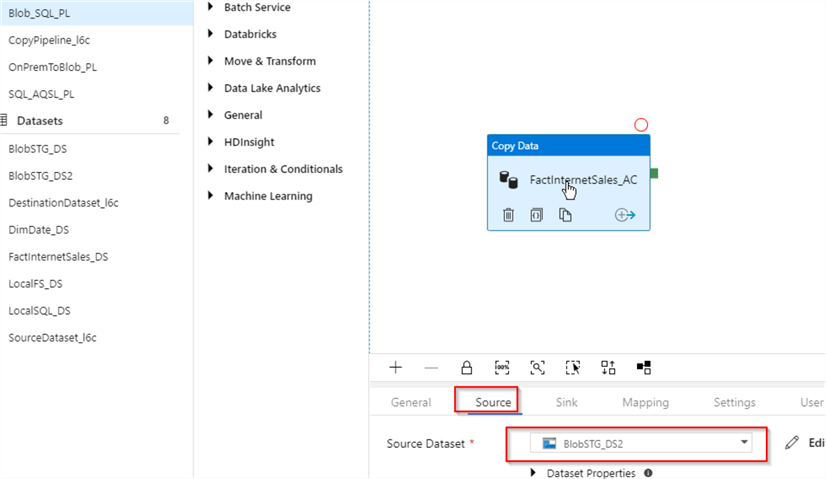
- Expand the Move & Transform category on the Activities panel and drag/drop the Copy Data activity into the central panel
- Select the newly added activity and assign the name (I named it FactInternetSales_AC)
- Switch to the Source tab and select the BlobStg_DS2 dataset we created earlier:
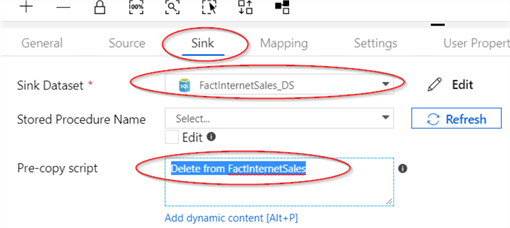
- Switch to the Sink tab and select the FactInternetSales_DS dataset we created earlier and enter a purge query for the destination table:
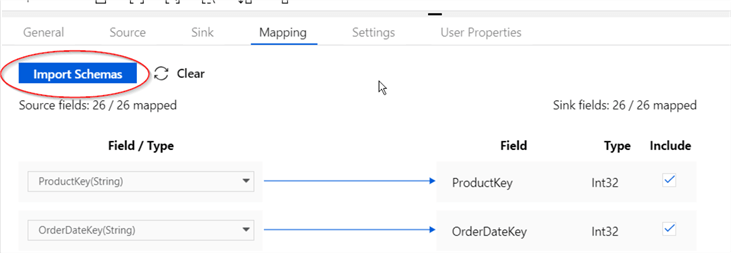
- Switch to the Mapping tab and select Import Schemas:
- Publishing changes - Finally, let’s publish the changes, using the Publish All button and check the notifications area for the deployment status.
Execution and Monitoring
Let's kick-off the pipeline using the Trigger Now command under the Trigger menu:

Now, let's switch to the ADF Monitoring page to ensure that pipeline execution was successful:

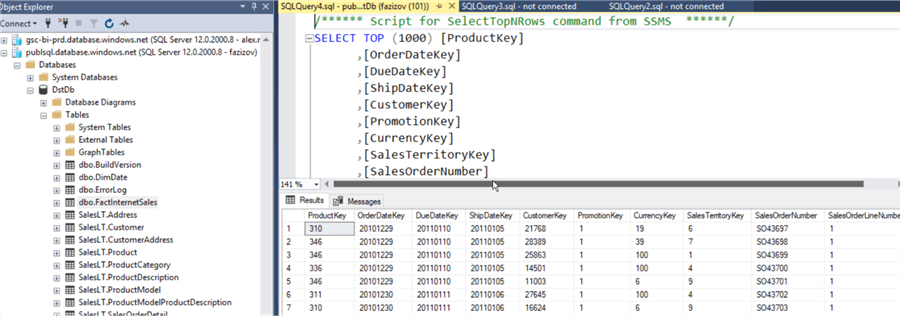
To verify that files have been transferred successfully, I’ve opened SSMS and checked the content of the target table in the Azure SQL Database:
Conclusion
In this post, we completed building a data flow to transfer files from an on-premises machine to an Azure SQL Database. As you may have observed, the ADF pipeline building process resembles building data flow tasks for SSIS, where you create source and destination components and build mapping between them.
If you followed the previous posts, you should be able to create simple pipelines to transfer data between various file and database systems. Although these kinds of pipelines are sufficient for transferring small data sets, you will need to build more sophisticated pipelines with incremental data processing capabilities for larger tables. You may also need to automate pipeline executions to run on pre-scheduled timelines or in response to certain events. We’ll discuss all these capabilities in future posts.
Next Steps
- Read: Transfer On-Premises Files to Azure Blob Storage
- Read: Copy data from an on-premises SQL Server database to Azure Blob storage
About the author
 Fikrat Azizov has been working with SQL Server since 2002 and has earned two MCSE certifications. He’s currently working as a Solutions Architect at Slalom Canada.
This author pledges the content of this article is based on professional experience and not AI generated.
View all my tips
Article Last Updated: 2019-05-29


