By: Haroon Ashraf | Updated: 2019-10-31 | Comments (6) | Related: > DevOps
Problem
As a SQL Server database developer, I need to understand and implement the concept of database code branching particularly in the case of state based database development using SQL Server Data Tools (SSDT).
Solution
The solution is to implement proper database code branching in a source control like Git after getting familiar with branching concepts and their implementation specifically from a SQL Database project point of view.
Moreover, implementing proper database code branching in Git or a similar source control can help you speed up database development, testing, refactoring and deployment there by creating a smooth and effective Database Lifecycle Management (DLM) process.
About Database Project Code Branching
It is worth reviewing SQL Database Project code branching and related concepts for beginners before we jump into implementing the solution.
SQL Database Project
A SQL Database Project as the name indicates is a special kind of project created and managed in SQL Server Data Tools (SSDT) which helps to quickly design, build, test, refactor and deploy database and its related objects as per requirement to the target environments.
State Based Database Development
In a state based development SQL Database Project which contains the database structure and its reference data (in some cases), is considered a single source of truth rather than the deployed database.
The SQL Database Project initiates the database development process and then it gets published to the target database through a number of ways. The database developer behind the SQL Database Project simply adds new objects or modifies existing objects there by changing their previous state to a new one and then publishes those changes to the target database environments without any need to write alter scripts.
Database Code Branching in Git
The importance of database code branching when using a source control like Git is almost same as maintaining your database structure through SQL Database Project in a state based development.
In a professional working environment, database development via SQL Database Project or any other database development approach is backed by source control systems such as Git which allows you to work on multiple versions of the code known as branching.
For example, when you start developing a database project backed by Git source control you are given a default branch of the repository to work under which is called the master branch.
However, the master branch is considered to be deployment ready code so basically you work in another branch such as dev and then integrate your changes with the master branch.
Finally, it is through the master branch you deploy new database changes to Dev, Test and Production environments in a traditional database development scenario with connected source control.
This is illustrated as follows:

Azure DevOps
In the previous section I talked about creating a SQL Database Project in SQL Server Data Tools (SSDT) and then adding it to the source control, but what if you start with out of the box source control support right from the beginning of the creation of your SQL Database Project.
Azure DevOps is set of services including Azure Git Repos (repositories) which offers new projects with built in source control support and a lot more features for teams and individual developers to build, test, deploy and manage their web/database solutions.
Implementing Database Project Code Branching
The database project source code branching is very important in day to day commercial database developments.
Create an Azure DevOps Project
Please go to the Azure DevOps web page and then sign in to your account.
In case you have do not have an Azure DevOps account then please sign up for one if you would like to implement the walkthrough in this tip.
Create an Azure DevOps project called database-project-code-branching:

Import DevOps Project Repository Locally
Click Repos from the left navigation bar in Azure DevOps to go to the project repository and import it locally on to your dev machine by choosing the second option to import the project as shown below:

Check the Azure DevOps Project
Go to the Team Explorer in your Visual Studio and click Home button from the tool bar or press CTRL + 0 and H shortcut key to view Home section where you should see your imported Azure DevOps project (repository):

Create a New SQL Database Project
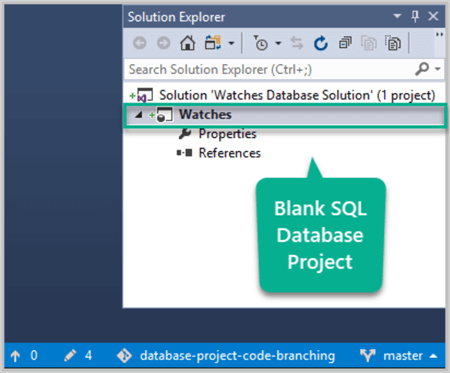
Click New… under Solutions in Team Explorer and create a new SQL Database Project called Watches under Watches Database Solution as shown below:

View the newly created SQL Database Project in Solution Explorer:

Understanding Git Repo and Branching
Please remember that as soon as we create an Azure DevOps project a Git repository is created with it and this is where we are going to save our database project code as the work continues.
Now the repository can have one or more branches where the master branch is considered the most stable version of your work.
It is the master branch which contains the changes to be deployed to Dev, Test and Production environments.
However, you should not directly work on master since this is considered to be the most stable or deployment-ready version of your code which finally gets published to the Production server.
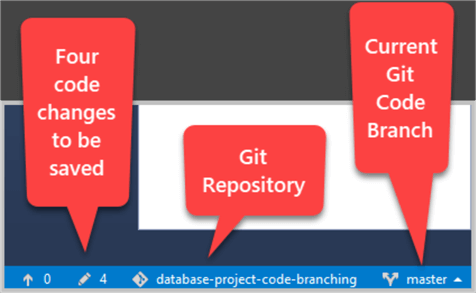
Take a closer look on the status bar at lower right which tells you the following things about your SQL Database Project:
- master - This means the currently selected Git branch is master
- database-project-code-branching - This is the name of your Git repository
- Four (4) - This means there are currently four changes in the (database) code which need to be put under Git source control.

Let's ignore the fourth icon showing 0 on the status bar for the time being to keep things simple.
Understanding Git Code Changes
As we can see there are four code changes to be committed to the Git source control, but we know we have not yet even created a single database object then what are those four changes?
The four pending code changes are as follows:
- We created a SQL Database Project which needs to be saved (even blank)
- We created the SQL Database Project in a Solution which also needs to be saved
- Git ignore file (a file which contains information about those files extensions which Git is not required to save)
- Git attributes file (a file which is required by Git to understand certain settings)
I am deliberately leaving the details of some of the Git things in this tip to keep us focused on the objectives of this tip and keeping things simple for the readers.
Click the pen icon to see the code changes:

Commit Default Changes to master
At this point there are no changes other than what came out of the box as we created a blank SQL Database Project in a solution.
So there is no harm saving these changes directly to the master branch as an exception to the rule I discussed earlier.
Since these changes are not our actual changes to the SQL Database Project, they are considered to be in the best stable form.
Please go to Team Explorer if you are not already there and type in comments Initial commit and click Commit All drop down and select and click Commit All and Push.
The changes are going to be saved instantly into the master branch.

You can skip this step and wait for all these default changes to be saved with your database changes to the dev branch since we said no code should be directly saved to master branch.
However, both ways are fine as long as your first code push to the master branch does not include any change other than what you got by default when the project was created.
Requirement to add WatchType Table
You receive a requirement to add WatchType table to the database project for business use.
As soon as you receive a business requirement to add new table WatchType (or any other database object) then you should not add it directly to the master branch rather this is time to work on a different branch such as dev.
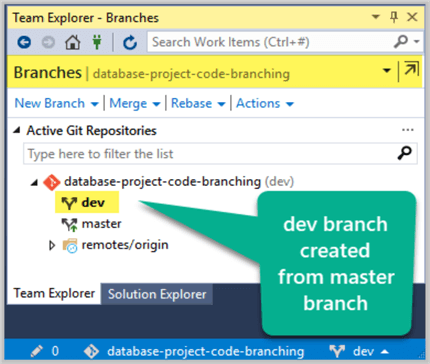
Create dev branch from master
Click master branch on the status bar (lower right corner) and then click New Branch:

Type in the name of the new branch dev and click the Create Branch button as shown below:

Please note that not only dev branch is created, but the Checkout branch check box if checked is going to switch you to the dev branch.

Add WatchType Table
Add a new table called WatchType to the SQL Database Project using the following T-SQL:
CREATE TABLE [dbo].[WatchType]
(
   [WatchTypeId] INT NOT NULL IDENTITY(1,1),
   [Name] VARCHAR(50) NOT NULL,
   [Detail] VARCHAR(150) NOT NULL,
   CONSTRAINT [PK_WatchType] PRIMARY KEY ([WatchTypeId])
)
The newly created table can be seen as follows:

Commit Changes to dev
Click the pen icon or CRLT+Alt+F7 shortcut key to commit changes to the dev branch.
Type in comments as "WatchType table added" and then click Commit and Push:

Create a Pull Request
This step is very important when you see an option to create a pull request as soon as you push your changes into the dev branch.
Basically, a pull request means the request to integrate with the master branch and you must create a pull request when you are ready to push your changes to the final stage which is the master branch.
Click Create a pull request as follows:

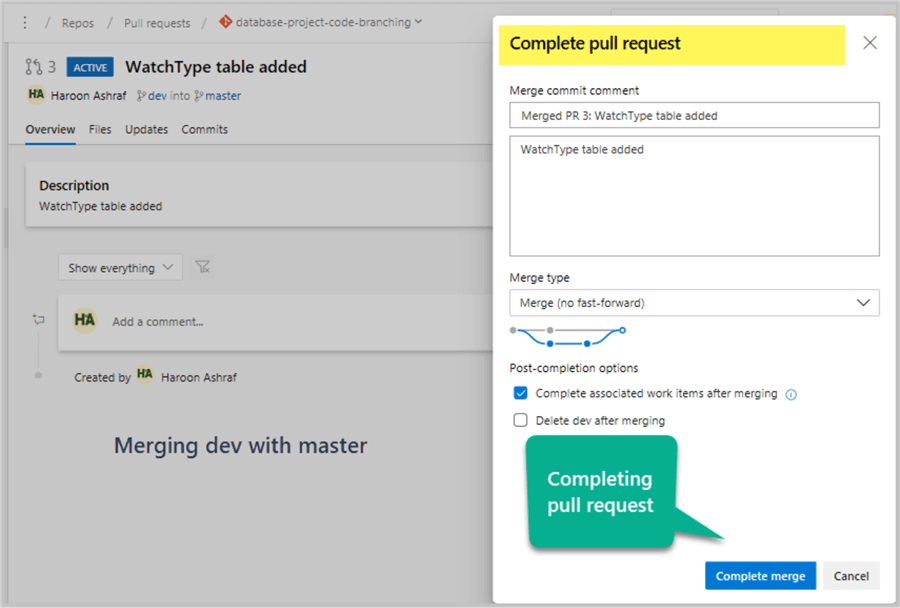
This will take you to the Azure web portal where you are going to first create a pull request by clicking the button followed by clicking complete pull request and finalizing it by clicking Complete merge:

Once the pull request is complete, you will be given an option to delete the source branch (dev) or not. I suggest keeping it (dev) so that you can carry on doing more changes and merging them with master by using pull requests. However, the branching does get deeper when you create a branch for each new feature.
Please see the below screenshot of a successful pull request:

Switch, Sync and Check master branch
Let us now check the master branch in Team Explorer which should have the latest changes.
Once you switch to the master branch in Visual Studio please remember to sync it with your remote master branch by clicking Sync in Team Explorer - Home:

Go to the Solution Explorer to view the SQL Database Project to see the latest pushed into the master branch by the pull request and merge operation:

Congratulations! You have successfully implemented database code branching in Git.
You master branch is now ready to deploy the SQL Database Project to Dev, Test and Production environments.
Please remember as said earlier, the master branch was never updated directly rather we worked on the dev branch and then merged the changes with master.
Next Steps
- Please try to implement the Test Driven Development with Modern Database Tools using tSQLt walkthrough using Git code branching strategy
- Please try implementing Developing Similar Structured Multi-Customer Databases with SQL Server Data Tools (SSDT) tip using Git code branching strategy
- Please try adding feature branch in the currently referenced tip to add any new database object of your choice alongside adding any new object to the dev branch and see how you create pull requests and merge these branches with master as a final step before the master branch gets ready to roll out the changes to Dev, Test and Production.
About the author
 Haroon Ashraf's interests are Database-Centric Architectures and his expertise includes development, testing, implementation and migration along with Database Life Cycle Management (DLM).
This author pledges the content of this article is based on professional experience and not AI generated.
View all my tips
Article Last Updated: 2019-10-31


