By: Fikrat Azizov | Updated: 2019-12-06 | Comments (1) | Related: > Azure Data Factory
Problem
Azure Data Factory (ADF), is a great tool to schedule and orchestrate cloud activities. Although ADF has many features to cover various data integration needs, it is not as flexible as its on-premises predecessor, SQL Server Integration Services (SSIS). To address these limitations, ADF v2 now includes Execute SSIS activity, which I discussed in this article. This functionality allows you to deploy SSIS packages to Azure SQL database and requires SSIS Runtime Services, which is a cluster of virtual machines, hosted on Azure. Microsoft charges SSIS Runtime Services on an hourly basis, and if you are not careful on pausing and resuming this service, or if you have long-running packages, you may end up with hefty charges.
If you have an on-premises environment with existing SQL Server licenses, there is a more cost-effective way of running SSIS packages from ADF, which I am going to share in this article.
Solution
Solution Architecture
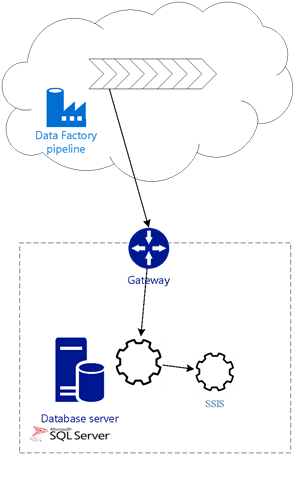
The solution proposed here involves direct interaction between ADF and SSIS packages deployed on an on-premises server. This interaction requires Self-Hosted Integration Runtime and number of wrapper-stored procedures to initiate a SSIS package and inquire about its execution status. Another requirement is the existence of SQL Server with SSIS services, running on your on-premises server. Unlike ADF’s Execute SSIS activity, this solution does not require the creation of shared virtual networks between on-premises and cloud networks.
Here is the architecture diagram of this solution:
Deploying SSIS Package
To demonstrate the solution outlined above, I am going to use the SSIS package described in this article. This package reads from the SalesLT.SalesOrderDetail table in the SrcDb database, joins against the SalesLT.Product table and writes the results into SalesLT.SalesOrderDetail table in DstDb database. You can get the source code of this SSIS project here.
Please follow below steps to deploy the project to your on-premises machine:
Step 1 - Ensure that SSIS services are running on the on-premises machine.
Step 2 - Open the SSIS project in Visual Studio 2015 (or higher version), right click on the project name and select the Deploy command; this will start the project deployment wizard.
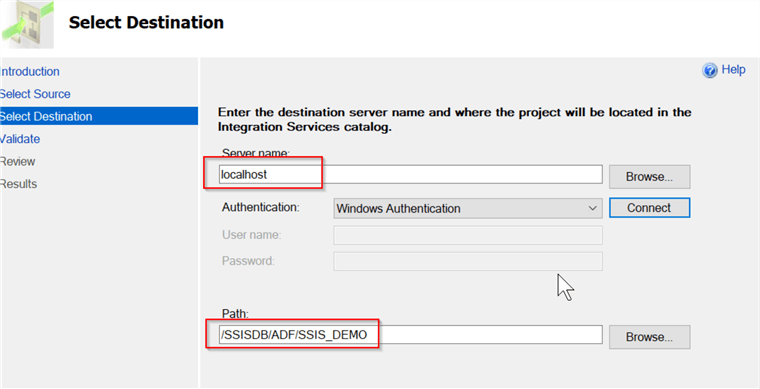
Step 3 - Select Windows authentication, enter your on-premises SQL server name and Integration Services Catalog folder, where the project will be deployed:
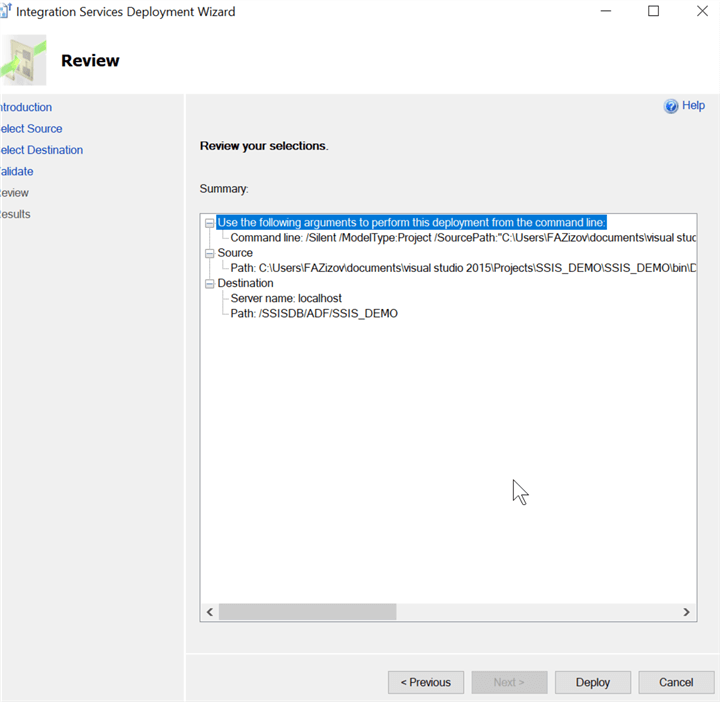
Step 4 - Review and confirms all of the settings on the last page of the deployment wizard:
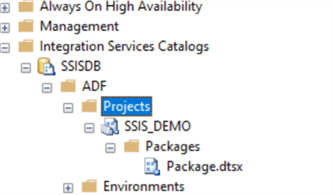
Once SSIS deployment completes, you can connect to the Integration Services Catalog and confirm the package deployment:
Execute SSIS package from ADF
We need the following components to execute/monitor SSIS package, from ADF:
- SQL Stored procedure to execute the package
- SQL Stored procedure to obtain the package execution status
Execute the below script in the context of one of your existing databases, to create a stored procedure for SSIS package initiation:
CREATE procedure [dbo].[usp_execute_ssis_package]
@pDate nvarchar(20)
AS
BEGIN
DECLARE  @execution_id bigint
DECLARE  @vDate sql_variant=cast(left(@pDate,charindex(' ',@pDate)-1) as sql_variant)
 EXEC ssisdb.catalog.create_execution  @folder_name = 'ADF',
   @project_name = 'SSIS_DEMO',@package_name = 'Package.dtsx',
   @execution_id = @execution_id output

EXEC [SSISDB].[catalog].[set_execution_parameter_value]@execution_id,
   @object_type=20, @parameter_name=N'pLastModDate'
   @parameter_value=@vDate
 EXEC ssisdb.catalog.start_execution@execution_id
SELECT @execution_id as execId
END
Note the above procedure has pDate parameter, which will be passed to the SSIS package. The SSIS package will use this parameter, to fetch the rows updated in the last 7 days. This procedure will return the execution id of the newly initiated package.
Next, execute this script under the same database, to get execution status of the package:
CREATE PROCEDURE [dbo].[usp_get_SSIS_Exec_Status]
@exec_id varchar(100)
AS
SELECT cast([status] as varchar(10)) statusCode ,
   IIF(status IN(1,2,5,8),'1','0')  execStatus
   FROM [SSISDB].[catalog].[executions]
   WHERE execution_id=cast(@exec_id as bigint)
GO
This stored procedure returns two fields- the package execution code (see this article for the list of all status codes) and execution status, indicating whether the package is still running (value 1) or completed.
The ADF pipeline is going to include the following components:
- The Lookup activity, which will allow us to execute the procedure usp_execute_ssis_package and return execution id (see this post, to get familiar with ADF Lookup activity)
- The Set Variable activity, to assign results of the Lookup activity to the pipeline variable
- The Until activity, which will include following activities
to be executed in a loop:
- The Wait activity, to allow 30 seconds of wait time
- The Lookup activity, to read the package execution status
- The Set Variable activities, to assign the package execution status to the pipeline variable
- The If Condition activity will check the package execution code and will pass the control to subsequent child activity, based on the package’s success or failure code. I will configure Wait activities in Success or Failure conditions for the If Condition activity; however, your data flow can include any other components.
In order to build the above-described data flow, create a pipeline named ControlFlow7_PLand follow the below steps:
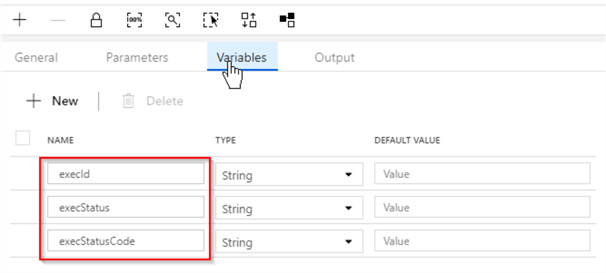
Step 1 - Add pipeline variables execId, execStatus and execStatusCode of string type (see ADF Pipeline variables for more details on pipeline variables):
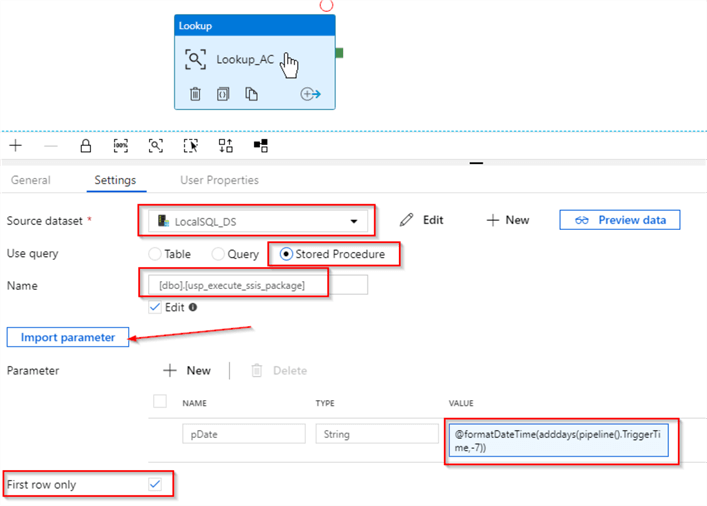
Step 2 - Drag and drop a Lookup activity into the pipeline design surface and name it as Lookup_AC. Select this activity, switch to the Settings tab, select the dataset LocalSQL_DS, which points to the AdventureWorks2016 database on your on-premises SQL Server. Next, select query type Stored procedure and enter [dbo].[usp_execute_ssis_package] in the Name field. Finally, click the Import parameter button to fetch this procedures parameter and enter an expression @formatDateTime(adddays(pipeline().TriggerTime,-7)) in the Value field. Here’s how your screen should look at this point:
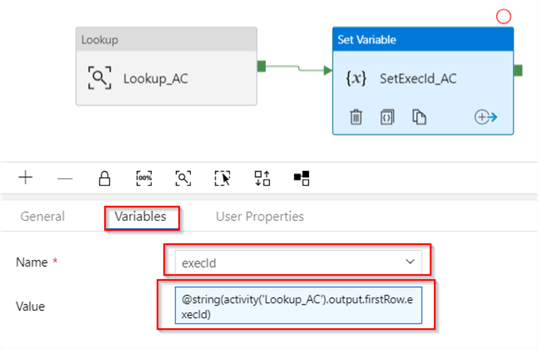
Step 3 - Next, add Set Variable activity to the Success end of the Lookup_AC activity and name it as SetExecId_AC. Switch to the Variables tab, select the pipeline variable execId from the Name drop-down list and enter an expression @string(activity('Lookup_AC').output.firstRow.execId) into the Value field. This configuration assigns the execId field, produced by Lookup_AC activity, to execId pipeline variable:
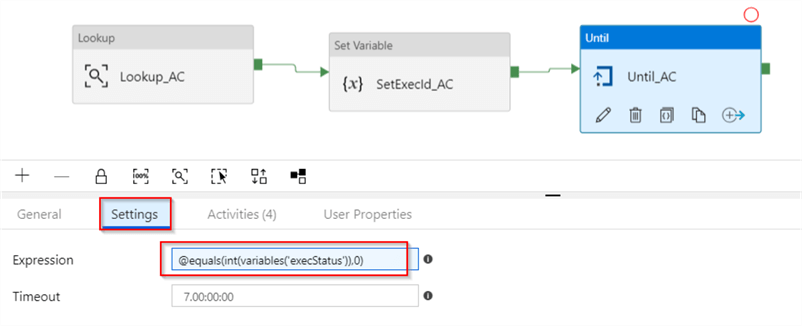
Step 4 - Add Until activity to the Success end of the SetExecId_AC activity and name it as Until_AC. Switch to the Settings tab and enter an expression @equals(int(variables('execStatus')),0) into the Expression field. This expression ensures that Until_AC will run in the loop until the value of execStatus variable gets zero value:
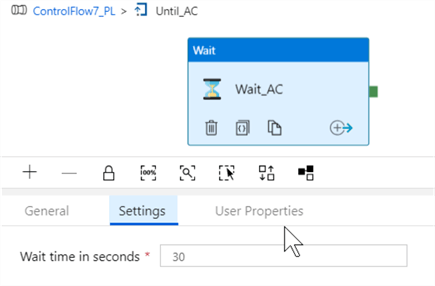
Step 5 - Switch to the Activities tab, and click Add activities button to start adding child components to the Until activity. First, add Wait activity (I named it as Wait_AC) and set its wait time setting to 30 seconds:
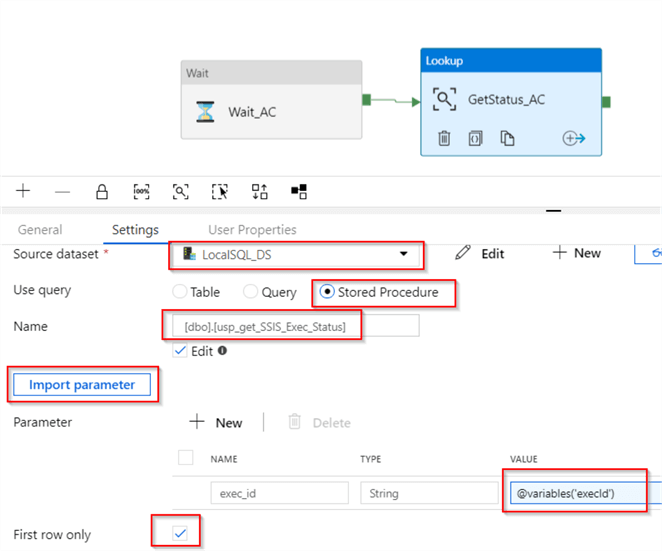
Step 6 - Next, add a Lookup activity to the Success end of the Wait_AC activity and name it as GetStatus_AC. Switch to the Settings tab and select the dataset LocalSQL_DS. Select Stored procedure query type and enter [dbo].[usp_get_SSIS_Exec_Status] in the Name field. Next, click the Import parameter button to fetch the stored procedure’s exec_id parameter and assign an expression @variables('execId') to its Value field. Here’s how your screen should look at this point:
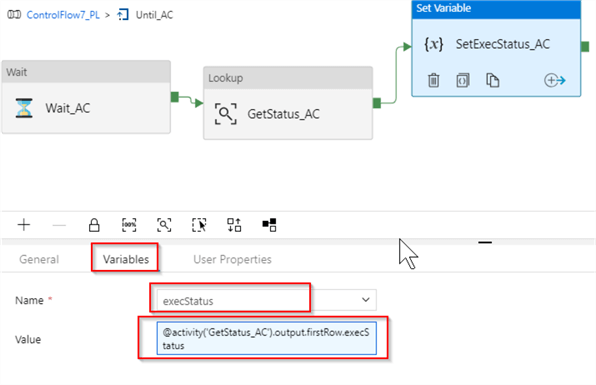
Step 7 - Add Set Variable activity to the Success end of the GetStatus_AC activity and name it as SetExecStatus_AC. Switch to the Variables tab, select the variable execStatus from the Name drop-down list and enter an expression @activity('GetStatus_AC').output.firstRow.execStatus to the Value field. This configuration will assign the execStatus field, produced by GetStatus _AC activity to the execStatus variable:
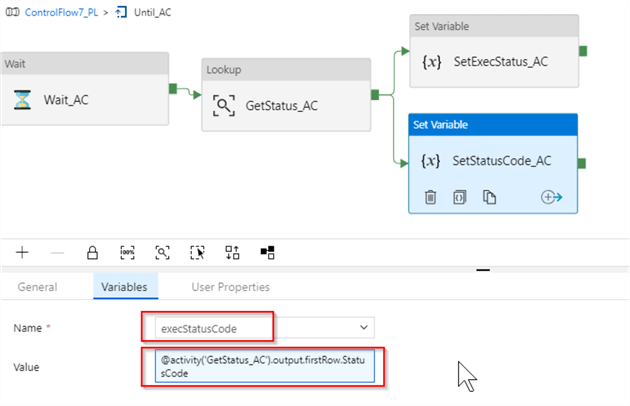
Step 8 - Add another Set Variable activity to the Success end of the GetStatus_AC activity and name it as SetStatusCode_AC. Switch to the Variables tab, select the variable execStatusCode from the Name drop-down list and enter an expression @activity('GetStatus_AC').output.firstRow.StatusCode to the Value field. This configuration will assign execStatusCode field, obtained by GetStatus _AC activity to the execStatusCode variable:
Step 9 - Now, that we have configured Until_AC activity, let us return to the main pipeline screen and add the If Condition activity (I named it as IfCondition_AC), to validate the success/failure code of the SSIS package (you can read more about If Condition activity from here). Enter an expression @equals(int(variables('execStatusCode')),7) in the Expression field of the IfCondition_AC activity. This expression will validate whether SSIS package has succeeded (code 7) or failed:
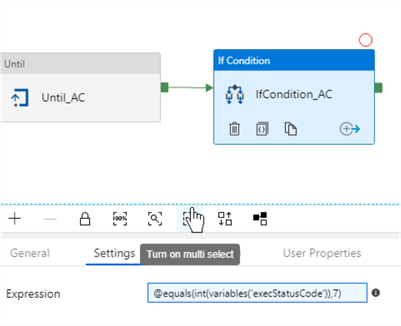
Step 10 - Switch to the Activities tab and add Wait activity to the True condition:
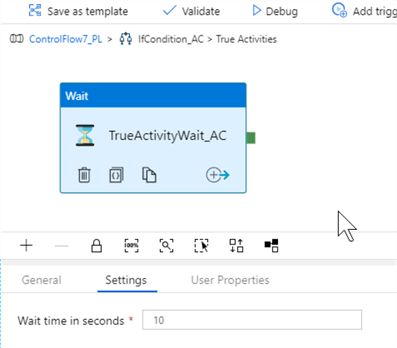
Step 11 - Finally, add another Wait activity to the False condition:
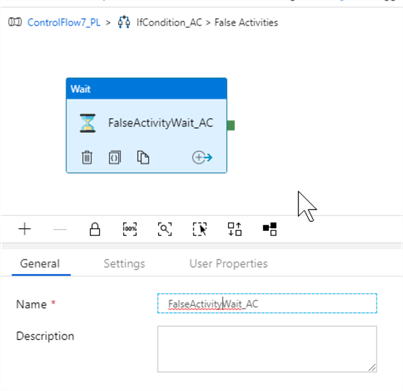
Execute and monitor the pipeline
Before we test the pipeline, let's execute the below script in the context of the DstDb database, to purge all the rows in the destination table. This will help us avoid possible duplicate key errors:
TRUNCATE TABLE [SalesLT].[SalesOrderDetail]
Next, to ensure that recently modified rows exist in the source table, execute the below script in the context of SrcDb database:
UPDATE [SalesLT].[SalesOrderDetail] SET ModifiedDate=getDate() WHERE SalesOrderID<=71784
Finally, let's kick-off this pipeline in a debug mode and examine the results in the Output window:
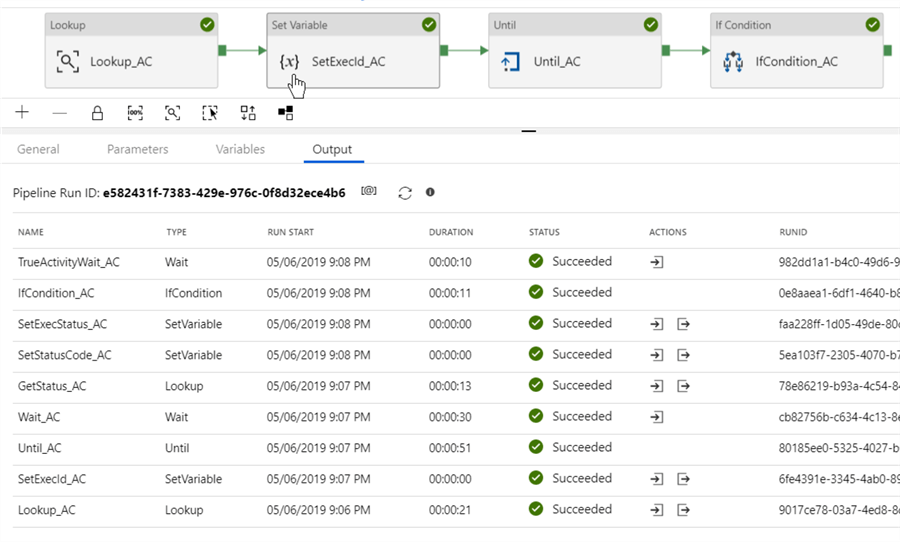
Publish the pipeline, once you are satisfied with the results.
Below is the JSON script for this pipeline as a point of reference:
{
"name": "ControlFlow7_PL",
"properties": {
"activities": [
{
"name": "SetExecId_AC",
"type": "SetVariable",
"dependsOn": [
{
"activity": "Lookup_AC",
"dependencyConditions": [
"Succeeded"
]
}
],
"typeProperties": {
"variableName": "execId",
"value": {
"value": "@string(activity('Lookup_AC').output.firstRow.execId)",
"type": "Expression"
}
}
},
{
"name": "Lookup_AC",
"type": "Lookup",
"policy": {
"timeout": "7.00:00:00",
"retry": 0,
"retryIntervalInSeconds": 30,
"secureOutput": false,
"secureInput": false
},
"typeProperties": {
"source": {
"type": "SqlSource",
"sqlReaderStoredProcedureName": "[dbo].[usp_execute_ssis_package]",
"storedProcedureParameters": {
"pDate": {
"type": "String",
"value": "@string(adddays(pipeline().TriggerTime,-7))"
}
}
},
"dataset": {
"referenceName": "LocalSQL_DS",
"type": "DatasetReference"
}
}
},
{
"name": "Until_AC",
"type": "Until",
"dependsOn": [
{
"activity": "SetExecId_AC",
"dependencyConditions": [
"Succeeded"
]
}
],
"typeProperties": {
"expression": {
"value": "@equals(int(variables('execStatus')),0)",
"type": "Expression"
},
"activities": [
{
"name": "GetStatus_AC",
"type": "Lookup",
"dependsOn": [
{
"activity": "Wait_AC",
"dependencyConditions": [
"Succeeded"
]
}
],
"policy": {
"timeout": "7.00:00:00",
"retry": 0,
"retryIntervalInSeconds": 30,
"secureOutput": false,
"secureInput": false
},
"typeProperties": {
"source": {
"type": "SqlSource",
"sqlReaderStoredProcedureName": "[dbo].[usp_get_SSIS_Exec_Status]",
"storedProcedureParameters": {
"exec_id": {
"type": "String",
"value": {
"value": "@variables('execId')",
"type": "Expression"
}
}
}
},
"dataset": {
"referenceName": "LocalSQL_DS",
"type": "DatasetReference"
}
}
},
{
"name": "SetExecStatus_AC",
"type": "SetVariable",
"dependsOn": [
{
"activity": "GetStatus_AC",
"dependencyConditions": [
"Succeeded"
]
}
],
"typeProperties": {
"variableName": "execStatus",
"value": {
"value": "@activity('GetStatus_AC').output.firstRow.execStatus",
"type": "Expression"
}
}
},
{
"name": "Wait_AC",
"type": "Wait",
"typeProperties": {
"waitTimeInSeconds": 30
}
},
{
"name": "SetStatusCode_AC",
"type": "SetVariable",
"dependsOn": [
{
"activity": "GetStatus_AC",
"dependencyConditions": [
"Succeeded"
]
}
],
"typeProperties": {
"variableName": "execStatusCode",
"value": {
"value": "@activity('GetStatus_AC').output.firstRow.StatusCode",
"type": "Expression"
}
}
}
],
"timeout": "7.00:00:00"
}
},
{
"name": "IfCondition_AC",
"type": "IfCondition",
"dependsOn": [
{
"activity": "Until_AC",
"dependencyConditions": [
"Succeeded"
]
}
],
"typeProperties": {
"expression": {
"value": "@equals(int(variables('execStatusCode')),7)",
"type": "Expression"
},
"ifFalseActivities": [
{
"name": "FalseActivityWait_AC",
"type": "Wait",
"typeProperties": {
"waitTimeInSeconds": 30
}
}
],
"ifTrueActivities": [
{
"name": "TrueActivityWait_AC",
"type": "Wait",
"typeProperties": {
"waitTimeInSeconds": 10
}
}
]
}
}
],
"variables": {
"execId": {
"type": "String"
},
"execStatus": {
"type": "String"
},
"execStatusCode": {
"type": "String"
}
}
},
"type": "Microsoft.DataFactory/factories/pipelines"
}
Next Steps
- Read these related articles:
About the author
 Fikrat Azizov has been working with SQL Server since 2002 and has earned two MCSE certifications. He’s currently working as a Solutions Architect at Slalom Canada.
This author pledges the content of this article is based on professional experience and not AI generated.
View all my tips
Article Last Updated: 2019-12-06


