By: Semjon Terehhov | Updated: 2020-02-12 | Comments (3) | Related: > Power BI
Problem
There are a lot of great APIs that can provide data input for reports. More people are using Power BI to develop reports and it would be great if we could use an API to load data directly into Power BI for reporting on the data. In this tip, we will walk through how this can be done.
Solution
This tip will help you get started with API data using Power Query M Formula language. The examples will cover both graphical and line code programming using Power Query Editor as well as give a short introduction to the syntax of Power Query M formula language.
Power Query M formula language
The Power Query M formula language is now embedded into Excel, SSAS and Power BI. The M stands for Mash-Up and its primary role is data manipulation. According to Microsoft, the syntax is case sensitive and the language is functionally like F#.
Here is a simple code example to get familiar with data Mash-Up:
let //use let to declare variables
TextVariable = Text.Proper("hello world")

in //use in to call variables defined in let
TextVariable

//this code block will return a single data string "hello world"
The expression "let" is used to assign variable names and values, where the "in" statement uses the variables defined in "let". (More on Mash-Up syntax can be found here)
How to use M language in Power BI
Start Power BI and select "Get Data" from a blank query as shown below:
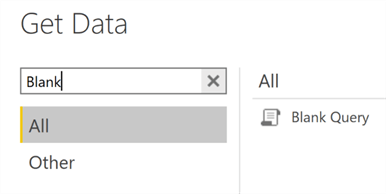
Figure 1: Get data from Blank Query
Choose Blank Query as shown in the picture above and click "Connect". This will open the Power Query Editor:
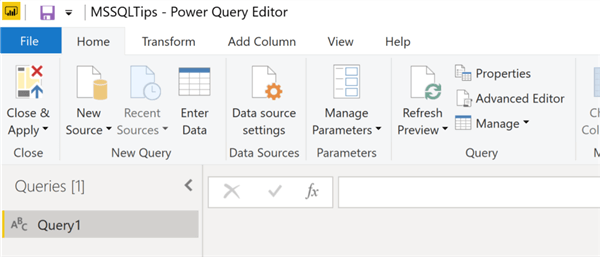
Figure 2: Power Query Editor Query1
Let's embed our small M script into the Power BI Query. Right click on Query1 and then select "Advanced Editor" and copy the code.
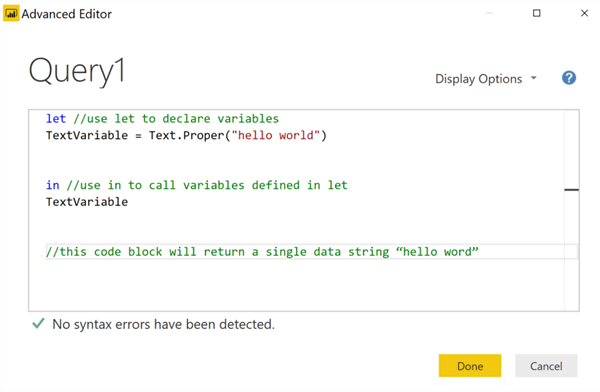
Figure 3: Advanced Editor for M script "hello world"
Click "Done" to close and apply the changes to the Advanced Editor. Query1 will return the text string "Hello World".
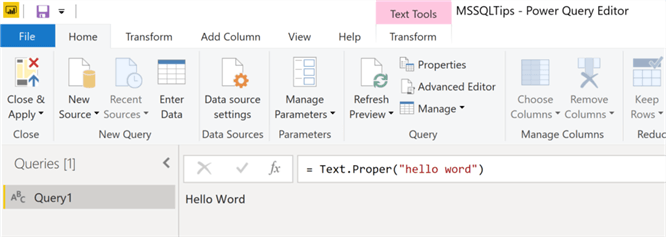
Figure 4: Hello World preview in Power Query Editor
Click "Close & Apply" to save the changes and Power BI will now fetch the data:
Figure 5: Power BI data refresh
For the purposes of this tip, I am using a simple card visualization to illustrate the result and we can see below the M language query result presented in a Power BI report.
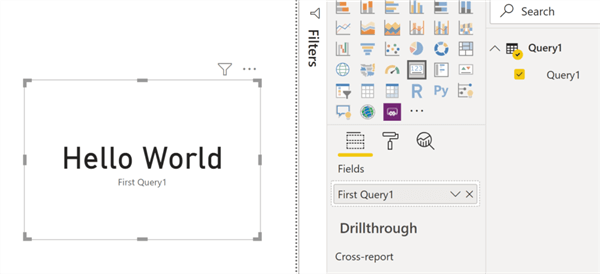
Figure 6: Power BI Report card for "Hello World"
M language Example: GET request followed by JSON parsing to the table
Before we go through API examples with Power Query M formula language, it's worth mentioning that Power BI has a standard Web data source that can be used without any coding at all, as described by an earlier tip. Unfortunately, the standard Web data source has limitations, when it comes to passing parameters and combining several GET requests into one query.
For the purpose of this tip I will be using the free API from https://docs.openaq.org/. As with all APIs the documentation is very important as it is the basis for any good data consumer project.
Let's start simple by querying the list of all countries that are participating in the clean air initiative.
In the Power Query Editor Create a new Blank Query called "Countries" and then add the following code to it:
let
   Source = Json.Document(Web.Contents("https://api.openaq.org/v1/countries"))
   //WebContents by default executes a GET request
   //Json.Document processes text for web into a JSON output

in
   Source

//this code block will return a single data string "hello world"
The Advanced editor should look like this:
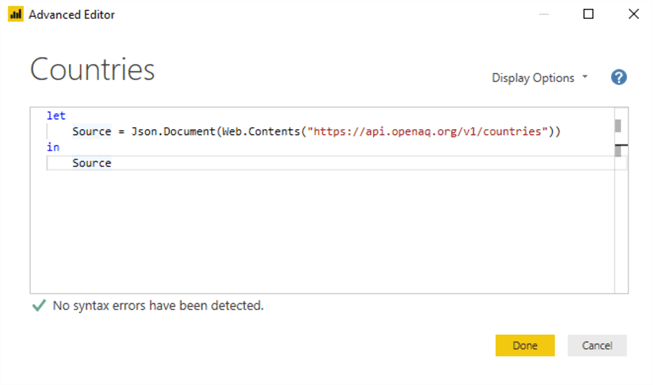
Figure 7: Advanced Query Editor API Countries
Check for any syntax errors and click "Done". You will be presented with the following result:

Figure 8: Power Query Editor Data preview countries
In red, I marked the two results that one gets from an API GET request in Power BI. One is called Meta and it contains the metadata returned from the API provider. Click on "Record" to see the metadata that has been actually returned in the call:
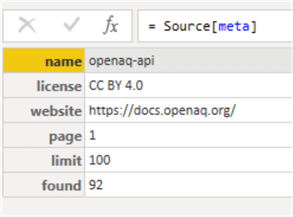
Figure 9: Countries GET request metadata
Apart from the name, license and website, we have information like page number, limit (this is the default limit) and the number of records (92). This is not something we will use in our reports, but we will be working with metadata later.
To go back, delete the Metadata navigation step as marked in red in lower right corner as shown below:

Figure 10: Remove the metadata step
Now click on the List of results to see what data has been returned by the API GET request:
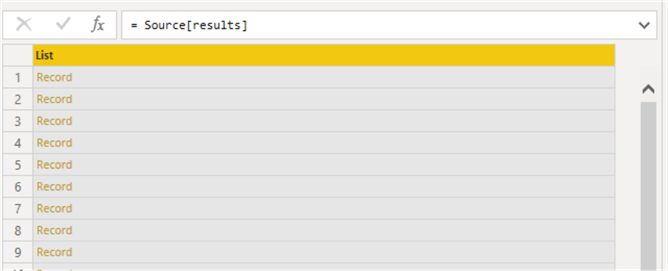
Figure 11: Expand the list of results
This is the list of 92 records each of which consists of one country as shown below:
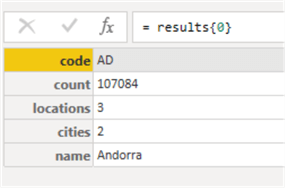
Figure 12: View of one country record
To convert the list of Records to a Country table click the "To Table" button as marked below:
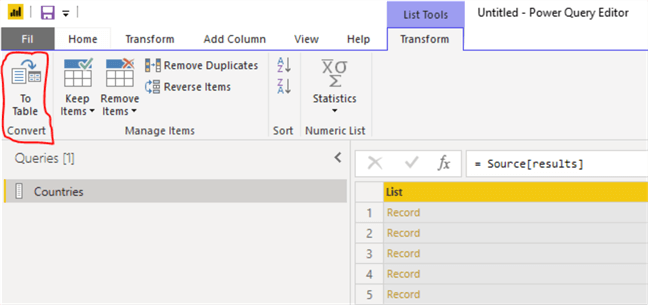
Figure 13: Convert list of records to table
Click OK on the dialog box below:
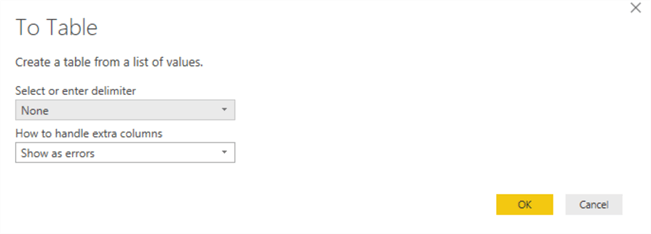
Figure 14: Handling error in conversion
Our dataset does not use delimiters, so this is the result of List to table conversion:

Figure 15: Split the column by its underlying attributes
Now we have one column that describes all attributes of a country. This is not something one can use in a report. We need to split the attributes into individual columns.
Click on the button marked in red to the right of Column1 as shown in the picture above. Now all country attributes are in separate columns and can easily be used in a Power BI report. Click on "Close and Apply" to use the data.

Figure 16: Final result of countries table
As shown below, the code returned is an ISO standard 2-character code associated with each country in a Power BI filled map object by Bing.
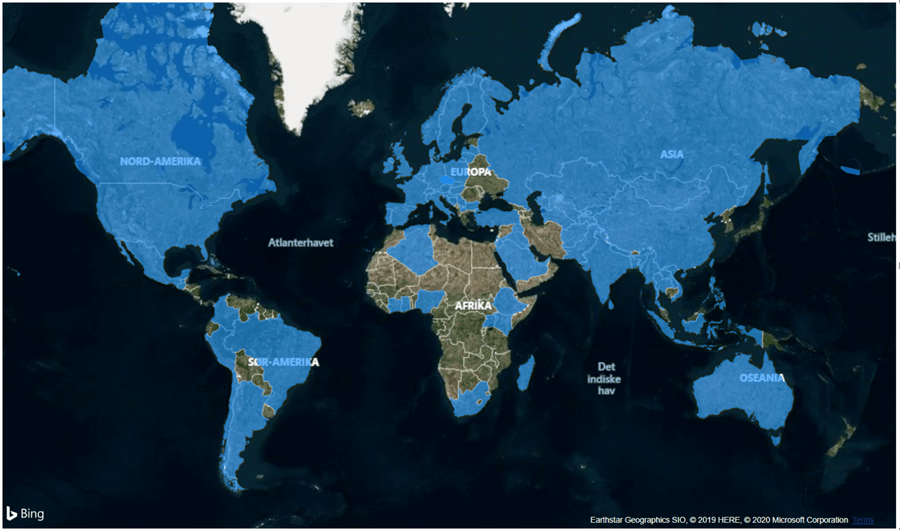
Figure 17: Countries map using ISO code
Wait, what has actually happened to our Power Query M formula language? We have been using the GUI for most of our steps. Well the GUI was programming the steps in the Power Query M formula language. Go back to the Power Query Editor and select Advanced Editor and you will find the following code:

Figure 18: M-Script for countries JSON API to table
let
   Source = Json.Document(Web.Contents("https://api.openaq.org/v1/countries"))
   results = Source[results],
   #"Converted to Table" = Table.FromList(results, Splitter.SplitByNothing(), null, null, ExtraValues.Error),
   #"Expanded Column1" = Table.ExpandRecordColumn(#"Converted to Table", "Column1", {"code", "count", "locations", "cities", "name"}, {"Column1.code", "Column1.count", "Column1.locations", "Column1.cities", "Column1.name"})
in
   #"Expanded Column1"
Each line in the let block corresponds to each step added to our query. See the steps shown below:
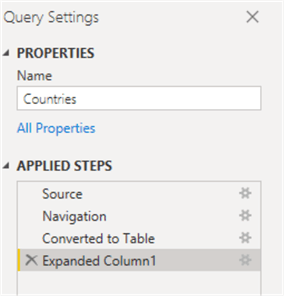
Figure 19: M-Script steps
M language Example: GET request with Parameters
Power Query M formula language is very handy when you need to pass parameters with GET requests. Here the standard web source unfortunately lacks functionality.
For this example, we will query a list of cities from https://api.openaq.org/v1/cities. If we run the same M script as before without passing any parameters the request will return the following metadata results:
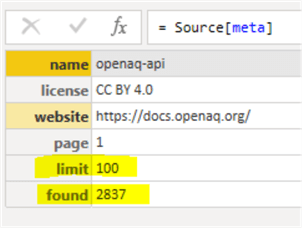
Figure 20: Metadata for cities GET request
The metadata tells us that the system has found 2837 records, but the request has a default limit of 100. That means we only got 100 records out of 2837. We will need to change the limit. Let's do that as shown below:
let
   cities_url = "https://api.openaq.org/v1/cities", //Web Url
   request_limit = "10000", //number represented by a string
   Source = Json.Document(Web.Contents(cities_url, [Query = [limit = request_limit]])) //Query is used to pass parameters
in
   Source
Now let's have a look at the metadata once more:
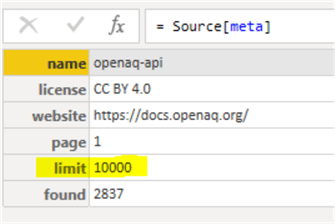
Figure 21: Metadata for cities GET request with maximum limit
The limit has changed from 100 to 10000 and it is key that it is more than the number of records.
If we go through the steps of data transformations as we did above, we should get a city table that looks like this:

Figure 22: Cities GET request data after being transformed from JSON to table
The M script code for the query and transformation is shown below:
let
    cities_url = "https://api.openaq.org/v1/cities", //Web Url
    request_limit = "10000", //number represented by a string
    Source = Json.Document(Web.Contents(cities_url, [Query = [limit = request_limit]])),
    // number represented by a string
    results = Source[results],
    #"Converted to Table" = Table.FromList(results, Splitter.SplitByNothing(), null, null, ExtraValues.Error),
    #"Renamed Columns" = Table.RenameColumns(#"Converted to Table",{{"Column1", "Cities"}}),
    #"Expanded Cities" = Table.ExpandRecordColumn(#"Renamed Columns", "Cities", {"country", "name", "city", "count", "locations"}, {"Cities.country", "Cities.name", "Cities.city", "Cities.count", "Cities.locations"})
in
    #"Expanded Cities"
M language Example: Combining GET requests
Let's run another example where the first GET request will return the number of countries and the second GET request using a list of country ISO codes to filter the request to get a list of cities for those countries.
At first we will need to modify our Countries query to return the list of country codes:
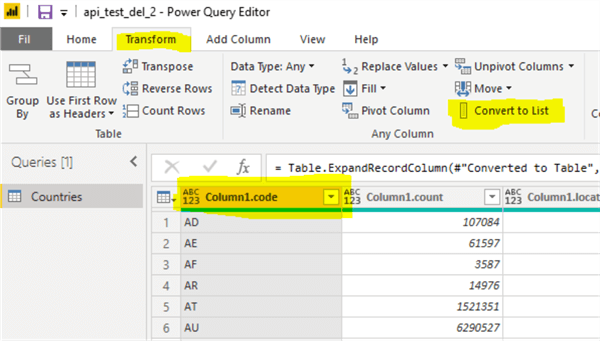
Figure 23: Convert country ISO code to list
Select Column1.code column and click on the "Convert to List" button as highlighted above:
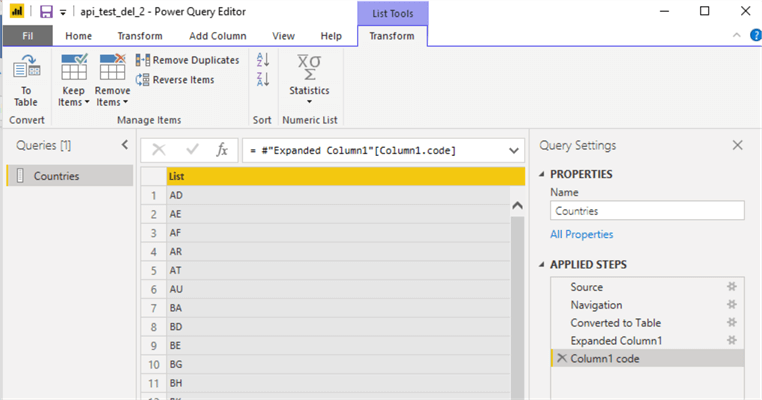
Figure 24: Country ISO code list
The M script is as follows:
let
    Source = Json.Document(Web.Contents("https://api.openaq.org/v1/countries")),
    results = Source[results],
    #"Converted to Table" = Table.FromList(results, Splitter.SplitByNothing(), null, null, ExtraValues.Error),
    #"Expanded Column1" = Table.ExpandRecordColumn(#"Converted to Table", "Column1", {"code", "count", "locations", "cities", "name"}, {"Column1.code", "Column1.count", "Column1.locations", "Column1.cities", "Column1.name"}),
    #"Column1 code" = #"Expanded Column1"[Column1.code]
in
    #"Column1 code"
This query output now can be used to feed data into our parameter list. Right click on queries and select to create "New Parameter":
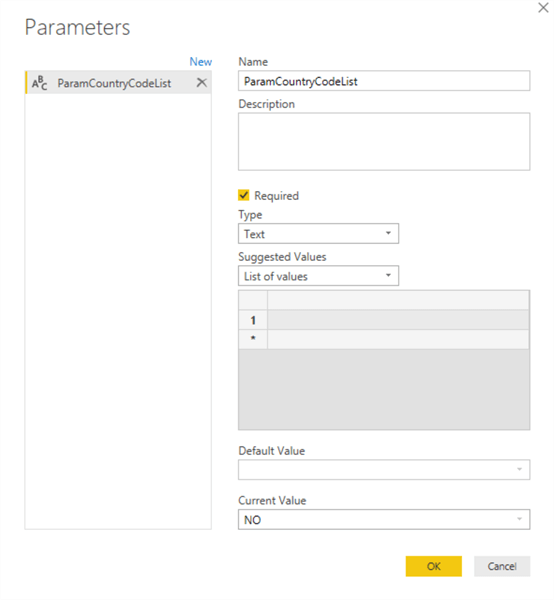
Figure 25: Parameter ParamCountryCodeList
Now we can use this parameter to pass values from one GET request to another.
Both GET requests have to be part of the same query otherwise the advanced query editor will return an error.
Here is the M script for all cities that are found in the list of countries returned by the first GET request:
let
    Source = Json.Document(Web.Contents("https://api.openaq.org/v1/countries")),
    results = Source[results],
    #"Converted to Table" = Table.FromList(results, Splitter.SplitByNothing(), null, null, ExtraValues.Error),
    #"Expanded Column1" = Table.ExpandRecordColumn(#"Converted to Table", "Column1", {"code", "count", "locations", "cities", "name"}, {"Column1.code", "Column1.count", "Column1.locations", "Column1.cities", "Column1.name"}),
    #"Column1 code" = #"Expanded Column1"[Column1.code],
    ParamCountryCodeList = #"Column1 code",
    cities_url = "https://api.openaq.org/v1/cities", //Web Url
    request_limit = "10000", //number represented by a string
    SourceCities = Json.Document(Web.Contents(cities_url, [Query = [limit = request_limit, country = ParamCountryCodeList]])),
    // number represented by a string
    ListOfRecords = SourceCities[results],
    #"Converted to CitiesTable" = Table.FromList(ListOfRecords, Splitter.SplitByNothing(), null, null, ExtraValues.Error),
    #"Renamed Columns" = Table.RenameColumns(#"Converted to CitiesTable",{{"Column1", "Cities"}}),
    #"Expanded Cities" = Table.ExpandRecordColumn(#"Renamed Columns", "Cities", {"country", "name", "city", "count", "locations"}, {"Cities.country", "Cities.name", "Cities.city", "Cities.count", "Cities.locations"})
in
      #"Expanded Cities"
or as shown in the Advanced Editor:
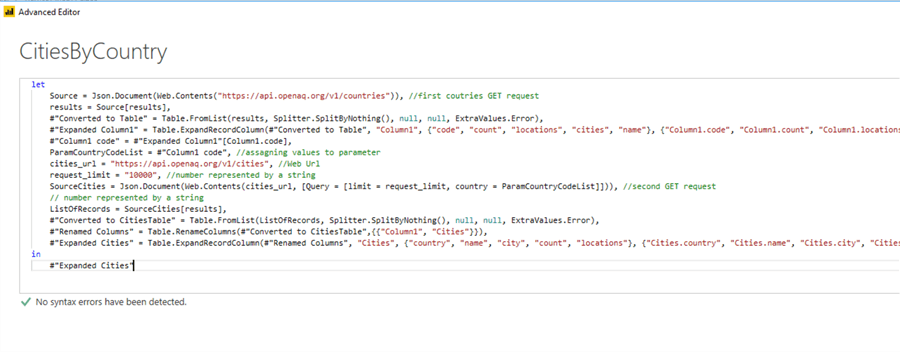
Figure 26: M-script multiple GET requests
The Cities table in the advanced editor should look like this:
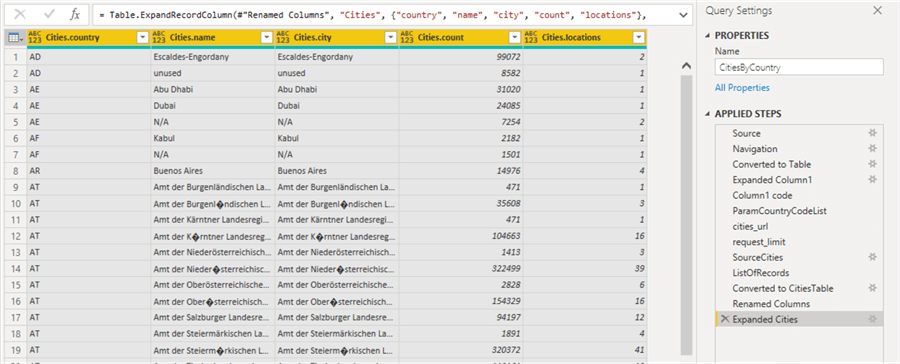
Figure 27: Cites table only found in the list of countries
Conclusion
The Power Query M formula language is an excellent tool when one has to get data direct from an API source to Power BI. It is of course no match when it comes to functionality against backend tools like SSIS, ADF or Logic Apps that possess a lot more power to manipulate API calls. But, with both graphical and code based interfaces to configure the transformations it is not far behind and this allows for quick and easy data transformations.
Consider Power Query M formula language for your next small Analytics project before you jump into a lot of heavy backend programming.
Next Steps
Learn more about Power BI in this 3 hour training course.
About the author
 Semjon Terehhov is an MCSE in Data Management and Analytics, Data consultant & Partner at Cloudberries Norway.
This author pledges the content of this article is based on professional experience and not AI generated.
View all my tips
Article Last Updated: 2020-02-12


