By: Filip Holub | Updated: 2020-03-18 | Comments (1) | Related: > Encryption
Problem
Microsoft released Always Encrypted with SQL Server 2016 to allow encrypted data "in flight" as well as "at rest". You can find more information in this article SQL Server 2016 Always Encrypted. With SQL Server 2019, Microsoft introduced Always Encrypted with Secure Enclaves that provides extended functionality to the Always Encrypted feature and this tip covers how to set this up.
Solution
In this tip, I would like to show how to deploy Always Encrypted with Secure Enclaves on SQL Server 2019.
The steps are:
- Configure Host Guardian Service on your Windows server
- Configure Windows Server with SQL Server as a Guarded Host
- Configure Always Encrypted with Secure Enclaves on SQL Server and Database
My Configuration
- Windows Server 2019 Datacenter (Computer Name: WinSrv2019Dtc)
- Windows Server 2019 Datacenter with SQL Server 2019 Developer (Computer Name: SQLServer2019)
- SQL Server Management Studio (SSMS) 18.4
Configure Host Guardian Service on your Windows server
NOTE: This machine cannot be joined to the domain before deploying Host Guardian Service!
First of all, we have to install a new feature HostGuardianServiceRole on our Windows server (without SQL Server - WinSrv2019Dtc) using PowerShell.
Open PowerShell (run as Administrator) and run the following:
Install-WindowsFeature -Name HostGuardianServiceRole -IncludeManagementTools -Restart

As soon as your Windows server is back online, we will need to install the Host Guardian Service, open PowerShell (run as Administrator) and run the following:
$AdminPassword = ConvertTo-SecureString -AsPlainText 'passwordofadministrator' -ForceInInstall-HgsServer -HgsDomainName 'domain.local' -SafeModeAdministratorPassword $AdminPassword -Restart

As you can see, this command created a new Active Directory Domain and joined our HGS computer to the domain and installed a Failover Cluster.
In my case, the name of the cluster is HgsCluster50E07 in domainlab.local.

After a reboot, we need to configure key attestation for your HGS. Open PowerShell (run as Administrator) and run the following.
Initialize-HgsAttestation -HgsServiceName 'hgs' -TrustHostKey

If finished successfully, you can check the results in the log file, in my case the file is: C:\Windows\Logs\HgsServer\200106094415\WINSRV2019STD

Configure Windows Server with SQL Server as a Guarded Host
Connect to the Windows server with SQL Server and install the Guarded Host feature, if Hyper-V is not installed on the machine it will be installed automatically with this feature:
Enable-WindowsOptionalFeature -Online -FeatureName HostGuardian -All

Then restart the computer.

After the restart, on the Windows server with SQL Server, you have to check if SQL Server is running on a virtual machine or physical machine without support UEFI Secure Boot, you must remove RequirePlatformSecurityFeatures in the registry, by using the following commands via PowerShell:
Set-ItemProperty -Path HKLM:\SYSTEM\CurrentControlSet\Control\DeviceGuard -Name RequirePlatformSecurityFeatures -Value 0
Then restart the Windows server to apply the changes.
Open PowerShell, generate the host key and export as a file to the desktop.
Set-HgsClientHostKeyntGet-HgsClientHostKey -Path $HOME\Desktop\hostkey.cer

Then run the following command where -Name parameter is the name of your SQL Server machine.
Add-HgsAttestationHostKey -Name SQLSERVER2019 -Path $HOME\Desktop\hostkey.cer

Then sign in to your Windows server with SQL Server (SQLServer2019) and attest the machine to the HGS machine (WinSrv2019Dtcrv2019Dtc) using the following commands via PowerShell.
Set-HgsClientConfiguration -AttestationServerUrl http://10.0.2.5/Attestation -KeyProtectionServerUrl http://10.0.2.5/KeyProtection/
Configure Always Encrypted with Secure Enclaves on SQL Server and Database
Log on to your Windows server with SQL Server, open SQL Server Management Studio (SSMS) and enable column encryption enclave as follows.
EXEC sys.sp_configure 'column encryption enclave type', 1;
RECONFIGURE;
GO
Restart the SQL Server Engine service.
Then check if column encryption enclave type was enabled using the following query.
SELECT [name], [value], [value_in_use]
FROM sys.configurations
WHERE [name] = 'column encryption enclave type';

I then restored the AdventureWorks2017 database to my SQL Server for testing.
Create Column Master Key
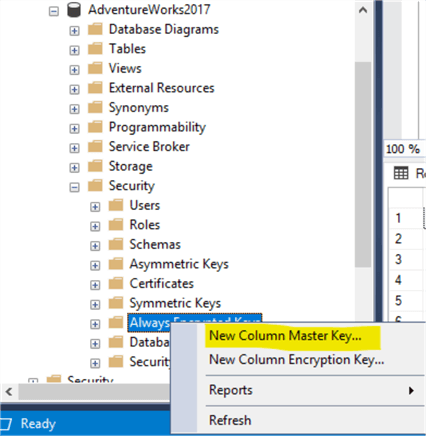
First create a column Master Key by expanding the database AdventureWorks2017 > Security > Always Encrypted Keys and right click and choose New Column Master Key.

I used the following settings:
- Name: CMK1
- KeyStore: Windows Certification Store – Local Machine
- Check Allow enclave computations
- Click OK

Create Column Encryption Key
Expand database AdventureWorks2017 > Security > Always Encrypted Keys > Column Encryption Keys and right click and choose New Column Encryption Key.

I used the following settings:
- Name: CEK1
- Column master Key: CMK1
- Click OK

The results look as follows:

Connect and Encrypt Column
Connect to SQL Server via SSMS with these options:

If we are successfully connected (with Always Encrypted enabled), we will able to encrypt a column. In my case, I have chosen Person.Password table and column PasswordSalt which is a varchar column.
USE [AdventureWorks2017];
GO
ALTER TABLE [Person].[Password]
ALTER COLUMN [PasswordSalt] [varchar](10) COLLATE Latin1_General_BIN2 ENCRYPTED WITH (COLUMN_ENCRYPTION_KEY = [CEK1],
ENCRYPTION_TYPE = Randomized, ALGORITHM = 'AEAD_AES_256_CBC_HMAC_SHA_256') NOT NULL
WITH(ONLINE = ON);
Now, the column should be encrypted and you can confirm this with a new connection to SQL Server without Always Encrypted enabled and select data from the table [AdventureWorks2017].[Person].[Password].

Summary
As we can see, there are a couple of differences in configuring Always Encrypted with Secure Enclaves. It’s not easy to configure, honestly. We will probably rarely see this in a production environment – IMHO. I’m always excited about new features in SQL Server and in some cases this could be very helpful.
Next Steps
- Always Encrypted with secure enclaves
- Always Encrypted
- Configure and use Always Encrypted with secure enclaves
About the author
 Filip Holub is a big SQL Server enthusiast from the Czech Republic with 5 years of DBA experience.
This author pledges the content of this article is based on professional experience and not AI generated.
View all my tips
Article Last Updated: 2020-03-18


