By: Edwin Sarmiento | Updated: 2020-02-27 | Comments (4) | Related: > SQL Server on Linux
Problem
In a previous tip on Installing SQL Server vNext CTP1 on Red Hat Linux 7.2, we read about how we can install SQL Server 2017 on a Linux operating system. We also noticed that this automatically installs the latest update of SQL Server 2017 on Linux which, at the time of writing, is SQL Server 2017 CU19. We have standardized our deployments with SQL Server 2017 CU 16. How do we go about installing a specific version of SQL Server on Linux?
Solution
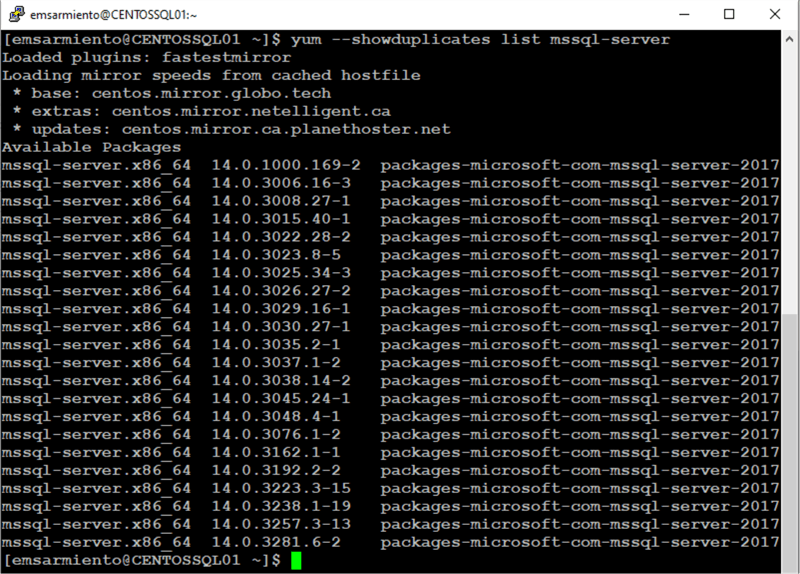
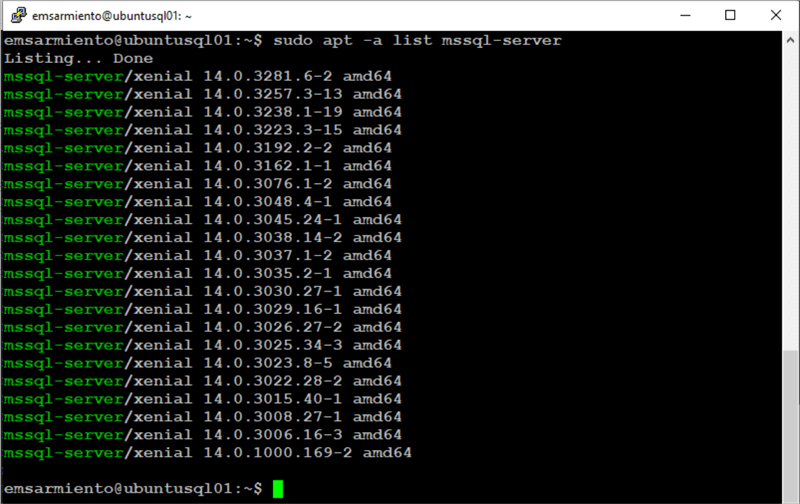
By default, installing SQL Server on Linux will automatically use the latest builds from the Microsoft Package Repositories. So, every time you install SQL Server on Linux, you are guaranteed to get the latest version. While this is a great way to make sure that all your SQL Server on Linux deployments are up to date, there might be cases where you need a specific version. The way to install a specific version of SQL Server on Linux is to explore the different packages on the Microsoft Package Repositories and choose the one that you need. You can check the available packages for RHEL/CentOS 7 (SQL Server 2017 | SQL Server 2019) or Ubuntu 16.04 (SQL Server 2017 | SQL Server 2019). Alternatively, you can also run the command below to list all the available packages for the version of SQL Server on Linux that you want to install. The result of this command will depend on the version of SQL Server that you are trying to install and it is based on the repository configuration file you are using.
#For RHEL/CentOS – SQL Server 2017
sudo yum --showduplicates list mssql-server

#For Ubuntu – SQL Server 2017
sudo apt -a list mssql-server

Be sure to check the Microsoft official SQL Server 2017 build versions website for the version number that you want to install. Don’t be misled by the Applies to: section of the KB article. While it explicitly says Windows, the SQL Server build numbers are the same on Linux.
The corresponding build number for SQL Server 2017 CU 16 is 14.0.3223.3. Run the command below to install this specific version on RHEL/CentOS.
#For RHEL/CentOS
sudo yum install -y mssql-server-14.0.3223.3-15
The format to install the specific version is on RHEL/CentOS is mssql-server-buildNumber. The buildNumber is based on the result of previous command - sudo yum --showduplicates list mssql-server on RHEL/CentOS or sudo apt -a list mssql-server on Ubuntu.
Run the command below to install this specific version on Ubuntu.
#For Ubuntu
sudo apt-get install -y mssql-server=14.0.3223.3-15
The format to install the specific version is on Ubuntu is mssql-server=buildNumber.
Proceed to configure the SQL Server on Linux installation by running the command below. Follow the prompts to choose your SQL Server edition and set the sa password.
sudo /opt/mssql/bin/mssql-conf setup
After the installation and configuration completes, run the command below to enable the SQL Server daemon (service) to launch on server boot.
sudo systemctl enable mssql-server
And restart the SQL Server daemon (service) for the changes to take effect.
sudo systemctl restart mssql-server
Be sure to configure the proper firewall rules on your Linux distribution to allow connectivity to SQL Server.
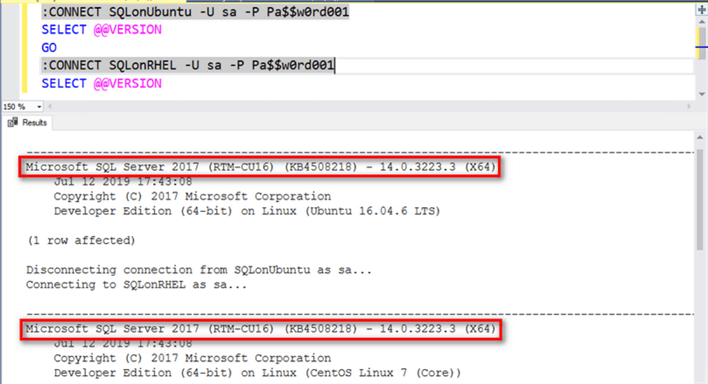
You can verify that the specific version was installed.

Next Steps
- Review the different SQL Server 2017 or SQL Server 2019 build versions to identify the build number of the version you want to install
- Review the previous tips on Installing SQL Server on Linux
About the author
 Edwin M Sarmiento is a Microsoft SQL Server MVP and Microsoft Certified Master from Ottawa, Canada specializing in high availability, disaster recovery and system infrastructures.
This author pledges the content of this article is based on professional experience and not AI generated.
View all my tips
Article Last Updated: 2020-02-27


