By: John Miner | Updated: 2020-04-02 | Comments | Related: 1 | 2 | 3 | More > Integration Services Development
Problem
There are many existing on premises SSIS packages that use the File System Task to copy and delete files. For instance, an ingestion process might save files to an inbound directory. After processing the files, a cleanup process might timestamp the files and move the files to an archive directory. Reprocessing can be done by moving files from the archive to inbound directory.
If your company is thinking of lifting and shifting these packages to Azure, how can you replicate these file management tasks using SSIS?
Solution
Microsoft has been supplying the SSIS developer with a set of tools for Azure since 2012. The most recent Azure Feature Pack for Visual Studio 2019 was released to general availability on November 5, 2019. Most systems designed for Azure use two types of storage: Blob Storage and Data Lake Storage. The Flexible File Task is the next evolution in managing files regardless where they are stored. This control will work with local, blob and data lake storage systems.
Today, we are going to investigate how the Flexible File Task can replace existing legacy file management code used with local storage.
Business Problem
There are three use cases that in which the Flexible File Task can come in handy.
| Use Case | Feature |
|---|---|
| 1 | Copying and deleting files saved in local storage. |
| 2 | Copying and deleting files saved in blob storage. |
| 3 | Copying and deleting files saved in data lake storage. |
Because this Flexible File Task works a variety of storage layers, replacing existing code with this new control might be a good idea. This will ease any future migrations to the cloud. For each storage layer, it is important to know both prior controls used in current systems and new controls provided with the most recent feature pack. A comparison between the File System Task and the Flexible File Task is useful for understanding the different design patterns that will work with local storage.
It is assumed that a development machine with Visual Studio 2019 and the SSIS extensions has been created. See this prior article for a typical build list for a development machine. In addition, the Azure Feature Pack for Visual Studio 2019 must be downloaded and installed within the environment. I choose to install the x86 feature pack since drivers are plentiful for this build version.
The focus of this article will be on using the new control with local file storage.
Use Case #1 – Local File Management
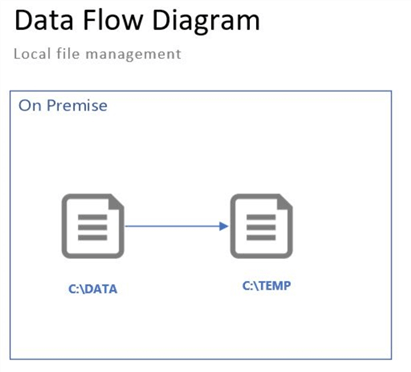
The first business case that we want to investigate is the movement of files from one directory to another. The move operation can be implemented with a copy action followed by a delete action. The data flow diagram shows the logical processing required by the program. A data architect might use the movement of files as part of the overall design. The "to be consumed" and "have been consumed" logical directories keep track of state for a given process.
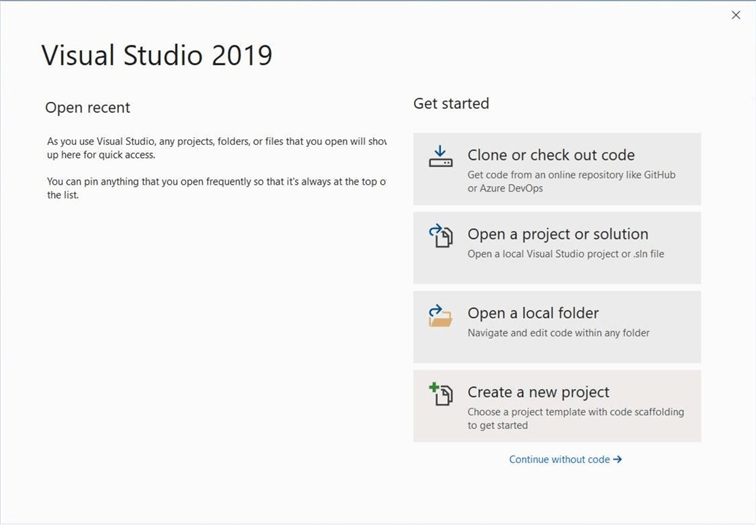
We are going to create one Visual Studio project to test all our business use cases. Each case will be a different package. Choose the startup package before executing a given test case. Let us start by opening the Visual Studio 2019 integrated development environment. We’ll begin by creating a new project using the get started menu.
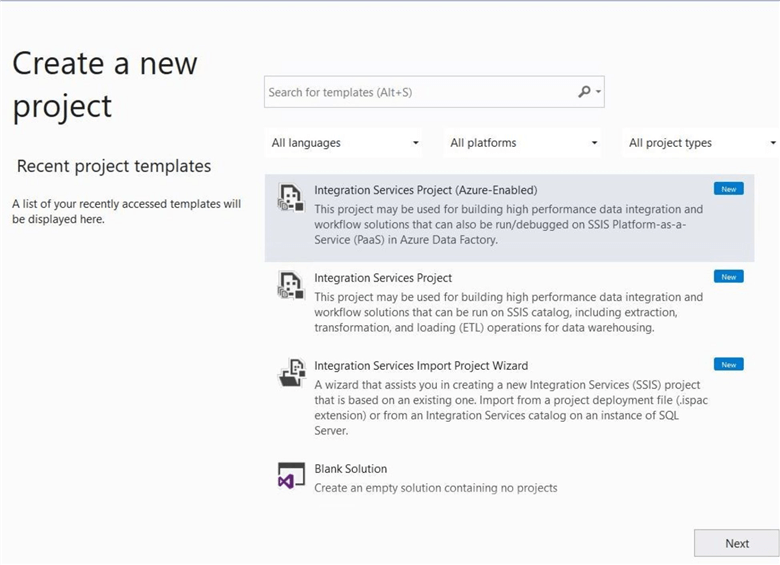
There are three types of Integrated services projects. Choose the middle selection for building package a SSIS package from scratch. The default deployment option is a local install. Click the next button to continue.
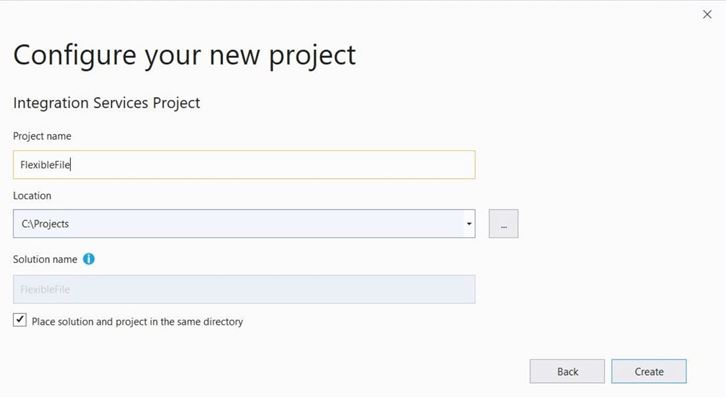
I chose to name the project "Flexible File" and save all the code underneath the c:\projects directory. Click the create button to start working with a new project. Please rename the default package to "Example1a.dtsx". In the next section, will work with a single file using the older File System Task.
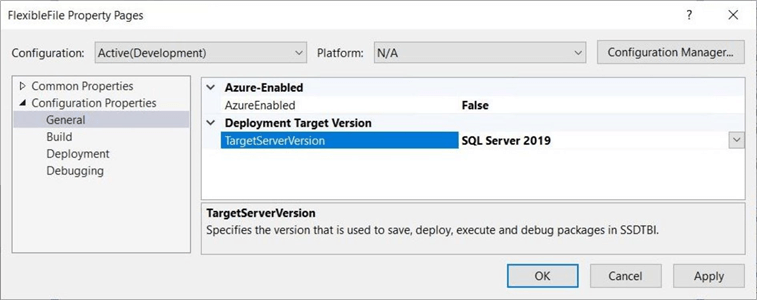
Finally, the target server version of the package is important. Our development environment has SQL Server 2019 installed locally. However, the Azure SSIS integration runtimes only allow for a SQL Server 2017 target server version. Make sure you select the correct version before continuing.
SSIS File System Task
The File System Task has been part of the SSIS toolbox since the beginning of the product. It allows for manipulation of both directories and files. Today, we want to copy the file named "S&P-2013.zip" from the DATA to the TEMP directory and then undo this action with a delete operation. Both file directories are children of the root directory of the C drive. The first step in creating a package is to define the connections.
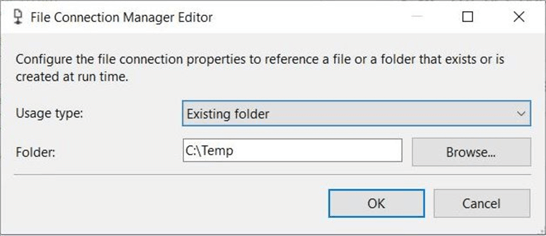
The image below shows the source directory connection.
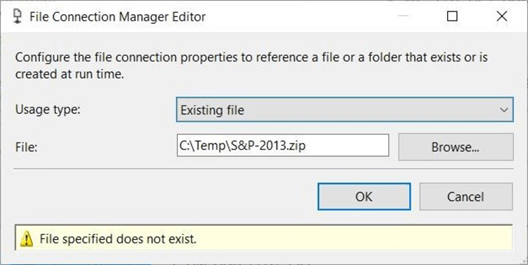
The image below shows the destination file connection. To avoid errors like the one below, make sure delayed evaluation is set at either the object or package level.
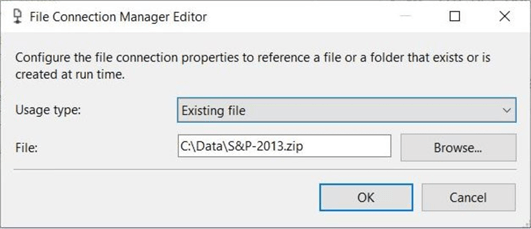
The image below shows the source file connection.
I like using a sequence container to group multiple actions (tasks) into one logical unit. Drag a sequence container onto the control flow area. Within the container, create two file system tasks. These tasks should have a success precedence constraint between them. If the first task completes, execute the second task. Please name all the objects on the control flow and connection manager using a convention that your company has agreed upon.
Jamie Thompson came up with a simple naming guideline in 2006. I have adapted that list to my own usage. In addition, it is very important to document everything that you create. An annotation has been added to the control flow area to document this package.
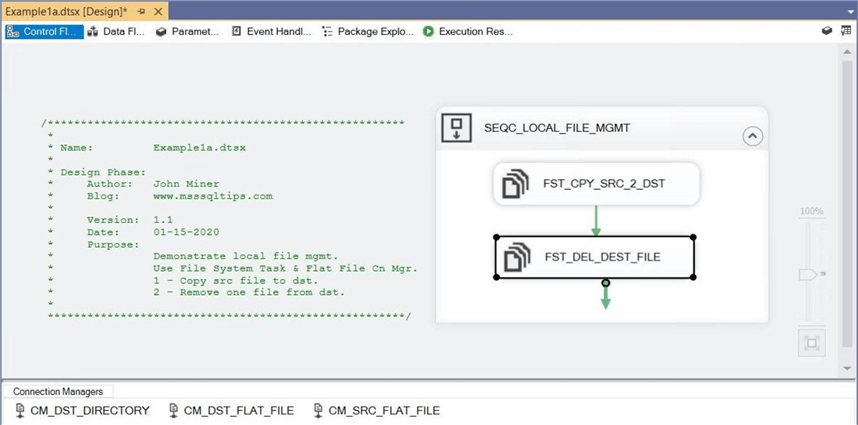
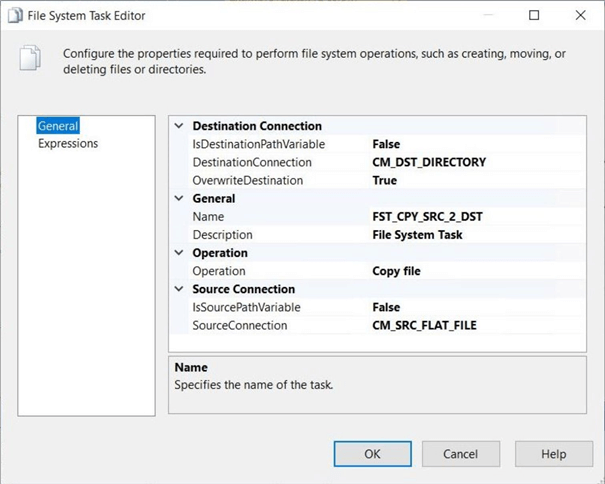
Let’s look at the details behind the COPY action seen below. The source and destination connections are pointing to the corresponding connectors. The copy file action has been chosen as the operation to perform.
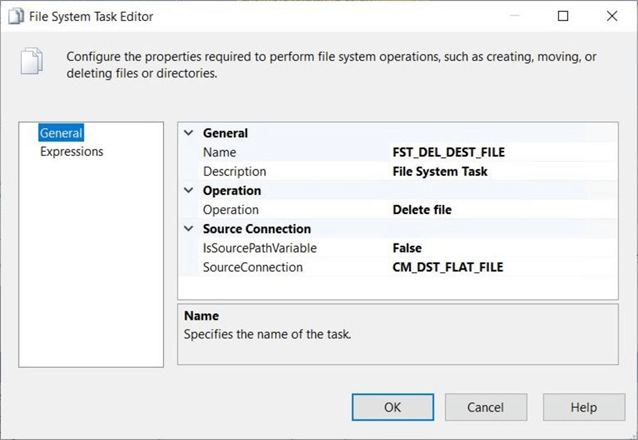
Next, the DELETE action shown below only uses one connector. We just need to provide the full path to the file to delete it from the operating system. The delete file action has been chosen as the operation to execute.
If the above steps were followed correctly, the package will execute to completion without any errors. The source file will be copied to the destination directory. Then this action will be reversed with a delete file operation.
Local File Storage
The image below shows the combined S&P 500 daily stock information compressed into a one zip file for each year. Each zip file contains 505 data files, one for each S&P 500 company. There is a total of 6 years of data shown in the image below.
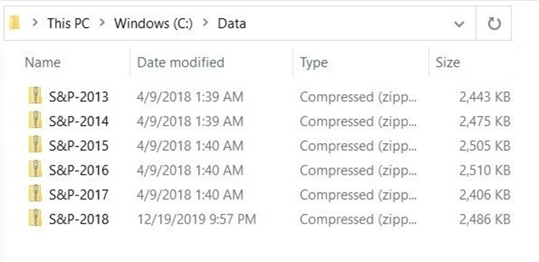
After executing the first File System Task, one file should be copied from the DATA to the TEMP directory as shown below. This file will disappear after the second File System Task completes.

In the next section, we will go over how to use the new control to complete this same design pattern.
SSIS Flexible File Task
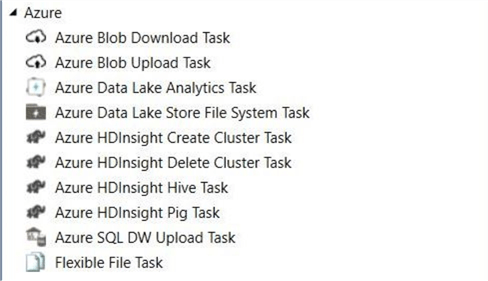
The Flexible File Task can only be used to copy and delete files. Therefore, it cannot manipulate local directories and files like the older control. Again, we are going to repeat the development required for the first use case. The Azure feature pack has its own section in the SSIS toolbox. The Flexible File Task can be seen at the bottom of the image shown below.
Please created a new package named "Example1b.dtsx" within the SSIS project. Again, create a sequence object to group two Flexible File Task controls. The first control will copy the file from the source to the destination directory. The second control will delete the file from the destination directory. Please notice that no connection managers are required to perform these actions. Make sure there is a precedence constraint between the tasks. We do not want to execute them in parallel. As always, document and name your code correctly for long term success.
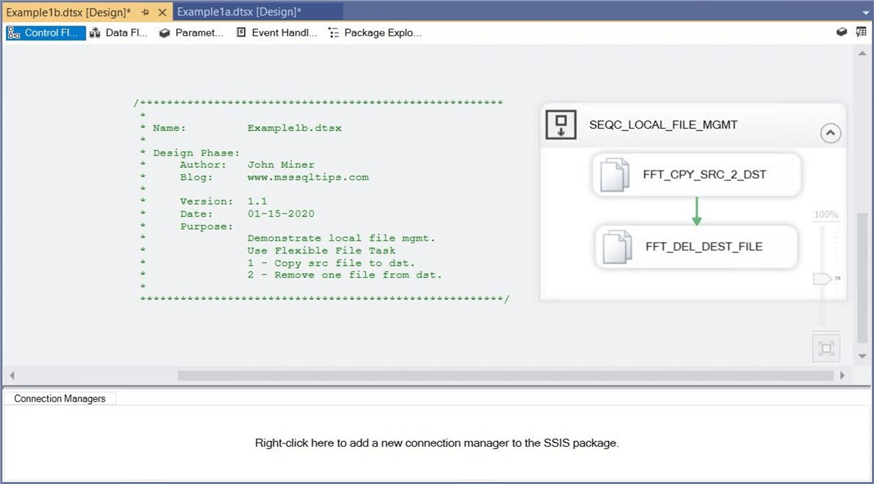
If the above steps were followed correctly, the package will execute to completion without any errors. The source file will be copied to the destination directory. Then, the action will be reversed. The first two packages demonstrate a trivial requirement of copying a single file and deleting a single file. In the real world, things are usually more complicated. How can we dynamically move a variable number of files from one directory to another?
SSIS For Each Loop Container
The For Each Loop Container or parent task uses an iterator to dynamically supply the child tasks with each matching file name for a given directory and search pattern. This file name should be stored in a package variable that is updated during each loop. A mapping of the package variable to the properties exposed by the child tasks completes the coding. During execution, the package variables overwrite the child task properties.
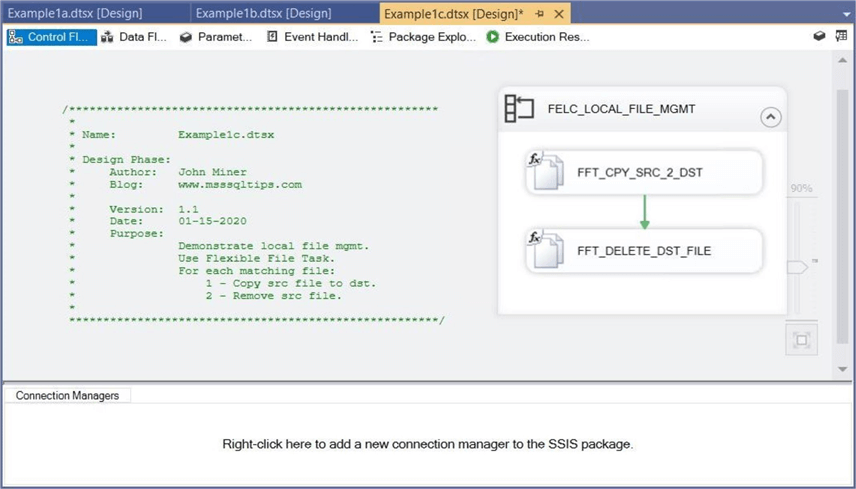
Now, please create a new packaged named "Example1c.dtsx" within the SSIS package. Place a For Each Loop Container on the control flow area. This container will group the two Flexible File Tasks. Unlike the previous two examples, we are going to implement a MOVE action. This means the first control will copy files from the source directory to the destination directory. The second control will remove the files from the source directory. The precedence constraint makes sure the COPY action is completed before the DELETE action is started. Finally, please use a naming convention and internal documentation for overall package hygiene.
To make a package dynamic, we need to define variables. Please see image below for details. Right click the Control Flow area, select variables from the drop-down menu. There are scoping rules for variables. They can be defined at the package or control level. Since we want to pass the variables from outside SSIS to the package, please define the variables at the package level. The following variables are used by the program: [varDstDir] – the destination folder, [varSrcDir] – the source folder, [varFileSpec] – the file search pattern, and [varFileNm]– the dynamic file name produced by the enumerator.

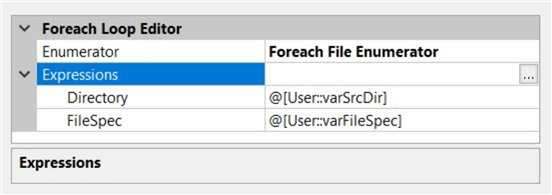
There are many different enumerator types that can be used within the for each loop container. Please pick the file enumerator. The folder and file specification are static place holders. If we did not map the variables to expressions, the package would always look for ZIP files in the DATA directory. Make sure you retrieve the name and extension for the output file name. The image below shows our static selections.
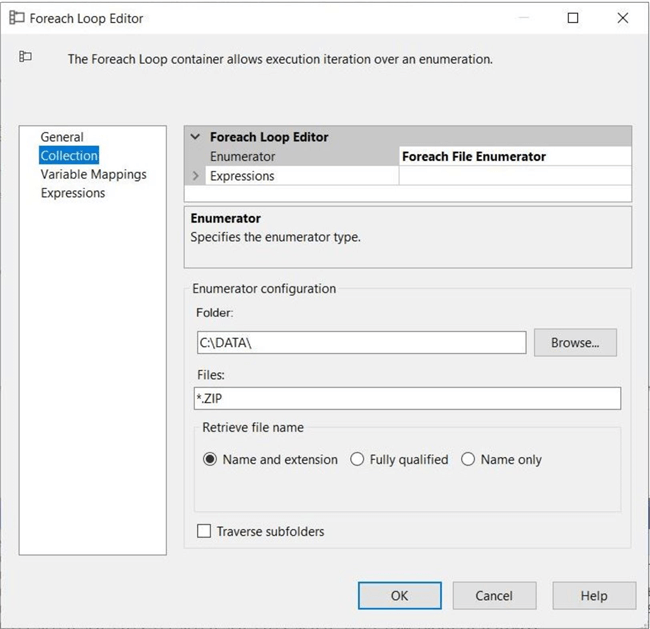
Please use the ellipses in the expression section of the enumerator to map control properties to package variables. In the future, we can call this package with different parameters (packages variables) to produce different results.
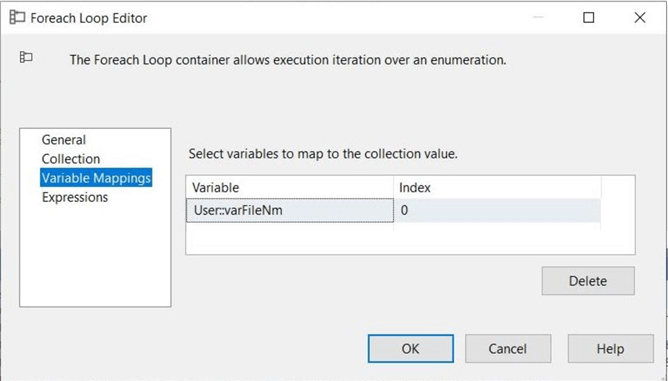
The variables mappings section is where the output from the enumerator is mapped to our package variable. The output is always located at index 0 for this control and should be mapped to our file name variable. Below shows the results of this data entry.
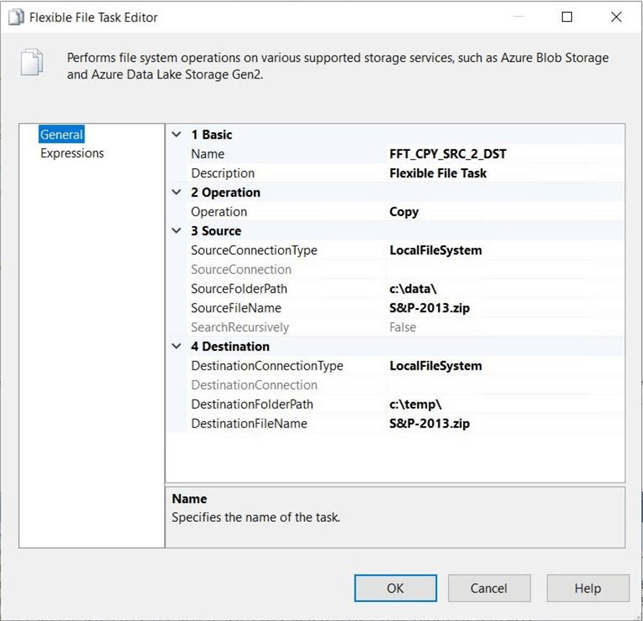
The entry of static information into the Flexible File Task editor is required to prevent design time errors. You can always enable delay validation property. This action might not work for all entries. In short, just enter the operation type, the source and destination directory, and the source and destination file names. For details, see the image below.
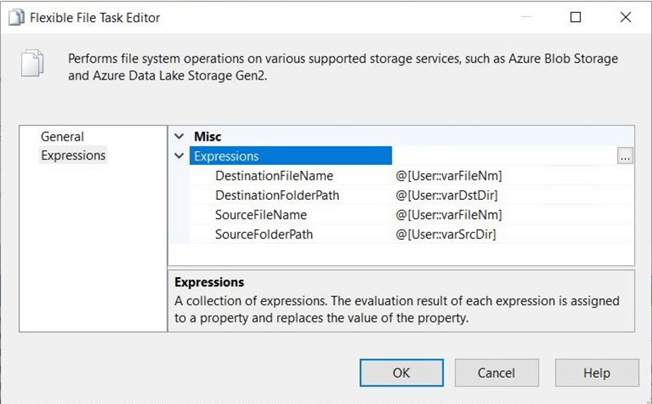
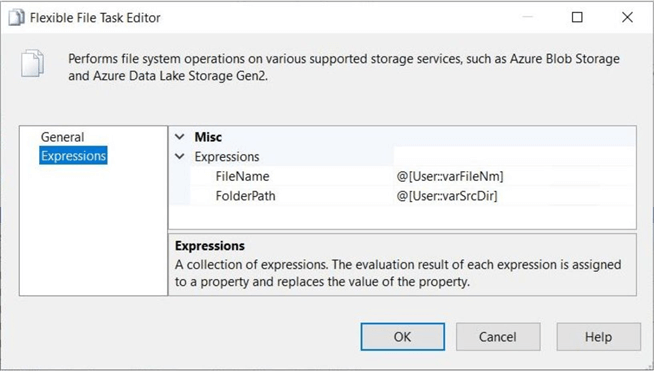
The last piece of the puzzle is to map the file and directory variables to the correct file and directory properties using property expressions. This mapping turns enables the dynamic execution of the control.
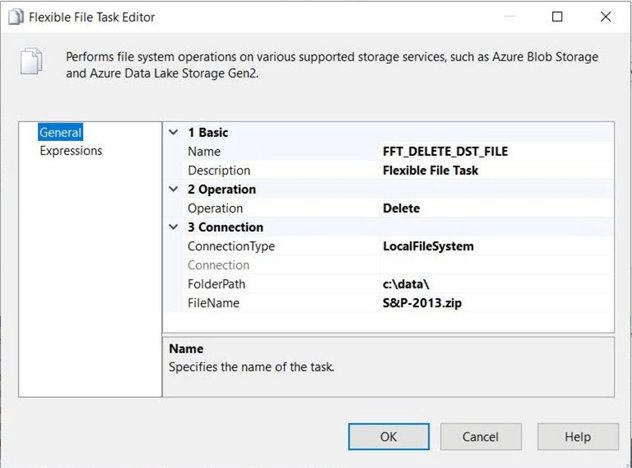
The static properties for the DELETE action defined by the Flexible File Task need to be filled in. The image below shows the operation, folder path and file name correctly filled in for a single file deletion.
Again, the mapping of variables to properties via the expressions editor is what makes the SSIS control dynamic. Please see the image below for the file and folder mapping. Today, we worked with the new control that is part of the Azure Feature Pack for Visual Studio 2019. The same techniques are required to make third party controls dynamic during execution. Please see the vendor documentation for the property to expression mappings. They are not always easy to identify.
Summary
The new Flexible File Task is the next evolution in controlling the copying and deleting of files regardless if they exist in local, blob storage or data lake storage. Today, we compared and contrasted the old versus the new control. The old File System Task control has a lot more capability to manage both directories and files. Unless you need this functionality, consider replacing the old control with the new one. This will ease the path to the Azure if you are considering lifting and shifting packages using the Azure SSIS integrated runtime engine.
The last design pattern shows how a package with different runtime parameters produces different results. Today, we moved ZIP files from the DATA to TEMP directory. By changing the package parameters (variables), we could have moved TXT files from the INBOUND to the OUTBOUND directory. The mapping of variables to properties turns a static task into a dynamic one.
There are many ways to execute SSIS packages. Extremely old systems might be using the dtexec utility to launch a package from a batch file. Recent systems might be executing a package from a SQL Agent job step. Some companies have lifted and shifted their SSIS code to the Azure cloud. These companies are calling packages using the execute package activity within Azure Data Factory. All these techniques have one thing in common. The ability to pass a parameter (variable) to the package at runtime.
To summarize the article, the Flexible File task does not add any additional value when using the local file system as a storage type. However, this task does shine when working with Azure Data Lake Storage Gen2. In a prior article, I went over "What’s new with ADLS2?". At that time, there were no SSIS tasks that could be used to programmatically work with the new storage. This new task fills that gap.
Next time, we will investigate how to manage files in Azure Blob Storage with the Flexible File Task.
Next Steps
- What is new in the Azure Feature Pack for SSIS 2019
- Use the Flexible File Task with Azure Blob Storage
- Use the Flexible File Task with Azure Data Lake Storage
- Use the Azure Data Lake File System Task in a control flow
- Use the Flexible File Source in a data flow
- Use the Flexible File Destination in a data flow
About the author
 John Miner is a Data Architect at Insight Digital Innovation helping corporations solve their business needs with various data platform solutions.
This author pledges the content of this article is based on professional experience and not AI generated.
View all my tips
Article Last Updated: 2020-04-02


