By: Mohammed Moinudheen | Updated: 2020-09-21 | Comments (2) | Related: > Restore
Problem
For on-premises SQL Server databases that have TDE enabled, we need certificates to perform a restore to another SQL Server. Do we have the same requirements for Azure SQL databases that have TDE enabled? Is it possible to restore an Azure TDE enabled database on-premises? Can we use a similar approach of restoring a TDE enabled Azure SQL database to an on-premises server?
Solution
To learn about transparent data encryption (TDE), you can refer this tip for the details. You can refer to this link for additional tips related to SQL Server encryption.
In this earlier tip, we cover how to perform a restore of a database that was originally enabled for TDE, but later disabled. You can see the steps that need to be performed for performing a restore. Even after disabling TDE, restoring the database backup to another server is not straightforward.
In this tip, we will see how we can perform a database export to a BACPAC file and then complete an import on both an on-premises server and to an Azure SQL database.
Restoring a TDE enabled database to a different SQL Server
You can use the scripts from this tip to enable TDE on an on-premises database.
Once done, perform a backup of the database and try to restore to another on-premises server. You will get this error message as expected.

Again, you will have to go through the steps outlined in this tip to perform a successful restore.
Create BACPAC of a TDE enabled on-premises database
You can export the same on-premises database that you created earlier to a BACPAC file and then import to another server and see if that works.
For exporting to BACPAC, follow the steps below.
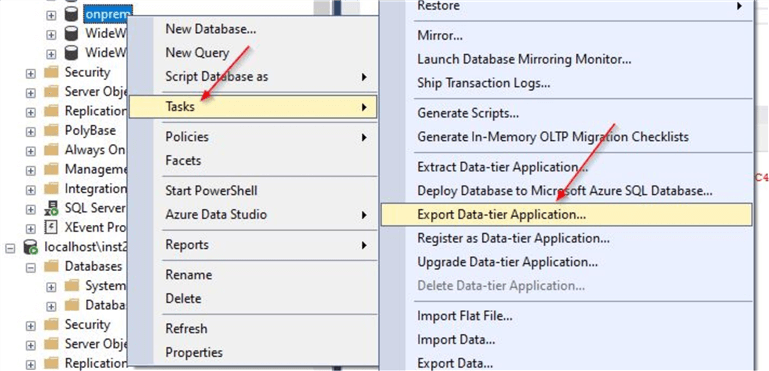
Right click on the database in SSMS, go to Tasks and click on Export Data-tier Application...
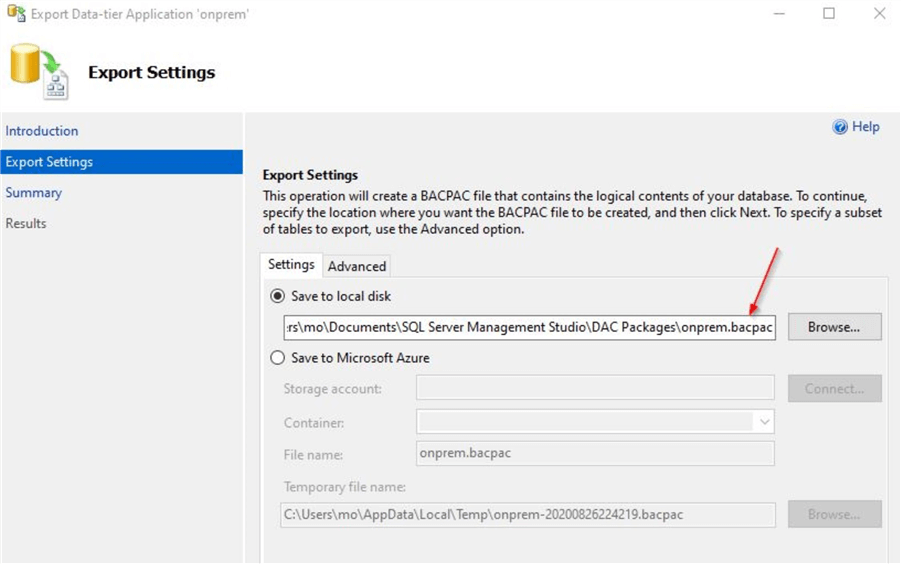
Once done, you will get an introduction page, click Next and you will see this screen where you can browse to a folder and provide a name for the BACPAC file.
Once done, click Next and you will see this screen where you can select Finish to complete the process.
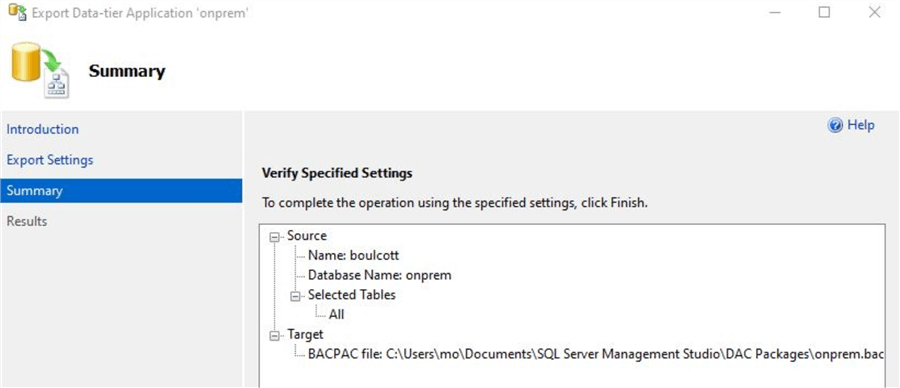
This process may take some time based on the size of the database, but at the same time you saw how easily we can export the contents of the database using this method.
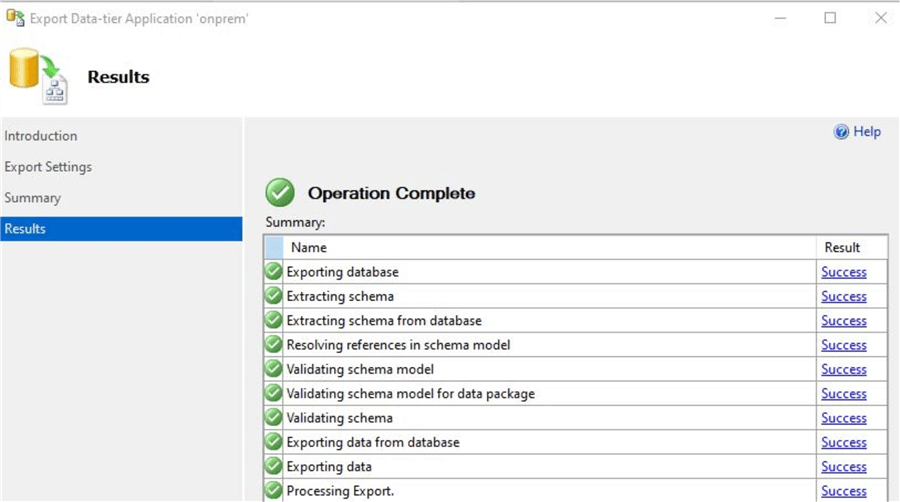
Once the export process completes, you will see this screen where you can view the confirmation.
Import BACPAC file on to another on-premises server
Once the process is done and the BACPAC file is available, you can use the file for importing as a database.
You can connect to another instance and try the import process.
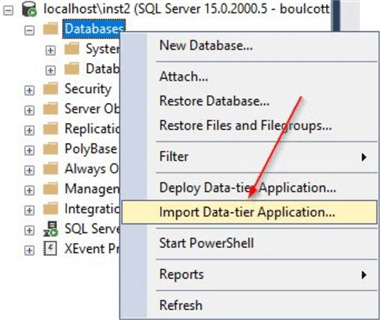
Right click on the Databases node and click on Import Data-tier Application as shown.
Once done, you will get an Introduction page, click on Next and you will see this screen. Use the Browse option to select the BACPAC file you wish to import.
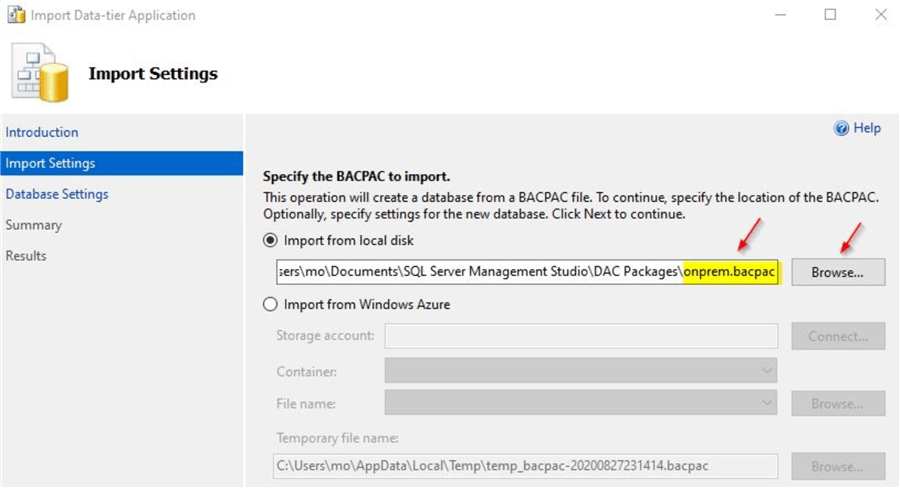
We will be using the BACPAC which we exported in the previous section. Click Next and you will see this screen where you can view the option to provide the database file locations.
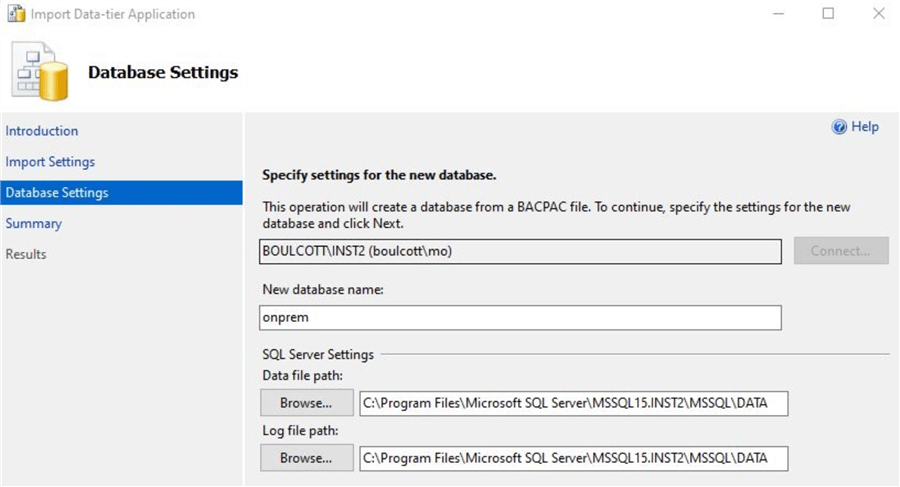
Once done, click Next... In the next window, you can view the summary of the settings.
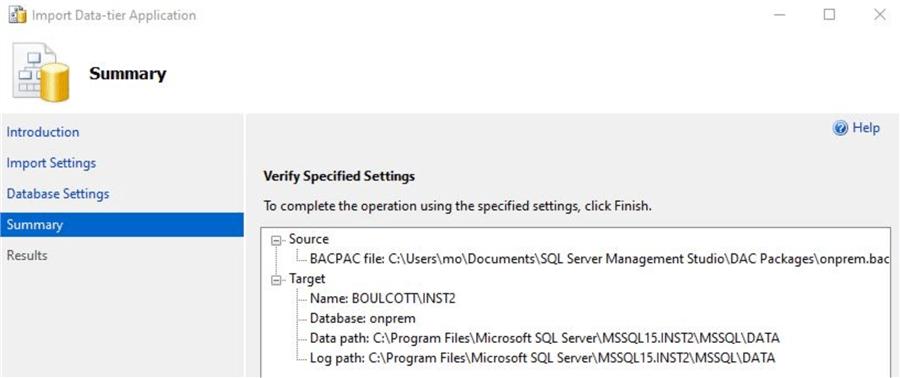
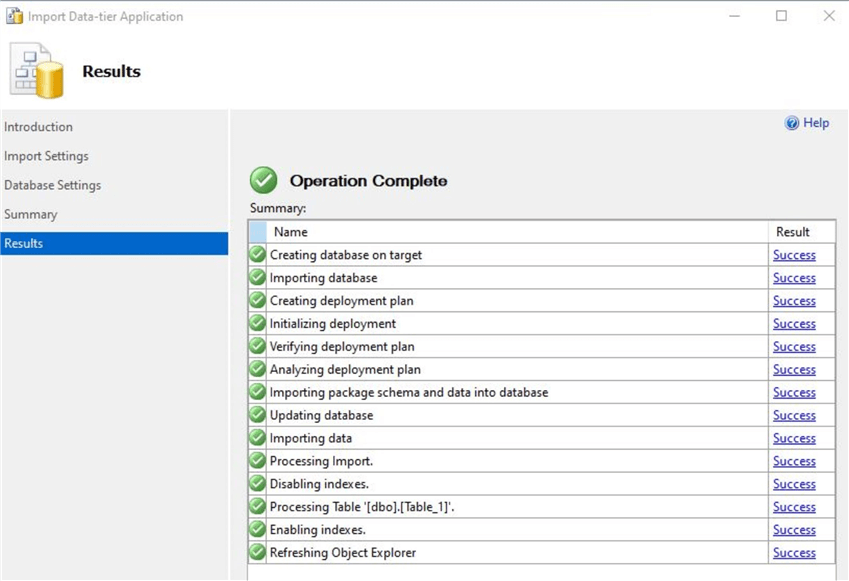
Click on Finish to complete the import process. The process will complete in some time based on the size of the data getting imported. You will see this screen once the import completes.
Checking the imported database
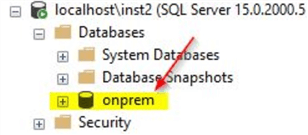
As you can see the imported process has completed successfully. You can go to the SQL instance to view the imported database.
Here, you can see the exported BACPAC of a TDE enabled database was imported fine to a different SQL Server instance.
Also, when you run this query on the source SQL Server instance where this database resides, you will see the below output that shows it is encrypted.
select name, is_encrypted, * from sys.databases where name = 'onprem' – provide your DB name

The output of the same query on the destination server is as below which shows it is not encrypted.

From this demo, you saw how we could perform an import/export process to recreate a database on a separate server where the source database was using TDE.
If you want to encrypt the database on the destination, you would need to go through the steps outlined in this tip to complete the encryption process.
Import BACPAC from on-premises server to Azure server
Follow the steps as shown earlier in the tip for importing the on-premises BACPAC file to Azure.
During the import process on the Azure SQL Server, you will see this screen where you need to select the correct Azure database settings.
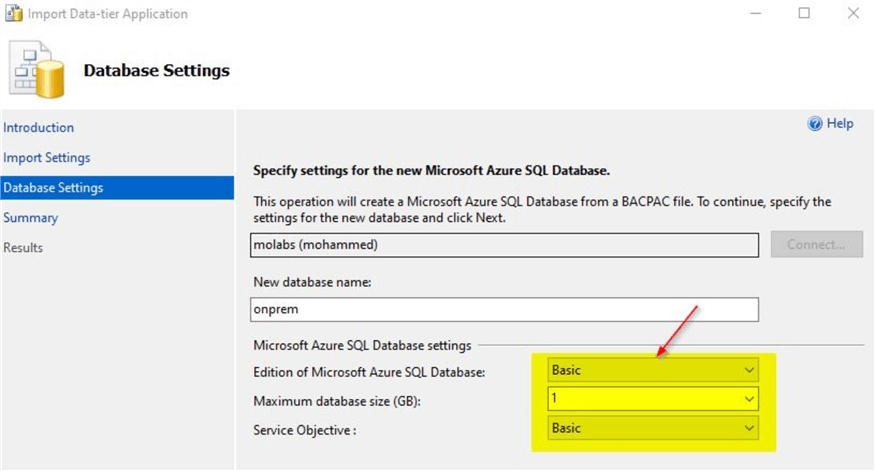
Once done, follow the rest of the steps as shown earlier in the article to complete the import process and the database is now available for use.
You can use the below queries to check the imported database once the import is successful.
select name, is_encrypted, * from sys.databases where name = 'onprem'

select db_name(database_id), encryption_state from sys.dm_database_encryption_keys

Above you can see that the imported database is TDE enabled by looking at the is_encrypted column. This is the default behavior in new Azure SQL database deployments, when a database is created it is encrypted. You can check the details of the system catalog sys.dm_database_encryption_keys in the Microsoft documentation.
Below are the various encryption states in the database based on the documentation which is shown in the second query results.
| 0 | No database encryption key present, no encryption |
| 1 | Unencrypted |
| 2 | Encryption in progress |
| 3 | Encrypted |
| 4 | Key change in progress |
| 5 | Decryption in progress |
| 6 | Protection change in progress (The certificate or asymmetric key that is encrypting the database encryption key is being changed.) |
Check TDE feature on an Azure SQL Database
From the Azure portal, you can view the status of TDE on the database overview section.
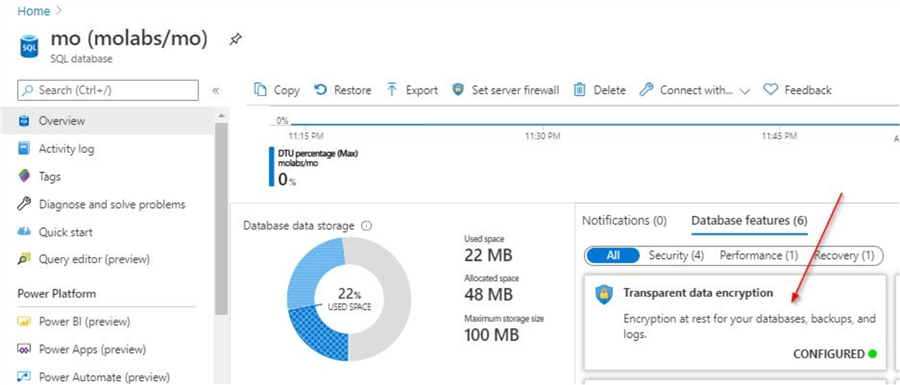
This feature is on by default for all new Azure SQL database deployments.
You can run the below queries on the Azure SQL database to check the encryption status.
select name, is_encrypted, * from sys.databases where name = 'mo'

select db_name(database_id), encryption_state from sys.dm_database_encryption_keys
Below is the output of the queries.
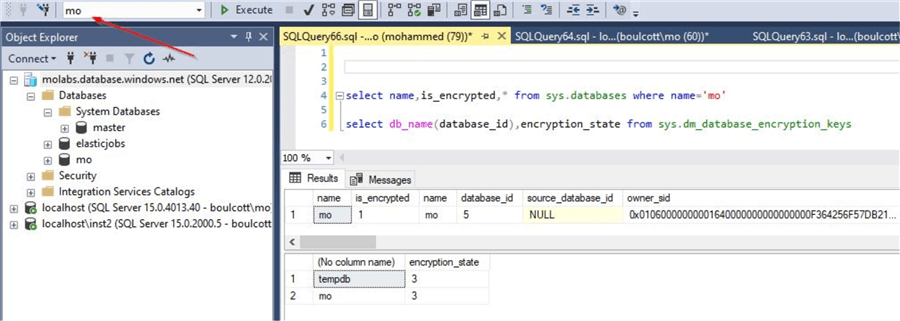
As you can see, the Azure SQL DB is encrypted. Even though this is an Azure SQL DB, for the second query, you are also able to see details of tempdb as this database gets encrypted when TDE is enabled.
Perform export of an Azure SQL DB
You can perform an export to BACPAC for the Azure SQL DB by connecting to it from SSMS. Just follow the steps shown in the earlier section for performing the export.
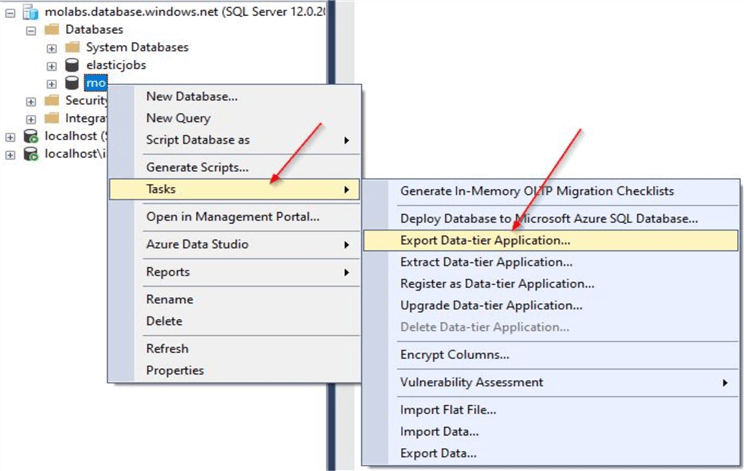
Continue to perform the next few steps as described earlier in the tip and complete the export to BACPAC. Once the BACPAC is ready, we will perform a restore to an on-premises instance as well as to Azure.
Import Azure SQL DB BACPAC to on-premises SQL Server
As shown earlier in the tip, follow the process for importing the BACPAC on an on-premises SQL Server. You will see the new database once the process completes.
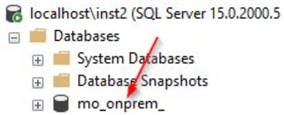
You can run the below commands on the on-premises database to validate the encryption details.
select name, is_encrypted, * from sys.databases where name = 'mo'

select db_name(database_id), encryption_state from sys.dm_database_encryption_keys
You can see that that there is no encryption on the imported database.

Import Azure SQL DB BACPAC to Azure SQL DB
In this section, we will follow the same process for importing the BACPAC file from Azure on to the same Azure server but with a different database name.
We already exported the Azure SQL DB to a BACPAC, so we will use that file. Follow the steps for completing the import of the BACPAC.
Once the import process is complete, let's try the same queries.
select name, is_encrypted,* from sys.databases where name='mo'

select db_name(database_id),encryption_state from sys.dm_database_encryption_keys
Here you can see that encryption in enabled for the newly imported database. As seen earlier while importing the BACPAC file from on-premises to Azure, this is the default behavior for new Azure SQL database deployments.

In this tip, you saw how we could use the export/import option for restoring a SQL database either on-premises or on Azure even though TDE was enabled on the database.
Next Steps
- Try this demo on a trial version of Azure or use existing on-premises SQL Server installations
- To learn more about Microsoft Azure, refer to this link on MSSQLTips
- To learn more about encryption, refer to this link on MSSQLTips
About the author
 Mohammed Moinudheen is a SQL Server DBA with over 6 years experience managing production databases for a few Fortune 500 companies.
This author pledges the content of this article is based on professional experience and not AI generated.
View all my tips
Article Last Updated: 2020-09-21


