By: Ryan Kennedy | Updated: 2020-10-01 | Comments (4) | Related: > Azure Data Factory
Problem
While Azure Data Factory Data Flows offer robust GUI based Spark transformations, there are certain complex transformations that are not yet supported. Additionally, your organization might already have Spark or Databricks jobs implemented, but need a more robust way to trigger and orchestrate them with other processes in your data ingestion platform that exist outside of Databricks.
By orchestrating your Databricks notebooks through Azure Data Factory, you get the best of both worlds from each tool: The native connectivity, workflow management and trigger functionality built into Azure Data Factory, and the limitless flexibility to code whatever you need within Databricks.
Solution
If you don't already have a free Azure account, follow this link to create a trial account.
In order to use Databricks with this free trial, go to your profile and change your subscription to pay-as-you-go. For more information, see Azure free account.
Also, if you have never used Azure Databricks, I recommend reading this tip which covers the basics.
Create an Azure Databricks Workspace
Please follow this ink to another tip where we go over the steps of creating a Databricks workspace.
Create an Azure Data Factory Resource
Next, we need to create the Data Factory pipeline which will execute the Databricks notebook. Navigate back to the Azure Portal and search for 'data factories'.

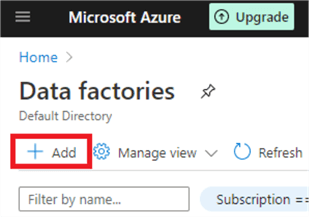
Click on 'Data factories' and on the next screen click 'Add'.
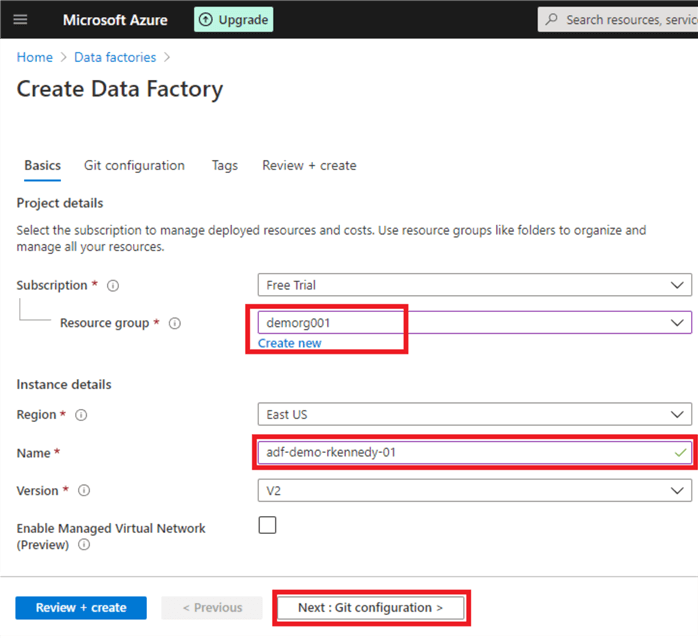
On the following screen, pick the same resource group you had created earlier, choose a name for your Data Factory, and click 'Next: Git configuration'.
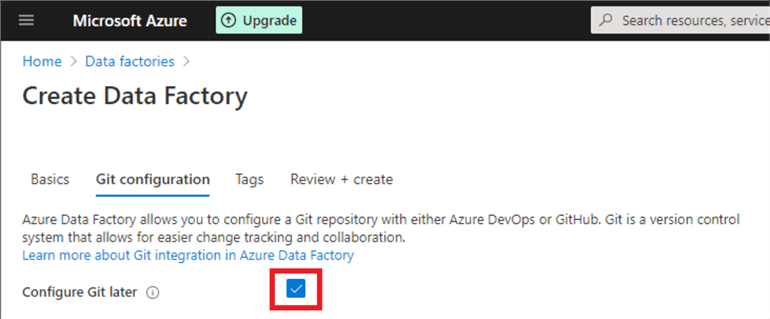
Normally, you would link your Data Factory to source control to enable saving incomplete code and for general code back-up. For now, check the box 'Configure Git later' and click 'Review and Create'.
Once your configurations are validated, click 'Create' and your Data Factory should be created!
Create a Databricks Linked Service
The next step is to create a linked service. A linked service within Data Factory is a connection string that is used to authenticate to different data sources or compute. In a production setting, all secrets, keys, and passwords are stored in the Keyvault, and then referenced within Data Factory.
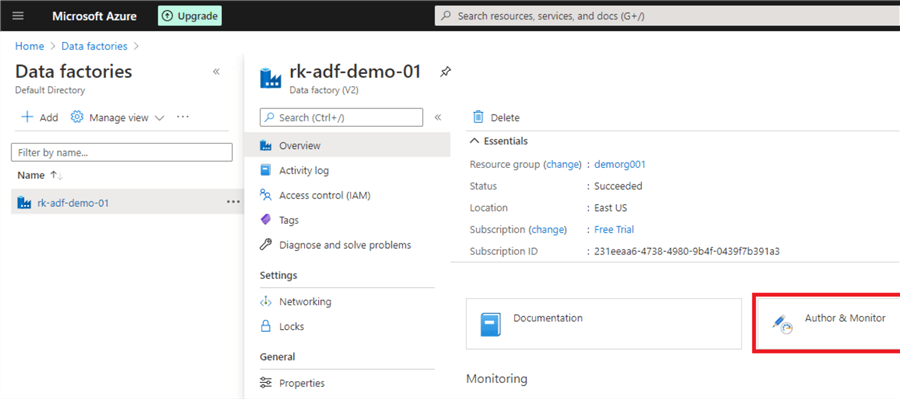
To add the linked service, we first need to open Data Factory. Navigate to the Data Factory you just created and click on 'Author and Monitor'.
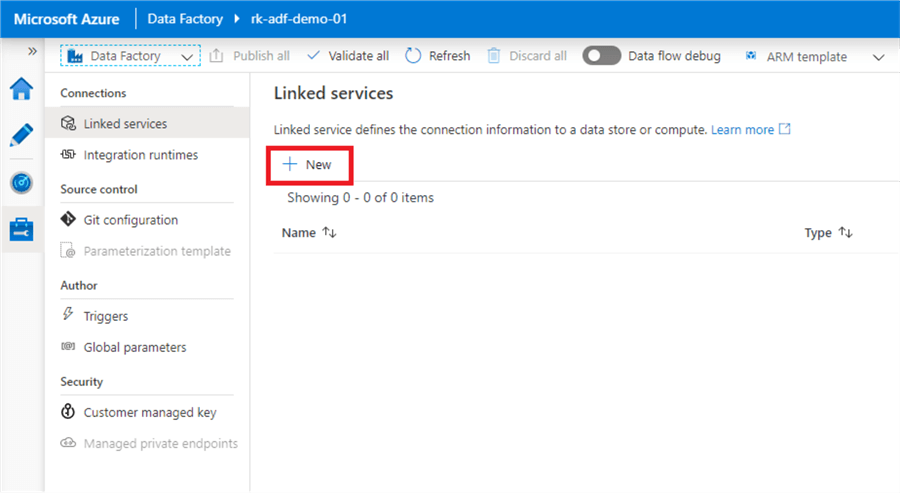
Once you are in the Data Factory, you can see the navigation bar on the left-hand side to go to the main components of Data Factory. Click the toolbox to open settings. This is where we will add the linked service.
The screen will automatically open on the Linked Services screen. Click 'New'.
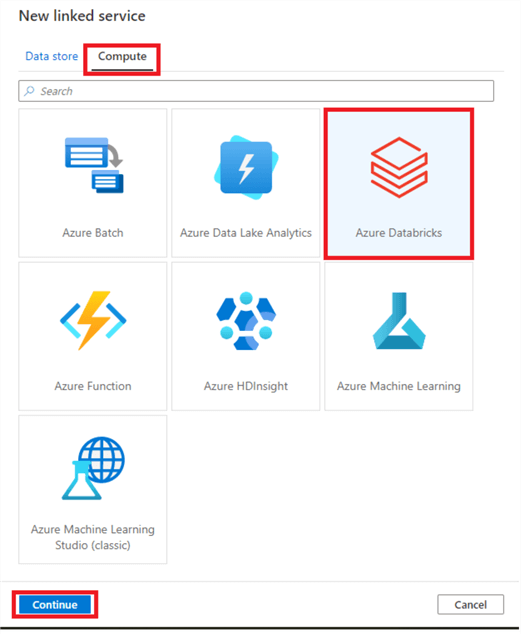
Switch from the 'Data store' tab to the 'Compute' tab, and select Azure Databricks. Click 'Continue'.
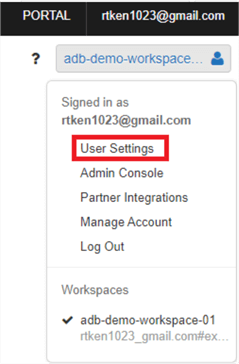
Before we complete this form, we need to go into Databricks to generate a user token. This token will allow Data Factory to authenticate to Databricks. Be careful what you do with this token, as it allows whoever has it to fully access your Databricks workspace.
Open Databricks, and in the top right-hand corner, click your workspace name. Then click 'User Settings'.
This will bring you to an Access Tokens screen. Click 'Generate New Token' and add a comment and duration for the token. This is how long the token will remain active. Click 'Generate'.

The token will then appear on your screen. Once you click 'Ok', the token will never appear again, so make sure you copy it properly! Copy the token, and go back to Data Factory.
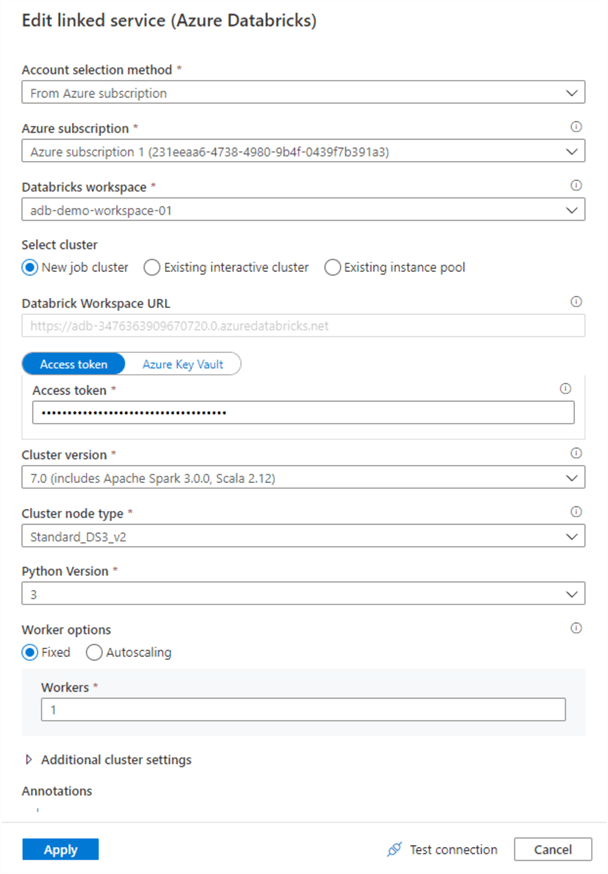
There are a few things to fill out in the linked service. Add a name using some form of naming convention. Under 'Account selection method', select 'From Azure subscription'. This will allow you to select your subscription and your Databricks workspace.
For the cluster, we are going to use a new 'Job' cluster. This is a dynamic Databricks cluster that will spin up just for the duration of the job, and then be terminated. This is a great option that allows for cost saving, though it does add about 5 minutes of processing time to the pipeline to allow for the cluster to start up.
Paste the access token into the appropriate field and then select the Cluster options as I have done in the below screenshot. Once you are done, click 'Test Connection' to make sure everything has been entered properly.
Import Databricks Notebook to Execute via Data Factory
The next step is to create a basic Databricks notebook to call. I have created a sample notebook that takes in a parameter, builds a DataFrame using the parameter as the column name, and then writes that DataFrame out to a Delta table.
To get this notebook, download the file 'demo-etl-notebook.dbc' that is attached to this tip.
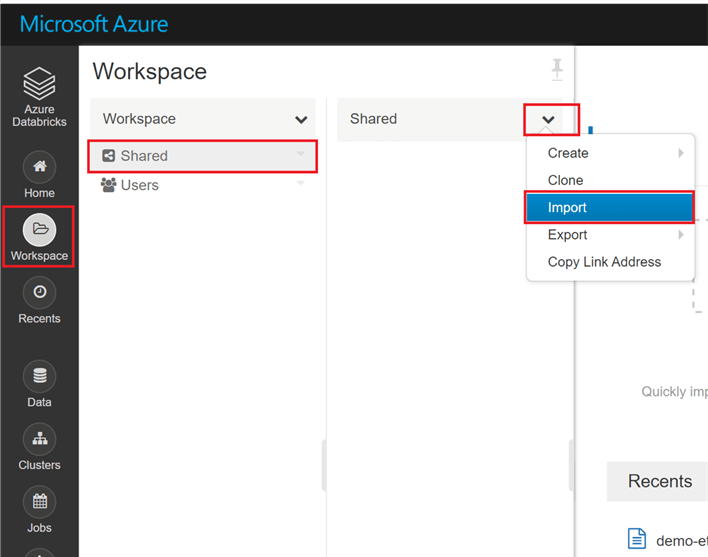
To import the notebook, navigate to the Databricks home screen. Click 'Workspace' in the navigation bar on the left, and click 'Shared'. Click the carrot next to shared, and select 'Import'.
Select 'File', and browse to the 'demo-etl-notebook.dbc' file you just downloaded.
Click Import, and you should now have the notebook in your workspace. Open the notebook to look through the code and the comments to see what each step does.
Create a Data Factory Pipeline
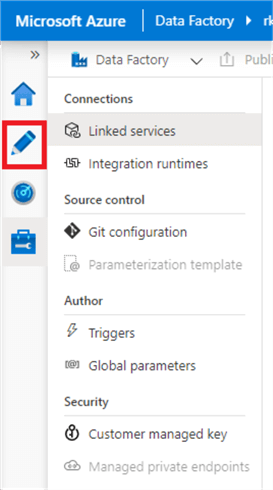
Now we are ready to create a Data Factory pipeline to call the Databricks notebook. Open Data Factory again and click the pencil on the navigation bar to author pipelines.
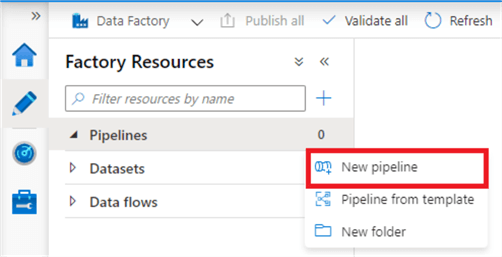
Click the ellipses next to the Pipelines category and click 'New Pipeline'.
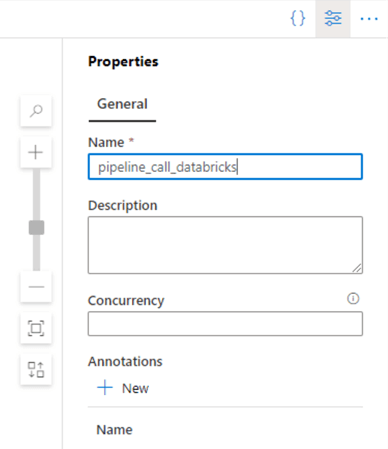
Name the pipeline according to a standard naming convention.
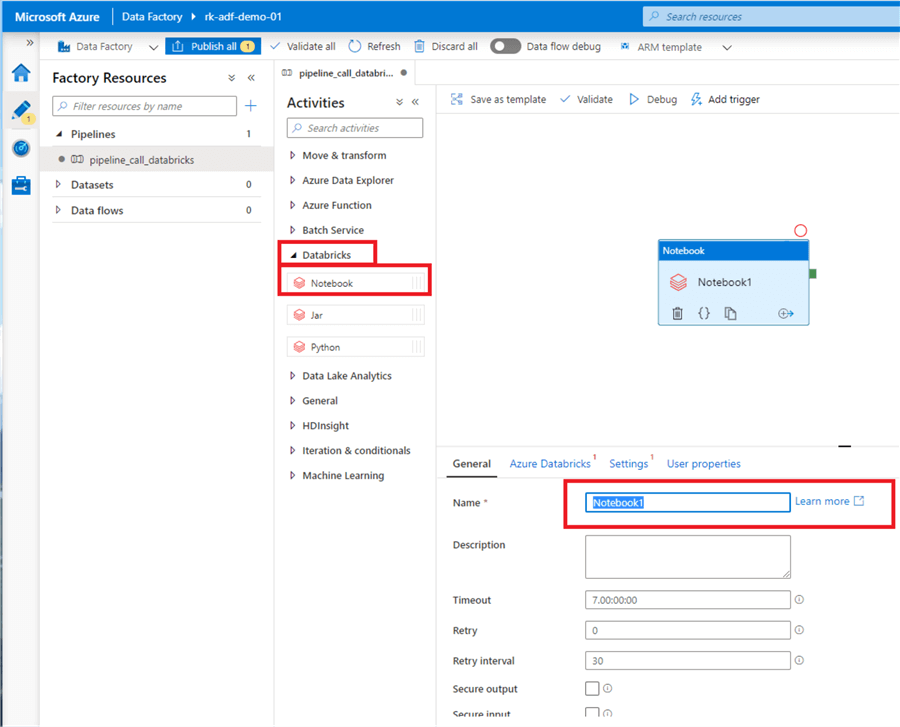
Next, add a Databricks activity to the pipeline. Under 'Activities', drop down 'Databricks', and click and drag 'Notebook' into your pipeline. Name the activity.
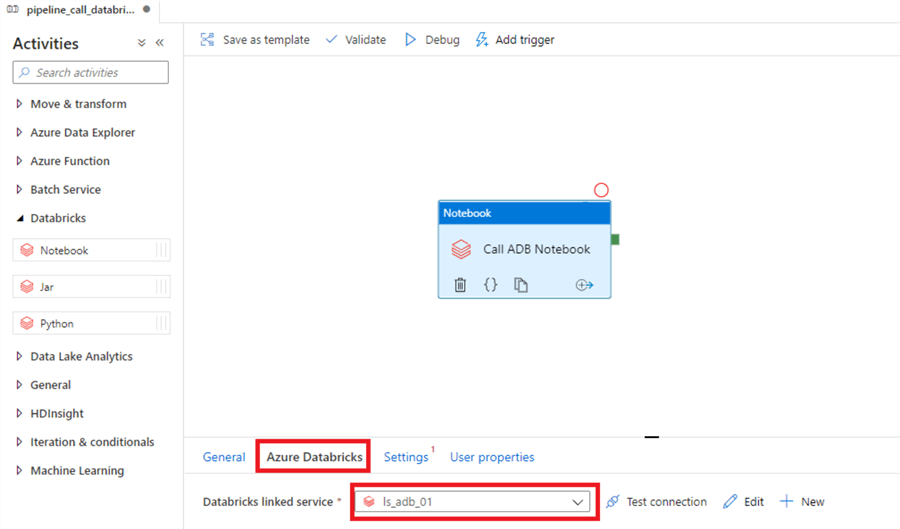
Navigate to the 'Azure Databricks' tab, and select the Databricks linked service you created earlier.
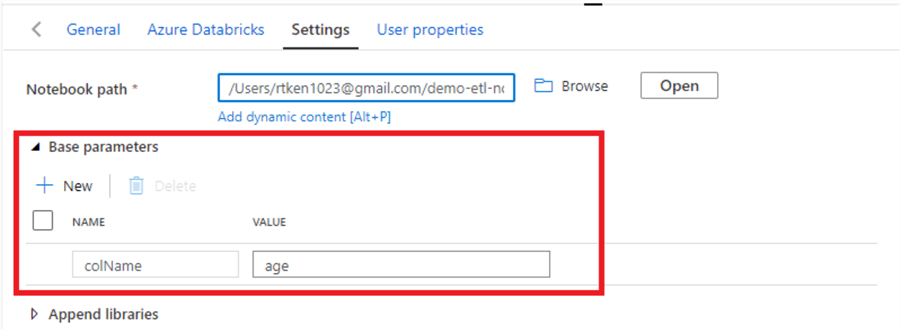
Move to the settings tab. Click 'Browse' next to the 'Notebook path' field and navigate to the notebook you added to Databricks earlier. Select it.

In order to pass parameters to the Databricks notebook, we will add a new 'Base parameter'. Make sure the 'NAME' matches exactly the name of the widget in the Databricks notebook., which you can see below. Here, we are passing in a hardcoded value of 'age' to name the column in the notebook 'age'. However, you can also pass dynamic content to the Databricks notebook, such as Data Factory variables, parameters, iterators, etc.
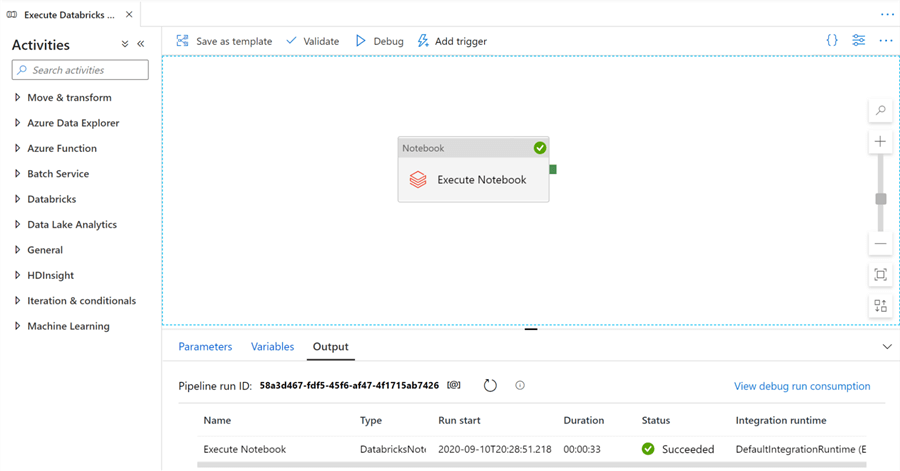
Now, we are ready to test the pipeline. Click 'Debug' in Data Factory, and the notebook should be executed.

If the job succeeds, your screen will look like this!
Debugging
Data factory offers a number of different ways to debug your notebook in case of failure or to see how variables and logic computed at runtime.
One option is to pass information back to Data Factory from the Databricks notebook. For example, if you want to keep track of row counts inserted during an ETL job, you can pass that row count value back from Databricks into Data Factory and then have Data Factory log it. That is what we do in this sample notebook.
By clicking the highlighted button in the output section of the page, you can see that we dynamically passed the row count from the ETL job back to the Data Factory.

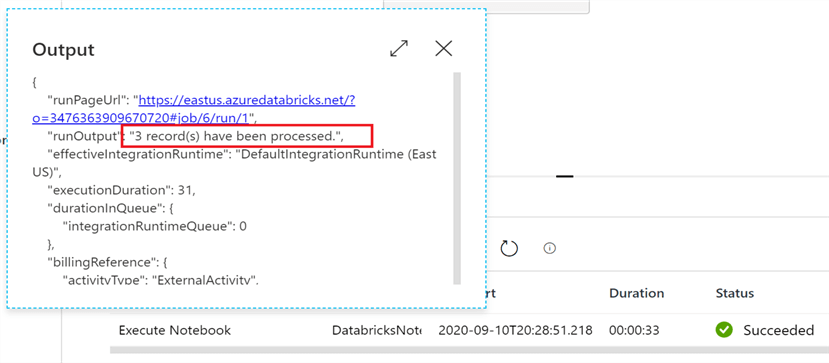
Even more critical is the ability to see an ephemeral version of the notebook for each execution of the pipeline. By clicking the eye glasses in the output section of the page, you can click a link that will take you to the actual execution of the Databricks notebook. Here, you can see either exactly where the notebook may have failed, or just generally all of the cell outputs from that job run. Adding print statements in your notebook can be extremely valuable to debug processes during the development phase.

Click the Run Page URL to open up the ephemeral version of the notebook.
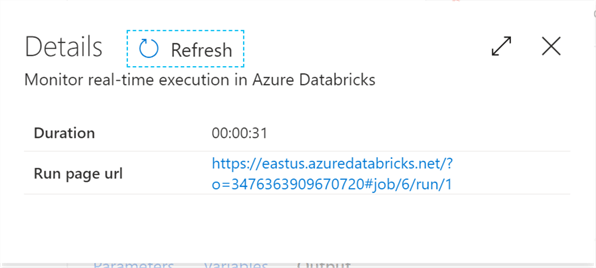
There you have it! You have successfully executed a Databrick notebook through Data Factory.
Next Steps
- If you have an existing Databricks notebook, try executing it through Data Factory.
- Attempt more complex Data Factory workflows. For example, pass a value from Databricks back to Data Factory, and then use that value somehow in the Data Factory pipeline (e.g. logging a record count).
- Consider how orchestrating your Databricks notebooks through Data Factory could improve your data pipelines.
- Read other Databricks articles on MSSQLTips:
About the author
 Ryan Kennedy is a Solutions Architect for Databricks, specializing in helping clients build modern data platforms in the cloud that drive business results.
This author pledges the content of this article is based on professional experience and not AI generated.
View all my tips
Article Last Updated: 2020-10-01


