By: Haroon Ashraf | Updated: 2020-10-19 | Comments | Related: > Database Design
Problem
As an entry level database developer, I would like to create and manage SQL databases using a simplified source control approach especially when working as a solo developer.
Solution
The solution is to start your development journey with SQL Database Project using SQL Server Data Tools (SSDT) for Visual Studio along with using Git source control centralized workflow.
Centralized Workflow and SQL Database Project
This tip is primarily focused on using SQL Database Project to build and manage databases and a simpler approach to put your database code under source control provided the developer is familiar with database development and source control concepts.
There are many ways to create SQL databases and using SQL Server Data Tools (SSDT) is one of them. Similarly, there are many patterns which can be used with Git source control and centralized workflow is one of them. Let us get some more understanding of this workflow before we implement it in a walkthrough.
What is a Centralized Workflow?
A centralized workflow is a simple way of saving database code changes to a central repository which serves as single source of truth.
Why we use Centralized Workflow?
A centralized workflow is easy to use and manage and often preferable for the projects migrated from a centralized source control system to Git until the development team behind the projects is ready to utilize the full potential of Git source control.
When is Centralized Workflow most Preferable?
When a single developer is working on a database project then centralized workflow is a safe and flexible option with some exceptions.
However, that does not mean a team of 2-3 developers cannot use it, but they have to be aware of the pros and cons.
How is Centralized Workflow Implemented?
A centralized workflow is implemented by using a single branch of code until completion. Since only one developer or a very small team of 2-3 developers work on a single branch of code it is relatively easier to avoid conflicts when releasing the final code.
For example, when you connect your SQL database project to an Azure DevOps Git repository you start working on a local version of master branch which is used to save the very first changes along with any new changes to the database project to the remote master branch until the project is complete.
In other words, you work on a local version of the master branch and you save your changes to the remote version and the story continues.

Is Centralized Workflow the way forward?
We can say, No. Centralize workflow is not the best way forward, but an excellent source control approach to begin with until you are fully ready to leverage the fully featured Git source control.
On the flip side we can say, Yes. It can be the way forward if a team is comfortable with this approach, but they may have to understand the caveats (precautions) that come up with this approach. It also depends on their willingness to consider the flexibility and benefits of other approaches fully supported by Git.
At the end of the day it depends on many factors including the development team itself, their level of expertise, the business requirements and preferences.
Using SQL Database Project with Centralized Workflow
Let us get hands-on experience of working with centralized workflow to save database project changes.
Pre-Requisites
This tip assumes that the readers are interested in following the walkthrough are familiar with the following technologies:
- Azure DevOps
- SQL Database Project
- Git source control
Create Azure DevOps Project
Please sign up to create a new Azure DevOps account if you don’t have one and are interested to implement this example.
Please sign in to your online Azure DevOps account and create Azure DevOps project named SQL Database Project with Centralized Workflow:

Rename Repository
Please navigate to the Repository section of Azure DevOps and rename the current repository as sql-centralized-workflow:

Now if we click on Branches under Repos from the left navigation bar, we need to select the option Switch to the default sql-centralized-workflow repository to switch to the repository which has just been renamed:

Create Local Copy of the Repository
Next, you have to create a local copy of the repository to start working locally by clicking the following options:

Please follow the instructions to complete the process:

Connect to the Repository
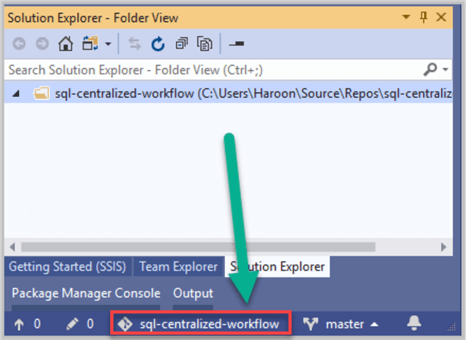
Please click on the sql-centralized-workflow repository in the status bar in Visual Studio as follows:

Right click on the repository and click Connect as shown below:

Things before creating a new SQL Database Project
Once you are connected to the repository this means you are now using a local copy of the master branch either to create a dev branch out of it or straight away start working on the master branch.
In a centralized workflow you are going to carry on with master branch provided you know that all the database changes are directly going to be pushed to the only main steam branch which is responsible for development, testing and release. This may look like a code safety hazard, but it is fine to do so especially when you are the only developer working on this project and aware of the merits and demerits of this approach.
Create a new SQL Database Project
Time to create a new SQL database project so please click New… under solutions:

Please create a new SQL database project named WatchesCW under a solution called Centralized Workflow and click on the Create button:

Please switch to the Solution Explorer to the see the newly created SQL Database Project:

Add first database object
We need to add a database object to the project now.
Right click on the project (WatchesCW) and then click Add followed by clicking Table… as shown below:

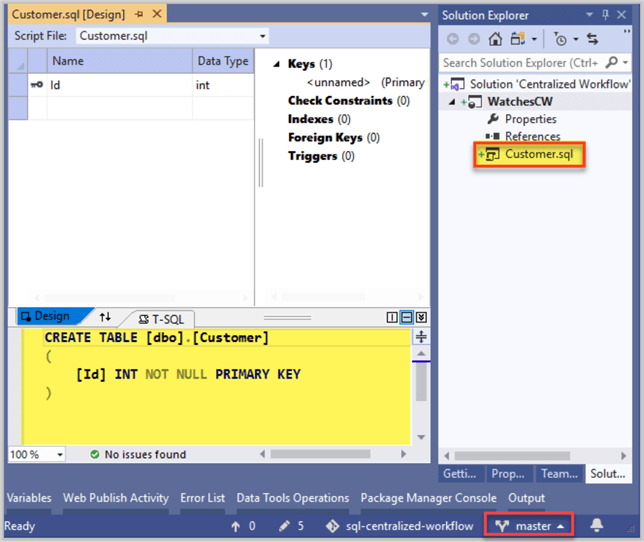
Create a new table called Customer leaving it to be created with default settings which means a primary key column ID is also going to be there:

Commit (Save) Changes to the Git Source Control
We have just created the first database object so please Build the project by clicking F5 to get the green signal (and keep it a habit) before saving your changes to the source control:

Next, click the pen icon in the status bar or use the shortcut key CTRL+ALT+F7 to open Changes section.
Add the comments "Customer table added" and select Commit All and Push to save the changes to the remote repository:

Once all the changes are successfully saved, the Team Explorer window should be showing the following messages:

Add second database object
Let us now add another table called Supplier using the default settings as shown below:

Commit (Save) Second Database Object to the Git Source Control
Please push the new database code changes just like the way we did earlier adding the comments "Supplier table added" and selecting "Commit All and Push":

If we switch to the Solution Explorer, we can see our database solution with both tables and padlock icons next to them showing they are protected by the source control:

Git Repository Check
Let us now navigate to the Azure DevOps project we created earlier to see how these changes are maintained by the Git source control.
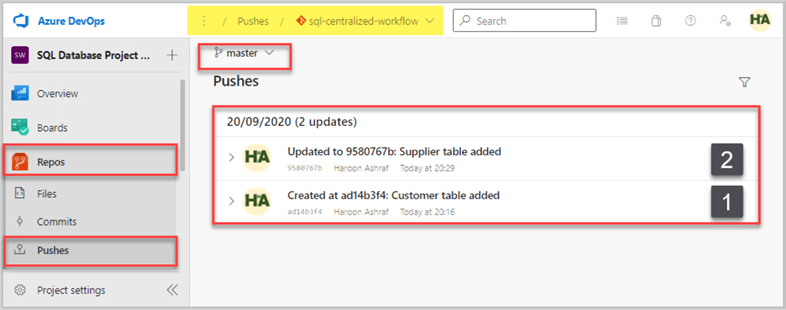
Go to Repos > Pushes from the left navigation bar to see all the changes we saved directly to the master branch in a historical order as shown below:

Similarly go to Commits under Repos to view the Graph of changes (commits) which is simple and straight without any complications:

Finally, please navigate to the Files under Repos to view the complete database code:

Congratulations, you have successfully implemented centralized workflow using Git source control for SQL Database Projects. This is an excellent approach to begin with and to be carried on as long as your requirements are simple and linear (one after the other) and there are no chances of team conflicts because either you are the only developer working on these projects (using centralized workflow) or (if working in a team) your team is aware of the pros and cons of this approach and are happy to continue with it.
Next Steps
- Please go through the tip Creating Multiple SQL Server Database Backup Formats in SSDT - Part 1 to add the Watch table followed by adding its reference data in two different steps where each step must be committed to the Git source control using centralized workflow as discussed in this tip
- Please have a look at the tip Manage Multiple Database Backup Formats in SQL Server Data Tools (SSDT) - Part 2 and try adding WatchOrder table followed by adding its reference data in stages by committing all the code of each stage into the Git source control using centralized workflow
- Please have a read through SQL Database Project Code Branching in Git to broaden your knowledge of working with SQL Database Projects using Git source control
About the author
 Haroon Ashraf's interests are Database-Centric Architectures and his expertise includes development, testing, implementation and migration along with Database Life Cycle Management (DLM).
This author pledges the content of this article is based on professional experience and not AI generated.
View all my tips
Article Last Updated: 2020-10-19


