By: Ryan Kennedy | Updated: 2020-10-26 | Comments (1) | Related: > Azure
Problem
Azure Databricks is a Unified Data Analytics Platform built on the cloud to support all data personas in your organization: Data Engineers, Data Scientists, Data Analysts, and more.
A core component of Azure Databricks is the managed Spark cluster, which is the compute used for data processing on the Databricks platform. Though creating basic clusters is straightforward, there are many options that can be utilized to build the most effective cluster for differing use cases. The following article will deep dive into the cluster creation UI and enable the reader to build the right cluster for their use case.
Solution
Deep Dive in Azure Databricks Cluster Creation and Management
The below solution assumes that you have access to a Microsoft Azure account, with credits available for testing different services. Follow this link to create a free Azure trial account.
To use a free account to create the Azure Databricks cluster, before creating the cluster, go to your profile and change your subscription to pay-as-you-go. For more information, see Azure free account.
Also, before we dive into the tip, if you have not had exposure to Azure Databricks, I highly recommend reading this tip which covers the basics.
Create a Databricks Workspace
Please follow the following anchor link to read on Getting Started with Azure Databricks.
What is a Cluster?
Before we dive into the details around creating clusters, I think it is important to understand what a cluster is. At its most basic level, a Databricks cluster is a series of Azure VMs that are spun up, configured with Spark, and are used together to unlock the parallel processing capabilities of Spark. In short, it is the compute that will execute all of your Databricks code. Take a look at this blog post to get a better understanding of how the Spark architecture works.
There are two main types of clusters in Databricks:
- Interactive: An interactive cluster is a cluster you manually create through the cluster UI, and is typically shared by multiple users across multiple notebooks.
- Job: A job cluster is an ephemeral cluster that is tied to a Databricks Job. It spins up and then back down automatically when the job is being run.
For the purposes of this article, we will be exploring the interactive cluster UI, but all of these options are available when creating Job clusters as well.
Explore Cluster Creation Options
Once you launch the Databricks workspace, on the left-hand navigation panel, click 'Clusters'.

From here, click 'Create Cluster'.
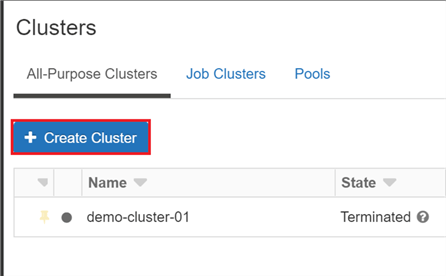
Let's dive into each of the fields on this screen.
Cluster Name

This one is the most straightforward – pick a name for your cluster. One point here though: Try to stick to a naming convention for your clusters. This will not just help you distinguish your different clusters based on their purpose, but it is also helpful if you want to link usage back to specific clusters to see the distribution of your budget.
Here is an example naming convention: <org name>_<group name>_<project>_adbcluster_001
Cluster Mode

There are two options for cluster mode:
- Standard: Single user / small group clusters - can use any language.
- High Concurrency: A cluster built for minimizing latency in high concurrency workloads.
There are a few main reasons you would use a Standard cluster over a high concurrency cluster. The first is if you are a single user of Databricks exploring the technology. For most PoCs and exploration, a Standard cluster should suffice. The second is if you are a Scala user, as high concurrency clusters do not support Scala. The third is if your use case simply does not require high concurrency processes.
High concurrency clusters, in addition to performance gains, also allow you utilize table access control, which is not supported in Standard clusters.
Please note that High Concurrency clusters do not automatically set the auto shutdown field, whereas standard clusters default it to 120 minutes.
Pool

Databricks pools enable you to have shorter cluster start up times by creating a set of idle virtual machines spun up in a 'pool' that are only incurring Azure VM costs, not Databricks costs as well. This is an advanced technique that can be implemented when you have mission critical jobs and workloads that need to be able to scale at a moment's notice. If you have an autoscaling cluster with a pool attached, scaling up is much quicker as the cluster can just add a node from the pool.
To create a pool, you should click the 'Pools' tab on the Cluster UI, and click 'Create a Pool'.
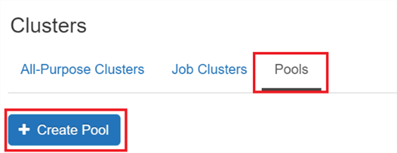
Then you have some options to explore:
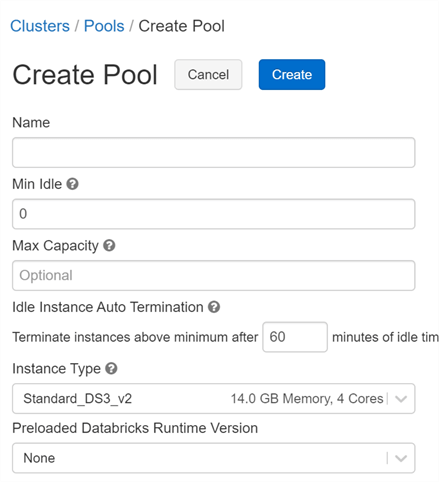
Again, name the pool according to a convention which should match your cluster naming convention, but include 'pool' instead of 'adbcluster'.
'Minimum idle clusters' will set a minimum number of clusters that will always be available in the pool. Thus, if your cluster takes one node from the pool, another will spin up in in its place to reach the minimum idle. The 'Max Capacity' field is an option that allows you to set a total limit between idle instances in the pool and active nodes in all clusters, so you can limit your scaling to a maximum number of nodes.
Your 'Instance Type' should match the instances used in your cluster, so set that here. If you preload the Databricks Runtime Version, your cluster will start up even faster, so if you know which runtime is in use, you can set it here.
Databricks Runtime Version
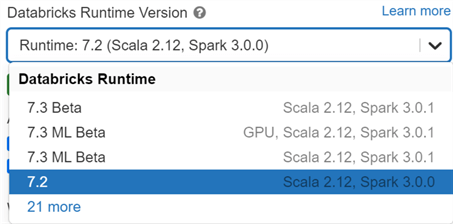
Databricks runtimes are pre-configured environments, software, and optimizations that will automatically be available on your clusters. Databricks Runtimes determine things such as:
- Spark Version
- Python Version
- Scala Version
- Common Libraries and the versions of those libraries such that all components are optimized and compatible
- Additional optimizations that improve performance drastically over open source Spark
- Improved security.
- Delta Lake
There are several types of Runtimes as well:
- Standard Runtimes – used for the majority of use cases.
-
Machine Learning Runtimes – used for machine learning use cases.
- ML Runtimes come pre-loaded with more machine learning libraries, and are tuned for GPU acceleration, which is key for efficiently training machine learning models.
- ML Runtimes also come pre-configured for ML Flow.
- Genomics Runtime – use specifically for genomics use cases.
Overall, Databricks Runtimes improve the overall performance, security, and usability of your Spark Clusters.
To see details such as what packages, versions, and improvements have been made for each runtime release, visit the runtime release page.
Autopilot Options

Autopilot allows hands-off scaling and shut down of your cluster.
- Autoscaling: If you enable autoscaling, you have the option of setting number of minimum and maximum workers, and your cluster will scale according to workload. One important note is that this scaling is done intelligently. It will not automatically max your cluster just because the load increases, rather it will add nodes to meet the load. It will also automatically scale down when workloads are lowered.
- Terminate after X minutes of inactivity: exactly how it sounds. It is a good idea to always have this set, so an idle cluster is not left running and incurring cost over night.
Worker and Driver Types
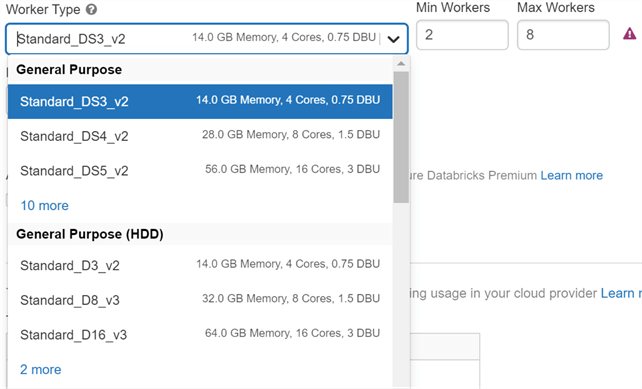
Worker and Driver types are used to specify the Microsoft virtual machines (VM) that are used as the compute in the cluster. There are many different types of VMs available, and which you choose will impact performance and cost.
- General purpose clusters are used for just that – general purpose. These are great for development and standard job workloads
- Memory optimized are ideal for memory intensive processes.
- Storage Optimized are ideal for Delta use cases, as these are custom built to include better caching and performance when querying Delta tables. If you have Delta lake tables that are being accessed frequently, you will see the best performance with these clusters.
- GPU Accelerated are optimized for massive GPU workloads and are typically paired with the Machine Learning Runtime for heavy machine learning use cases.
Here you can also set the minimum and maximum number of nodes if you enabled autoscaling. If you didn't, you set the number of nodes that the cluster will have.
There is also an option to set your Driver machine type. In standard use cases, the driver can be set as the same machine type as the workers. However, if you have use cases where you are frequently coalescing data to the driver node, you might want to increase the power of your driver node.
Advanced Options
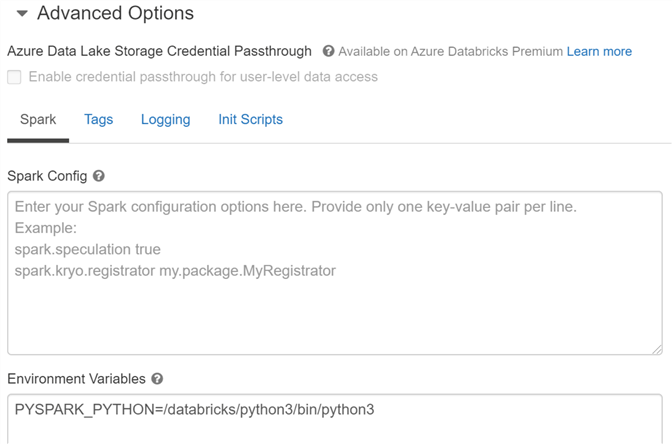
Finally, there are advanced options that can be used for custom configurations of your cluster:
- Azure Data Lake Storage Credential Passthrough allows the Active Directory credential to be passed down to the ADLS Gen 2 data lake, where role-based access control can be configured. This allows you to set your permissions at the data lake level. To read more about this option, read the article Databricks and Azure Data Lake Storage Gen 2: Securing Your Data Lake for Internal Users.
- Spark Config allows you to specify deeper configurations of Spark that will be propagated across all nodes on your cluster. This is an advanced option that can be used to fine tune your performance. Read here for available Spark configurations.
- Environment Variables are similar to spark configurations – certain settings can be set here to tweak your Spark installation. Read here for available environment variables.
- Tags are used for tagging your cluster so you can track usage. This option is critical if you need to develop a chargeback process.
- Logging allows you to specify a location for cluster logs to be written out. Read here for more details.
- Init Scripts allows you to run a bash script that installs libraries and packages that might not be included in the Databricks Runtime you selected. Read here for more details.
Advanced options are just that – they are advanced. However, they allow for almost limitless customization of the Spark cluster being created in Databricks, which is especially valuable for users who are migrating existing Spark workloads to Databricks.
Next Steps
- Navigate to the cluster creation page and explore the options.
- If you currently have Databricks clusters in use, see if any of the above options can be used to improve your cluster performance.
- Read more about Databricks security here: Databricks and Azure Data Lake Storage Gen 2: Securing Your Data Lake for Internal Users
- Read more about Azure Databricks on MSSQL Tips:
About the author
 Ryan Kennedy is a Solutions Architect for Databricks, specializing in helping clients build modern data platforms in the cloud that drive business results.
This author pledges the content of this article is based on professional experience and not AI generated.
View all my tips
Article Last Updated: 2020-10-26


