By: Ryan Kennedy | Updated: 2020-11-19 | Comments (2) | Related: > Azure
Problem
In the modern technology fabric, there are many different technologies at play, and thus, there are usually requirements for interoperability between these technologies. At the root of all technical platforms is data, and as data grows, distributed data processing technologies are becoming a standard for transforming and serving data across layers.
So, what happens when you have an API based orchestration system for processing data, or need to access the power of distributed computing via API?
Databricks Jobs are Databricks notebooks that can be passed parameters, and either run on a schedule or via a trigger, such as a REST API, immediately. Databricks Jobs can be created, managed, and maintained VIA REST APIs, allowing for interoperability with many technologies. The following article will demonstrate how to turn a Databricks notebook into a Databricks Job, and then execute that job through an API call.
Solution
Executing Databricks Jobs Via REST API in Postman
If you would like to follow along and complete the demo, please make sure to:
- Create a free Postman
account
- Additionally, make sure to download and install the Desktop Postman agent, as this will be required to make the API call.
- Have an active Azure subscription that has been switched to pay-as-you-go.
This will allow us to create clusters in Databricks.
- Get a free trial for Azure
- To switch to pay-as-you-go, follow these instructions
Create a Databricks Workspace
Please follow the following anchor link to read on Getting Started with Azure Databricks.
Import a Databricks Notebook
Next, we need to import the notebook that we will execute via API. I have created a basic Python notebook that builds a Spark Dataframe and writes the Dataframe out as a Delta table in the Databricks File System (DBFS).
Download the attachment 'demo-etl-notebook.dbc' on this article – this is the notebook we will be importing.
Open up Azure Databricks. Click Workspace > Users > the carrot next to Shared. Then click 'Import'.
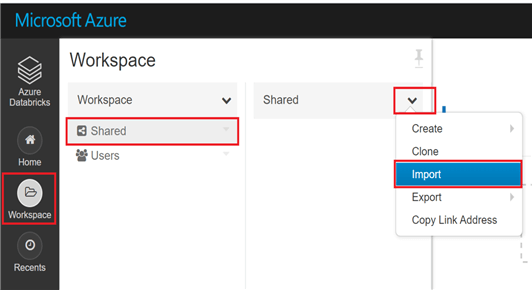
Browse to the file you just downloaded and click import. We are now ready to turn this notebook into a Databricks Job.
Create a Databricks Job
Databricks Jobs are Databricks notebooks that have been wrapped in a container such that they can be run concurrently, with different sets of parameters, and not interfere with each other. Jobs can either be run on a schedule, or they can be kicked off immediately through the UI, the Databricks CLI, or the Jobs REST API. The Jobs REST API can be used to for more than just running jobs – you can use it to create new jobs, delete existing ones, get info on past runs, and much more.
To build our Job, navigate to the Jobs tab of the navigation bar in Databricks.

This brings us to the Jobs UI. Click on 'Create Job'.
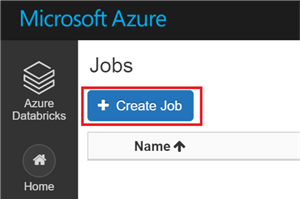
The first thing we need to do is name our Job. As with everything, it is good to adopt a standard naming convention for your Databricks Jobs. An example convention: dbricks_<type>_<function>.

The Job Id is set automatically. In this case, the JobID is 7.

Next, select the notebook that was previously imported. Click on 'Select Notebook' and navigate to the notebook 'demo-etl-notebook'.

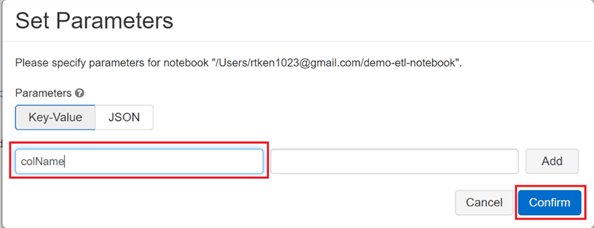
Next, edit the parameters so that dynamic values can be passed into the notebook. If you open the notebook previously imported, you will see at the top we have configured a 'colName' parameter. This parameter determines the column name of our Delta table. On the Jobs screen, click 'Edit' next to 'Parameters', Type in 'colName' as the key in the key value pair, and click 'Confirm'.
In the Cluster section, the configuration of the cluster can be set. This is known as a 'Job' cluster, as it is only spun up for the duration it takes to run this job, and then is automatically shut back down. Job clusters are excellent for cost savings. Click 'Edit' to change our job cluster configuration.

Since we are working on a very small demo job, we are going to configure a small cluster. Fill out the fields as you see here:
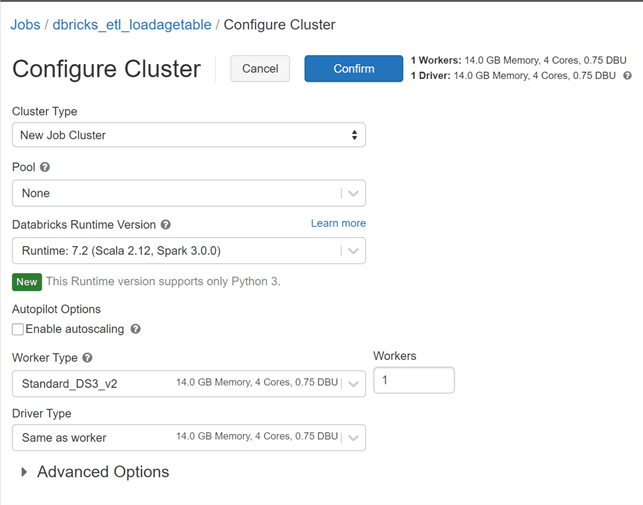
Click 'Confirm'.
The Jobs UI automatically saves, so the job is now ready to be called.
Build the Postman API Call
The next step is to create the API call in Postman. Log in to Postman via a web browser with the account created earlier.
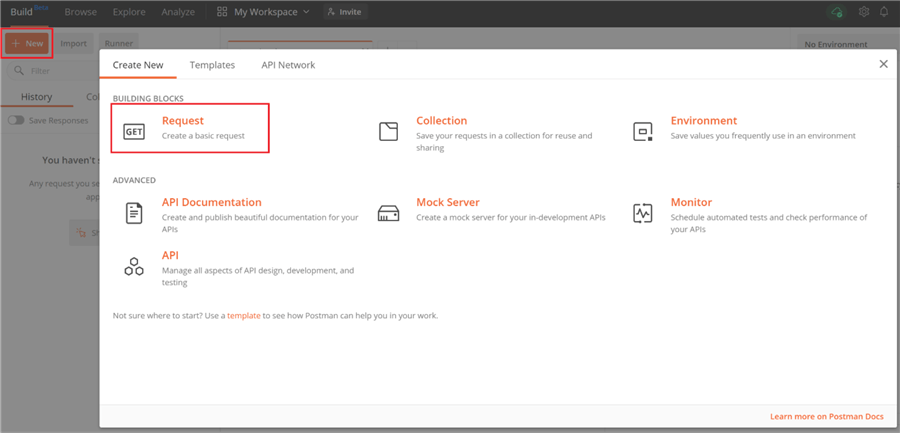
In the top left-hand corner, click 'New', and subsequently select 'Request'.
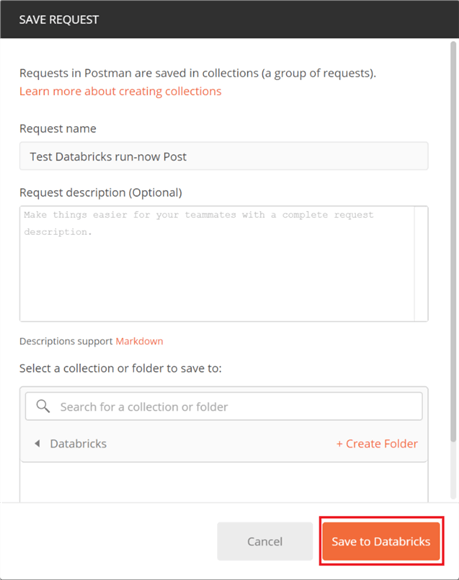
Name your request 'Test Databricks run-now Post'. If you don't have a collection, you will need to click the 'Create Folder' plus sign to create one. A collection is a container within Postman to save the requests you build. Create a new collection called 'Databricks'.
Click 'Save to Databricks'.
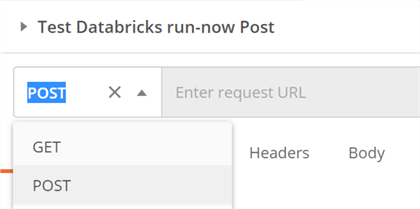
Switch the request type to 'Post'. Different functions of the Jobs API require different request types, so make sure to read the documentation when testing calls.
The request URL is a combination of the Databricks location your workspace is hosted in paired with the specific API call you want to make. To get the first part of the URL, navigate to the Azure Portal, and find your Databricks Workspace resource. On the Overview tab, find the URL field in the top right corner, and copy it:

Then, add the API call to the end of the URL. In this case, we are calling the 'run-now' API. The URL should now look like the following:
To authenticate to Databricks, we need to generate a user token in the Databricks workspace. Navigate back to Databricks and click the workspace icon in the top right corner. Then select 'User Settings'.
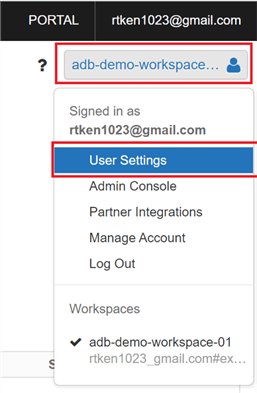
This will bring you to the 'Access Tokens' tab. Click 'Generate New Token', name the token 'Postman', and change the 'Lifetime' to 1 day. This means the token will only be active for a single day. Click 'Generate'. Copy the access token and save it somewhere safe. Once it is saved, click done.
Navigate back to Postman and click on the 'Authorization' tab. The Auth type for this request is a 'Bearer token', so select that from the TYPE dropdown. Then, paste the token into the 'Token' field. The authorization page should look like the following:

Finally, we need to fill in the body to make the actual request. The documentation has samples of these calls. Here is the link for the run-now API call.
Copy the example JSON request from the above link and navigate to the 'Body' tab in Postman.
Before you can paste in the request, you need to select the type as 'raw' and drop down the raw type carrot to the right and select JSON.

Now, paste in the sample request you copied from the documentation, but modify it so that the JobID matches the JobID previously created (you can find that on the Job page in Databricks). This will likely be '1' if it is the first job created. Additionally, change the parameter key to be 'colName', and the value to be 'age'. The result should look similar to the following:

We are now ready to execute the Job via API!
Execute the Job via API and View Results
To execute the job, simply click 'send' in Postman. You may get the following error, and if you do, click 'Use Postman Desktop Agent' to resolve it. This step requires that you installed the Postman agent on your desktop.

Click 'Send' again, and if successful, the response should look like the following:

If you get an error, double check each section to make sure there are no typos and that the authorization token was entered properly.
The job has now been initiated. Navigate to Databricks, where we can view the results of the Job.
Open the Jobs UI, and under Active Runs there should be a job running. At this stage, the job cluster is spinning up, which usually takes around 5 minutes. Once it completes, you will see it moved to the 'Completed in past 60 days' section.
Wait for the job to move to the completed section, and then click 'Run 1'.
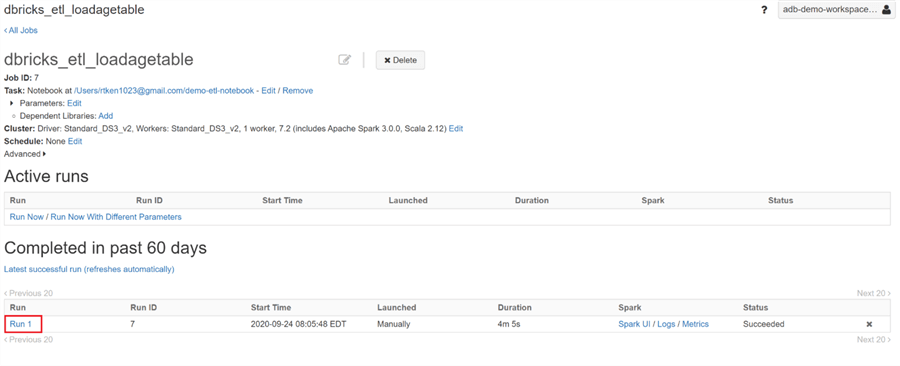
This opens an ephemeral version of the notebook, meaning that you can see all the outputs of the notebook with the parameters you passed in VIA the job. This is a valuable tool for debugging and to see how changes are affecting the notebook code.
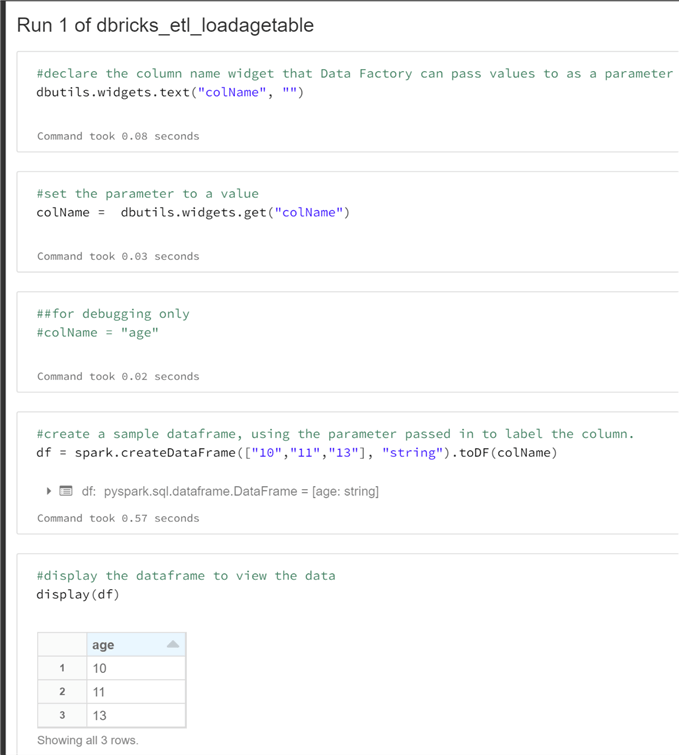
We can see above that the column name of our Dataframe was name 'age', which we passed in through the colName parameter.
There it is you have successfully kicked off a Databricks Job using the Jobs API.
Next Steps
- Use this methodology to play with the other Job API request types, such as creating, deleting, or viewing info about jobs.
- Implement a similar API call in another tool or language, such as Python.
- Read more about Azure Databricks:
About the author
 Ryan Kennedy is a Solutions Architect for Databricks, specializing in helping clients build modern data platforms in the cloud that drive business results.
This author pledges the content of this article is based on professional experience and not AI generated.
View all my tips
Article Last Updated: 2020-11-19


