By: Kenneth A. Omorodion | Updated: 2020-12-09 | Comments (3) | Related: > Power BI
Problem
I have written in a previous article on how to leverage Excel sources in Power BI Paginated reports of which I described how to connect to a single Excel file within OneDrive for Business and how to set up a scheduled refresh for this dataset in the Power BI service. However, there are situations where one may want to combine several files from several folders within OneDrive for Business or SharePoint sources, then this might pose some challenges. In this article I have described a detailed technique on how to achieve this in Power BI.
Solution
There have been several articles relating to how to solve this challenge, but most have been on combining files from single/same folder in SharePoint or OneDrive for Business, you can find an example of this here by Microsoft. I will now provide the needed solution in a series of steps.
Step 1: Get data from the OneDrive location
The diagram below shows the structure of the OneDrive for Business location with four different folders holding similar datasets, but of different months. This has been prefixed by "Data&AI" for a reason I will explain later (though not mandatory to include, but helpful).
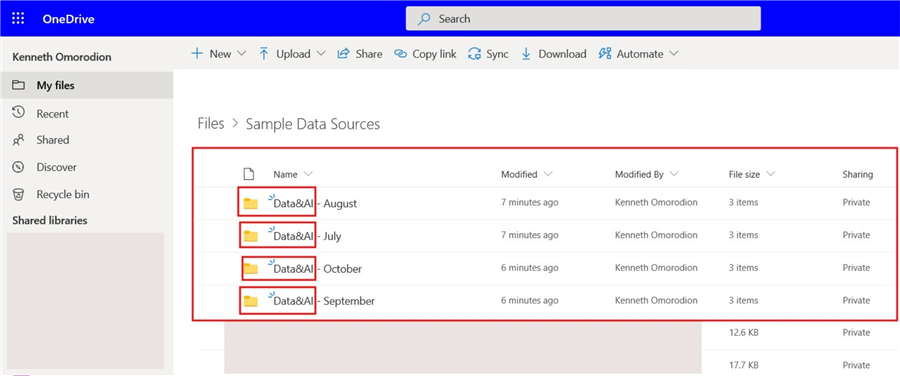
When the "August" folder is opened for example, it contains three .csv files for the month of August only. Similar files are also in the "July", "September" and "October" folders for data for those months as seen in the diagram below. This can be in some other forms in your own business environment, but the solution is the same logic.

We now understand the structure of how the datasets are saved within the OneDrive for Business location, and next is how to combine the datasets in each month automatically for reporting purposes. Let's connect to the OneDrive location where the datasets are saved so we can get the datasets into Power BI as seen in the diagram below.
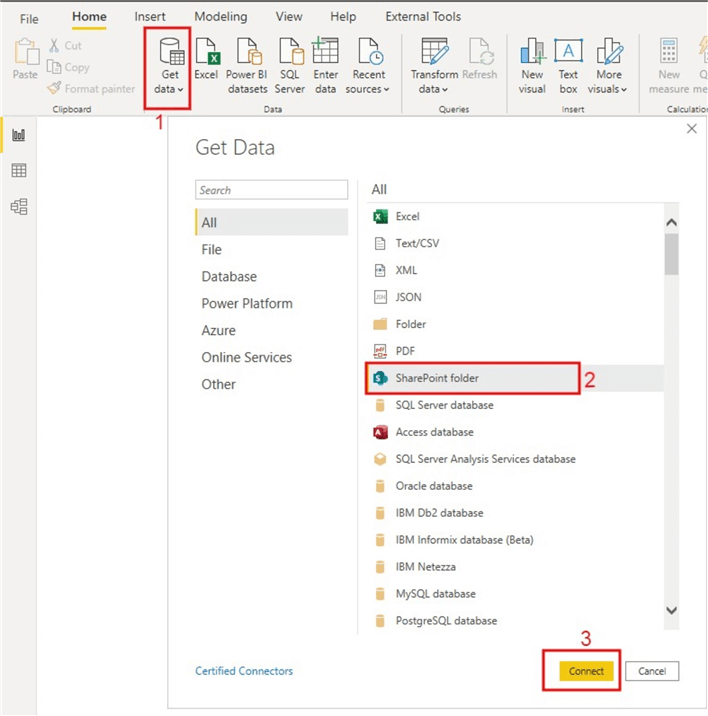
In this case we need to select the "SharePoint folder" option as our source connector. Then copy the URL link for the OneDrive location of the folders as seen below.
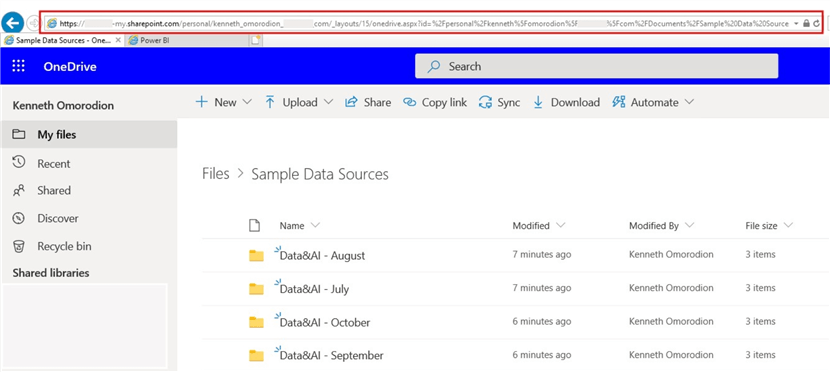
The link should look like the one below. Please note x y and z represent sensitive information I needed to remove.
https://xyz-my.sharepoint.com/personal/x_y_z_com/_layouts/15/onedrive.aspx?id=%2Fpersonal%2Fx%5Fy%5Fz%5Fcom%2FDocuments%2FSample%20Data%20Sources
But the full link would not work when used for the connection, thus it should be edited to look like the one below.
https://xyz-my.sharepoint.com/personal/x_y_z_com
Then paste the shortened URL on the Site URL as seen in the below diagram.

You might need to sign into your Microsoft account if not done so already as seen below.
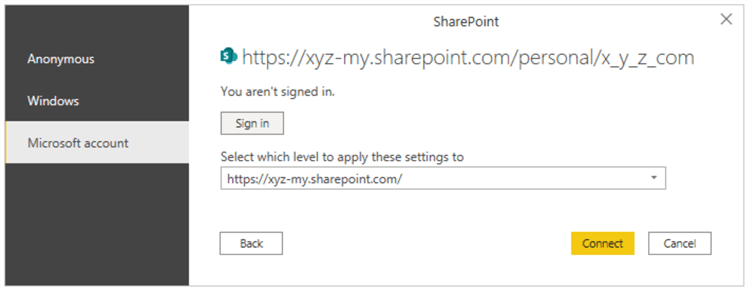
When you successfully sign in, you should see something like the output below, just go ahead a click on "Transform Data".

That should now take you to the Power Query Editor window.
Step 2: Filter out unwanted data
The initial look in the Power Query Editor provides us with all the datasets in the OneDrive for Business along with their extensions and other details as shown in diagram below.

However, since our intention is to filter out other datasets and use only the ones we require in this project, then the need for the prefix at the front of each folder names as I mentioned earlier becomes evident. The prefix "Data&AI" would be used to filter for the datasets we need on the folder path as seen in the image below.
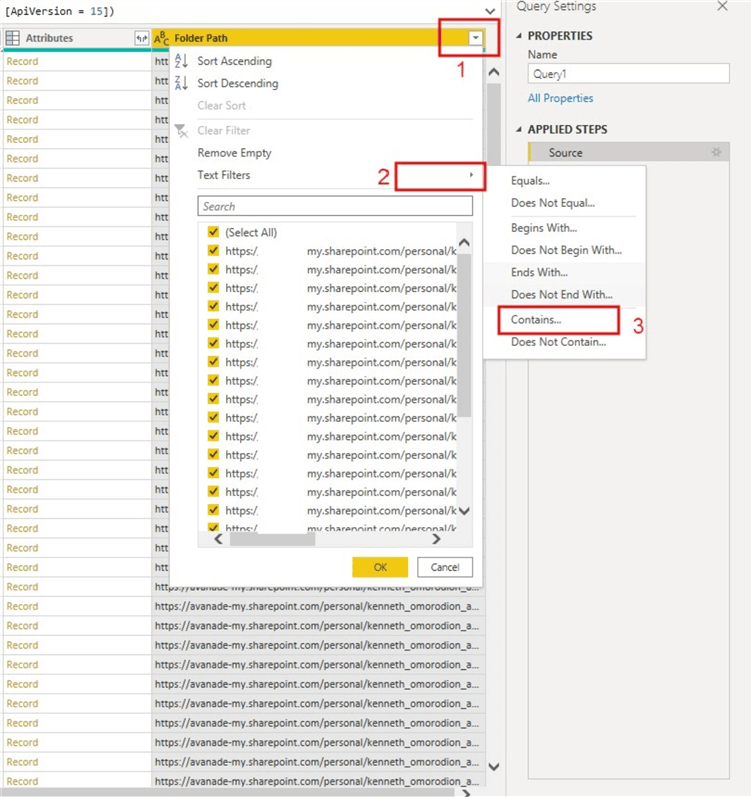
When we select the Contains text filter option, we enter "Data&AI" as seen below.
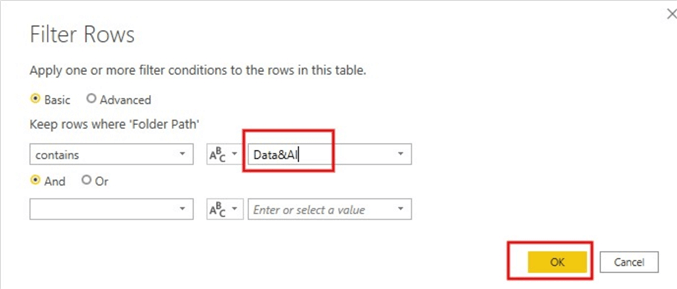
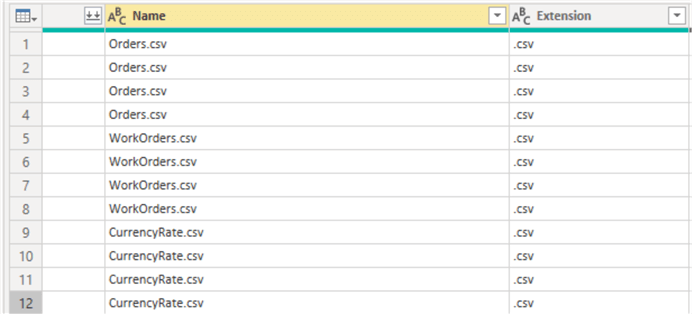
This would then filter it down to the datasets we need as seen in the diagram below.
Step 3: Work on a single dataset at a time
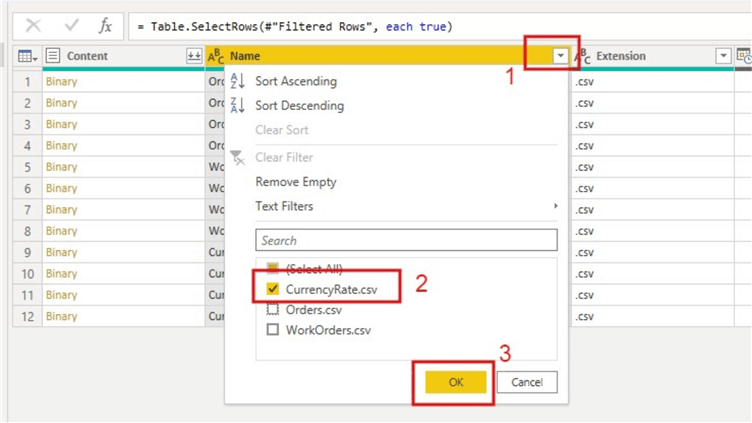
The technique here is to start by working on a single type of the dataset at a time. To do this we need to filter on the "Name" column and select a single dataset as seen in the diagram below.
Then we need to combine the files for "CurrencyRate.csv" from the different months as seen below.

So, by now you can now see the "CurrencyRate" dataset has now been successfully combined. For the purpose of this tip, I will mention that Power Query has created a function for one of the files and then ran it through each of the files from each folder to combine them. You can learn more about functions and parameters in Power BI from this awesome blog.
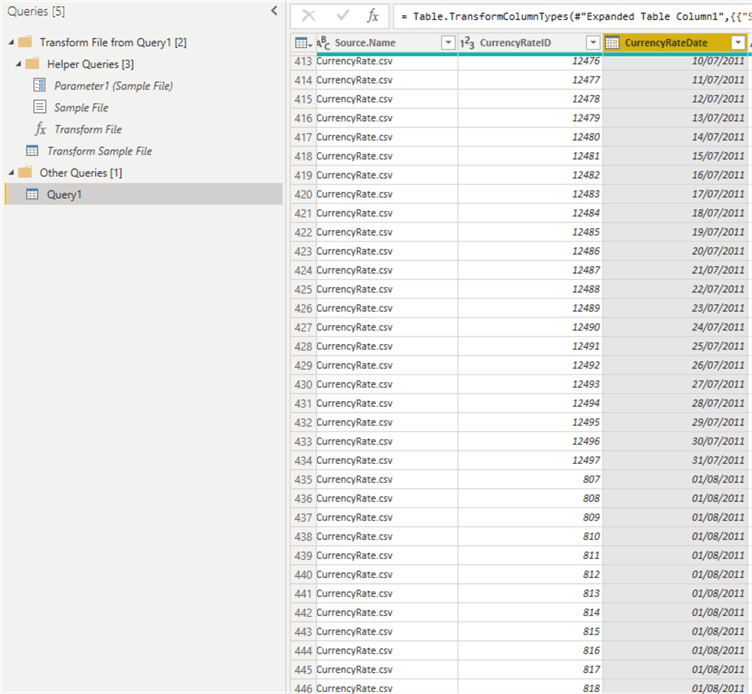
You can then rename the Query1 to an easily understandable table name like "Currency_Rate" for example and remove the "Source.Name" column as it is not required.
Step 4: Use the Advanced Editor Query to configure the combining of the other datasets
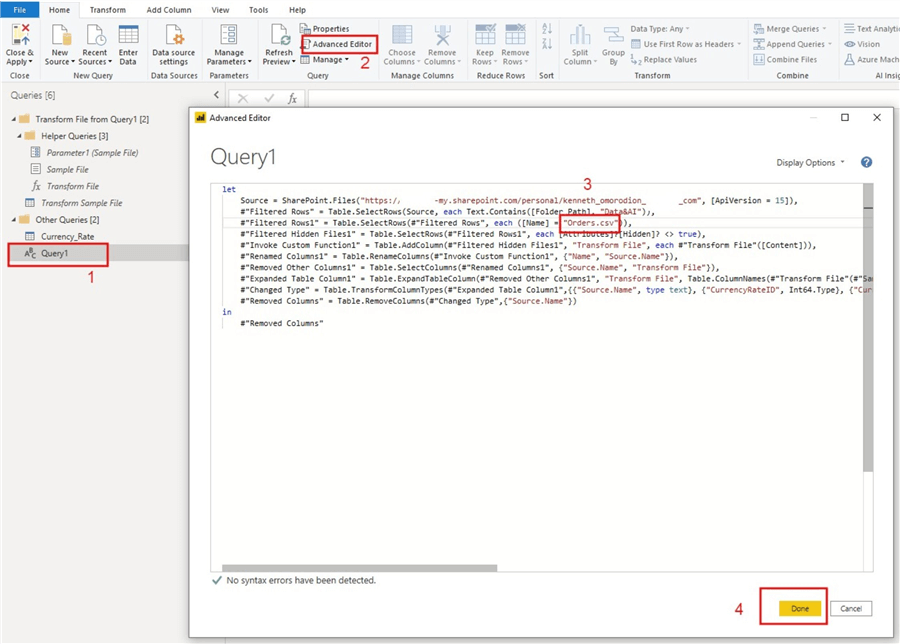
To do this we need to click on the Currency_Rate table and select the "Advanced Editor" to expose the M query behind it as seen in the diagram below.

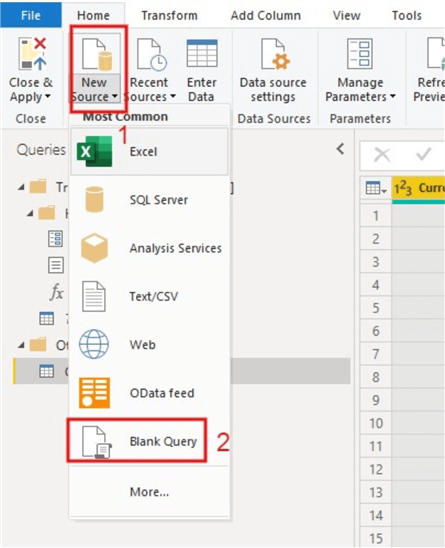
Then we need to make just one change to be able to work on the next dataset. Let us work on the "Orders.csv" dataset. So, we go copy the M code, and close the window. We need to connect to a new Blank Query source as shown below.
Again, with the new Query that opens, we need to click on the "Advanced Editor" again so we can paste the M code we just copied earlier into it as seen below. After that, we need to go copy the name of the new dataset (so we do not get the spelling wrong) and then replace it with that of the "CurrencyRate" as seen in the diagram below.
Initially, this might create a query with errors like the one below.

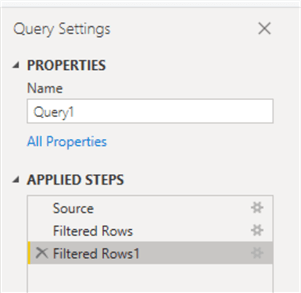
To resolve this, we can take out the applied steps to fix the issue (note that this might not always be the first three steps, just ensure you can see the filter symbol on the "Name" column that should be where to combine) as shown below, and then we need to combine again for this dataset.

So, as can be seen in the diagram below, we have successfully combined the files for Orders in the different folders as we did for the CurrentRate dataset.
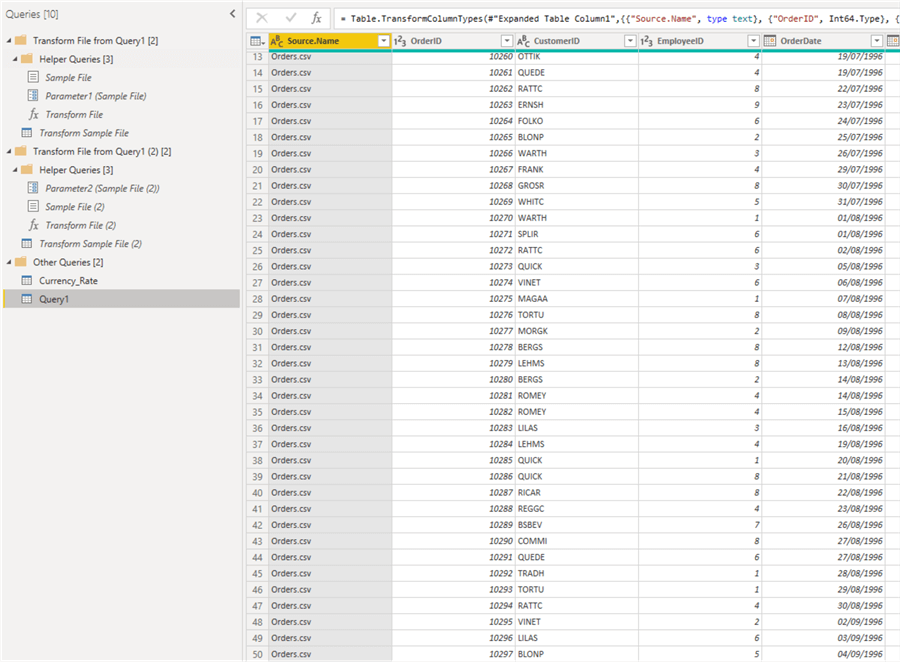
This can be repeated for as many other datasets in different folders that need to be combined.
Note that for each dataset a new function is created as pointed out earlier. After combining the datasets, the queries can be loaded accordingly, and report visuals created and published to the Power BI service.
See my article on how you can schedule a refresh for the datasets within the Power BI service. Note that you would not require an On-Premises Gateway as the source is Online (i.e. OneDrive for Business or SharePoint source).
Next Steps
- Download the pbix file and sample data sources for this article.
- You can learn more about Parameters and Functions in Power Query from here.
- Try this tip out in your own environment and adapt it with your business logic.
Learn more about Power BI in this 3 hour training course.
About the author
 Kenneth A. Omorodion is a Business Intelligence Developer with over eight years of experience. He holds both a bachelorís and masterís degree (Middlesex University in London). Kenneth has the MCSA, Microsoft Data Analyst - Power BI and Azure Fundamentals certifications. Kenneth is a Microsoft Certified Trainer and has delivered corporate training on Power BI, SQL Server, Excel and SSRS.
This author pledges the content of this article is based on professional experience and not AI generated.
View all my tips
Article Last Updated: 2020-12-09


