By: John Miner | Updated: 2021-03-17 | Comments (1) | Related: > TSQL
Problem
There are four basic operations on any persistent storage, known by the acronym CRUD which stands for create, read, update and delete. The Transact-SQL (T-SQL) language used by Microsoft SQL Server implements these four actions with the INSERT, SELECT, UPDATE and DELETE statements.
While storage prices have decreased in the last decade, it is still very important to think about retention periods for the data that your company collects. The deletion of data too soon in the records management life cycle might mean non-compliance to local and state regulatory statutes. On the hand, keeping data too long might expose the company to legal issues for expired products. The DELETE statement can be used to purge off historical data as the retention period expires.
In this brief tutorial, we will review the DELETE statement. We will start off with very basic uses of the statement and progress to more advanced ones.
Solution
When learning about any new statement, I find the best method for understanding how it works is to execute a bunch of code examples demonstrating different use cases. As always, it is always a good idea to read through the documentation and become familiar with syntax. You can read more about the statement this from this link, but I will be highlighting the main points from the MSDN documentation in this tip.
Lab Environment
Most tutorials have a lab environment defined for the student to work with. Nowadays, most of my work is performed in the Azure Environment. The image below shows both an Infrastructure as a Service (IaaS) and a Platform as a Service (PaaS) deployment of the Adventure Works Database for SQL Server 2019.
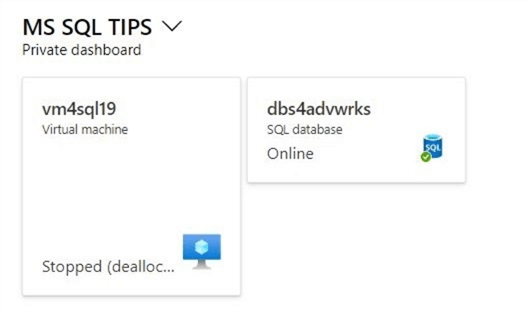
You can follow along with a local install of the database engine if you do not have an Azure Subscription. Please follow my previous tip on creating an Azure Virtual Machine for Testing. Instead of the Contoso database, we will be working with the Adventure Works database. Please name the virtual machine vm4sql19. First, download and install the developer version of Microsoft SQL Server 2019 using this link. Second, download and install the latest version of Microsoft SQL Server Management Studio using this link.
The backup of the database can be download from this MSDN web page. Use the restore database wizard to bring the database online. Please see screen shot below for details. Repeat the restore process for the Data Warehouse (DW) version of the database. We will need this database to showcase some of the more advanced DELETE syntax later in this article.
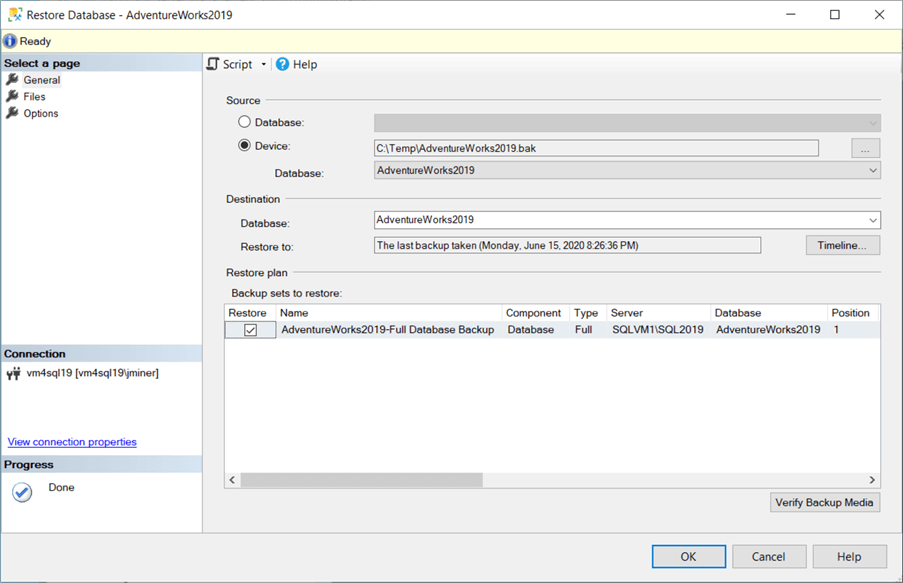
Now that the IaaS environment is setup, we need to concentrate on the PaaS environment. Please deploy a general purpose Azure SQL database. It does not matter if DTUs or v-Cores are chosen for the computer. This tip shows how to deploy the service using the Azure Portal. I choose to name the logical server as svr4tips2021. Please follow Victor’s tip on how to Migrate a SQL Server database to Azure SQL Server. To recap, so time has been spent on setting up a lab environment for testing. I will be using this environment in future articles.
Single Record Deletion
Removing a single record from a table is the simplest example of a delete statement. The T-SQL code below has two statements. The first statement shows one record from the [SalesOrderDetail] table in the output window. I use the SELECT statement to verify the FROM and WHERE clause is correct. The second statement DELETES the same record from the table. I usually run each statement separately. If I do not get the results that I want in the first statement, I do not execute the second statement.
-- Select order details
SELECT *
FROM [Sales].[SalesOrderDetail]
WHERE [SalesOrderId] = 46599;
GO

-- Remove order details
DELETE
FROM [Sales].[SalesOrderDetail]
WHERE [SalesOrderId] = 46599;
GO
The output below shows sales order 46599 having one sales detail line.
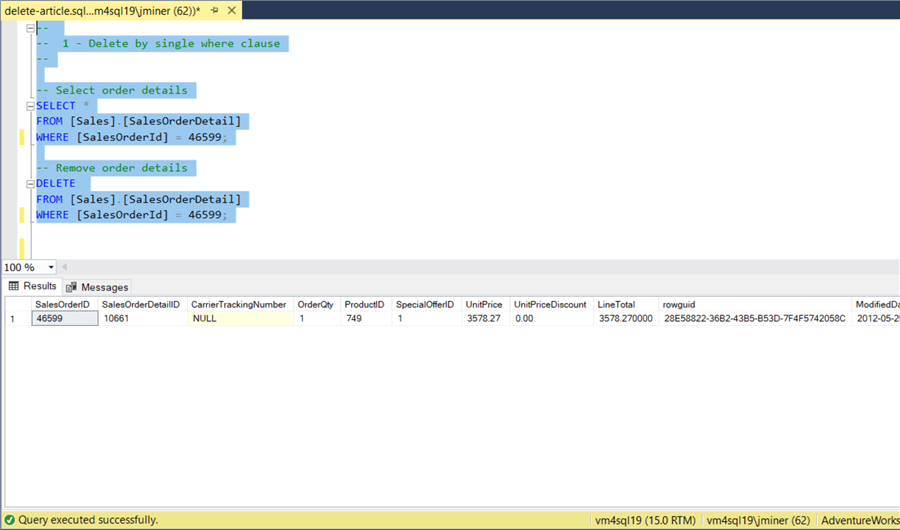
If we look at the messages window, we can see that two actions were executed. The first was a SELECT statement and the second was a DELETE statement.

If we re-execute the SELECT statement, we can see from the image below that the selected record is gone.
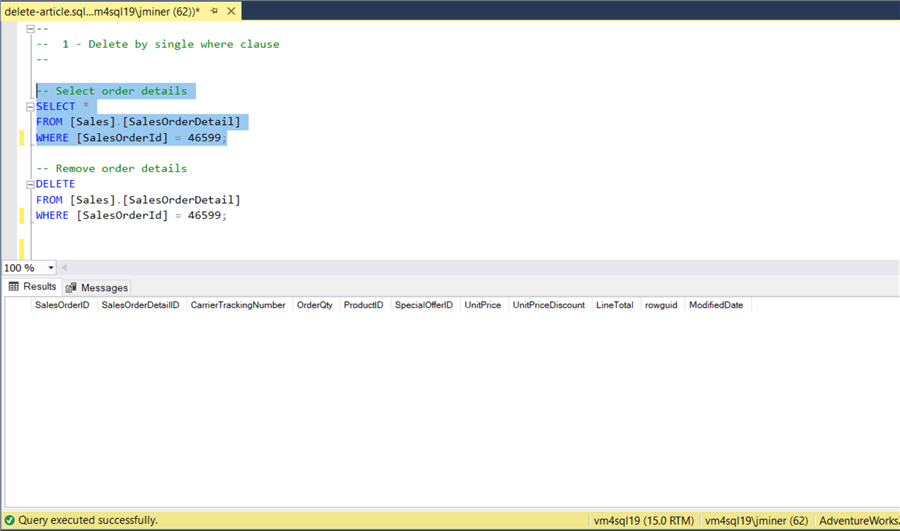
While the statement above worked correctly, we now have a parent record (sales order) that does not have a child record (sales detail).
Logical Consistency
There are a couple of ways to handle a parent record without a child record. The first solution is to handle this issue in the application layer. The user could be prompted when the last detail record is removed. They can be asked to remove the parent record at this time. The second solution is to write a clean up process that removes any sales orders that are x days old and do not have any detail records.
The T-SQL code below has two statements. The first statement shows how to left join two tables. The WHERE clause could be removed to search of all parent records that do not have a child. The second statement removes the targeted parent record. I chose to simplify the code. If you want to use the left join between two tables, you will have to learn how to use an ALIAS. I will be covering that topic next.
-- Select header details
SELECT H.SalesOrderID, D.SalesOrderDetailID
FROM [Sales].[SalesOrderHeader] AS H
LEFT JOIN [Sales].[SalesOrderDetail] AS D ON H.SalesOrderID = D.SalesOrderID
WHERE H.[SalesOrderId] = 46599;
GO

-- Remove header details
DELETE
FROM [Sales].[SalesOrderHeader]
WHERE [SalesOrderId] = 46599;
GO
The image below shows the SELECT and DELETE of the parent record that does not have a child.
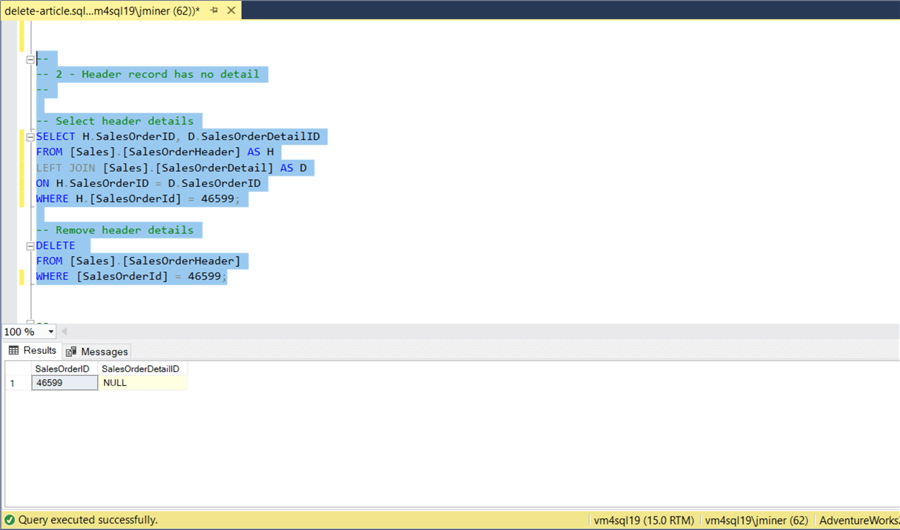
If we re-execute the SELECT statement, we can see the parent record has been removed from the table.

Please remember, referential integrity (Primary Key and Foreign Key relationship) does not enforce certain business rules such as a SALES ORDER must have at least one SALES ORDER DETAIL record.
Implicit vs Explicit Transactions
A semicolon denotes the end of a transaction. By default, implicit transactions are set off. Therefore, the DELETE statement will automatically execute. What happens if we forget to select the WHERE clause when executing a DELETE statement in SSMS? All, the records in the table are gone! In this section, we will talk about using explicit transactions when deleting records from tables.
The HRIS department has asked IT to delete any historical pay records that are less than the year 2014. The SELECT statement below shows that 39 rows match these criteria.
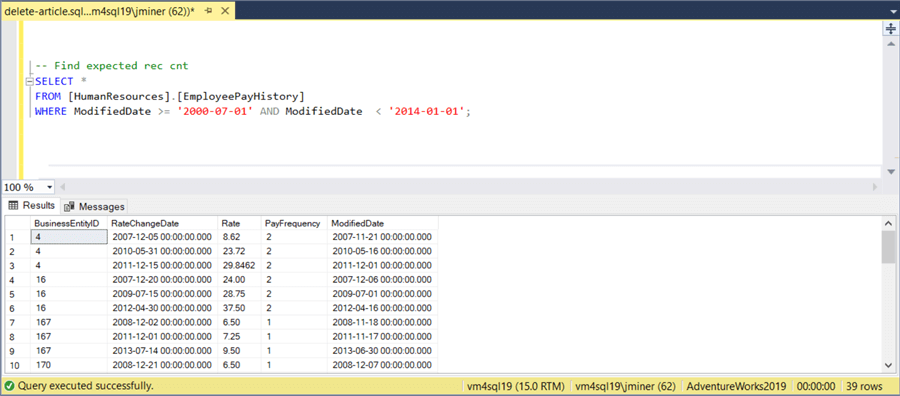
The T-SQL code below introduces an explicit transaction by using the BEGIN TRAN statement. Like usual, we want to see the target population of the DELETE statement by using a SELECT statement. The DELETE statement is using the double FROM clause. This is required syntax if you want to use a table ALIAS in our code. The @@ROWCOUNT function returns the number of rows impacted by the last statement. This will tell us the number of records that will be deleted. Last but not least, we want to close the transaction by executing either a COMMIT TRAN or ROLLBACK TRAN. Use the first statement if you are happy with the results of the DELETE statement. Otherwise, use the second transaction to undo the deleted records.
-- Find expected record count
SELECT *
FROM [HumanResources].[EmployeePayHistory]
WHERE ModifiedDate >= '2000-07-01' AND ModifiedDate < '2014-01-01';
GO

-- Start transaction
BEGIN TRAN;

-- Use alias
DELETE
FROM H
FROM [HumanResources].[EmployeePayHistory] AS H
WHERE ModifiedDate >= '2000-07-01' AND ModifiedDate < '2014-01-01';

-- Show effected record count
PRINT @@ROWCOUNT

-- Commit or rollback transaction
/*
COMMIT TRAN
ROLLBACK TRAN
*/
The messages show in the image below reflects both the DELETE and PRINT statements. Since we were expecting 39 records to be removed from the table, it is okay to close the transaction with a commit statement.
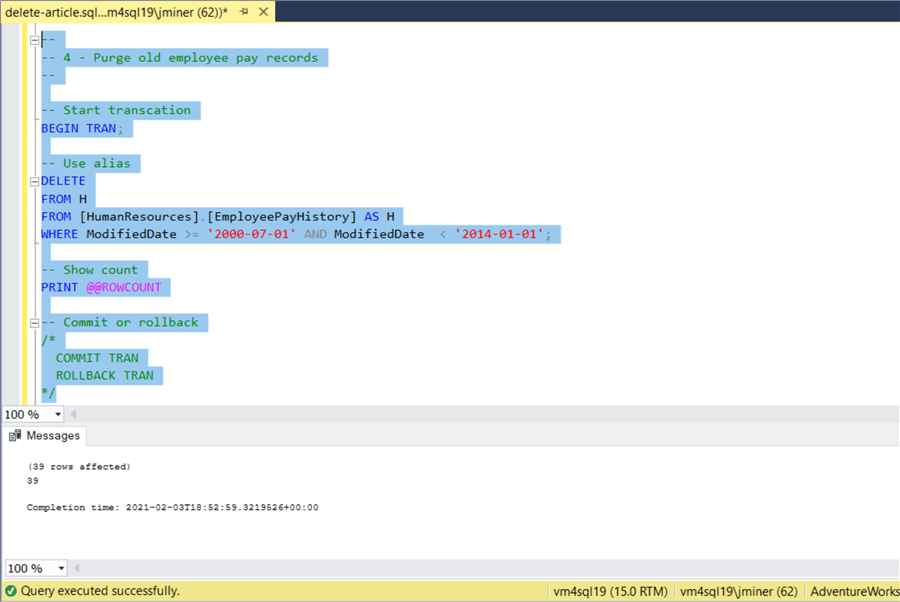
Finally, always close your transactions. There is the potential for open locks on the tables. This will cause you problems in the future. The image below shows the closure message when the transaction is finally committed. I try to avoid manually deleting information from a production environment. However, there are times when these actions are required to fix a problem. Please use explicit transactions when performing manual deletions.

Table Copy
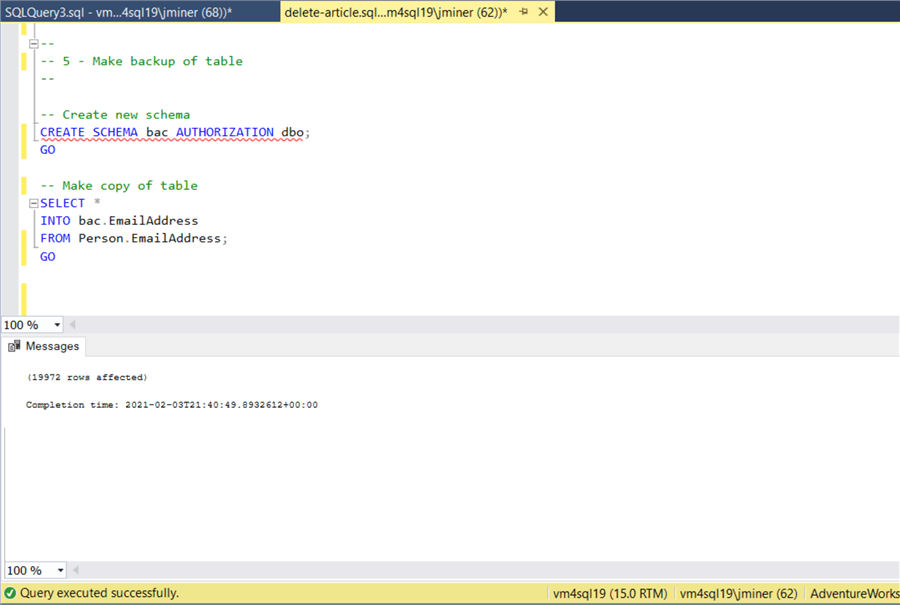
During this tutorial, we are going to work with the [Person].[EmailAddress] table many times. Instead of restoring the whole database after the table is empty, it might be a good idea to create a copy of the local table. I think SCHEMAS are an underused storage technique. Essentially, we can create two tables with the same name but in different schemas. The T-SQL code below contains two statements. The first statement creates a new schema called [bac]. The second statement copies the table data from one schema to another. The INTO clause will automatically create a new table in our new schema.
-- Create new schema
CREATE SCHEMA bac AUTHORIZATION dbo;
GO

-- Make copy of table
SELECT *
INTO bac.EmailAddress
FROM Person.EmailAddress;
GO
The image below shows that 19,972 records were copied from the [Person] to [bac] schema.
We can take a quick look at the table data by right clicking the table and choosing SELECT TOP 1000 rows.
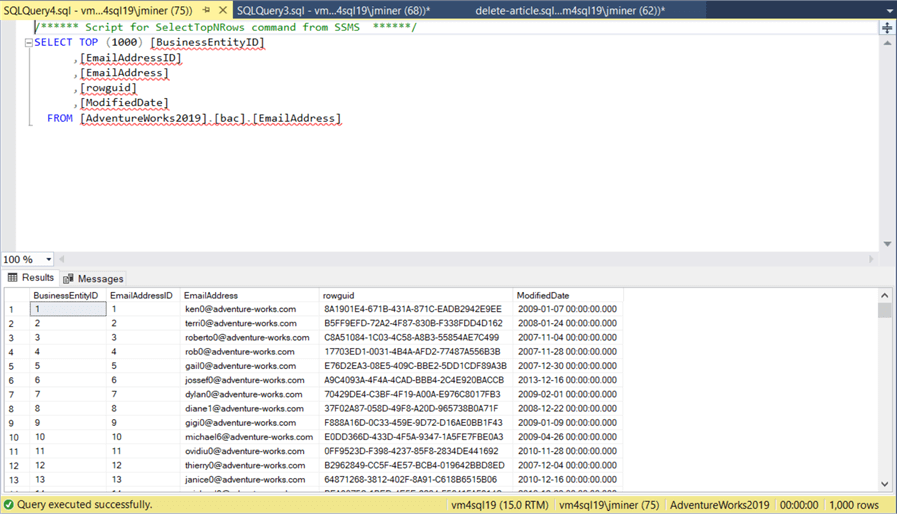
Making a copy of an existing table is a valuable technique. I have done this many times during unit testing when the test case modifies the target table.
Complex Delete Statements
The DELETE statement removes records from one table using some type of search condition. Since we can use a table alias in the statement, we can perform multiple joins and/or where conditions to narrow down the final list of records to delete. There is no way to cover all possible conditions that might apply in this article. However, I will show an example of deleting records using two search conditions in the WHERE clause.
The T-SQL code below finds email addresses between the years of 2005 and 2010 that start with the name "john".
-- Show john's old email addresses
SELECT *
FROM [Person].[EmailAddress]
WHERE YEAR([ModifiedDate]) IN (2005, 2006, 2007, 2008, 2009, 2010) AND EmailAddress LIKE 'john%';
GO

-- Remove john's old email addresses
DELETE
FROM [Person].[EmailAddress]
WHERE YEAR([ModifiedDate]) IN (2005, 2006, 2007, 2008, 2009, 2010) AND EmailAddress LIKE 'john%';
GO
The image below shows 7 records match our two logic conditions. The execution of the DELETE statement will result in the removal of these records.
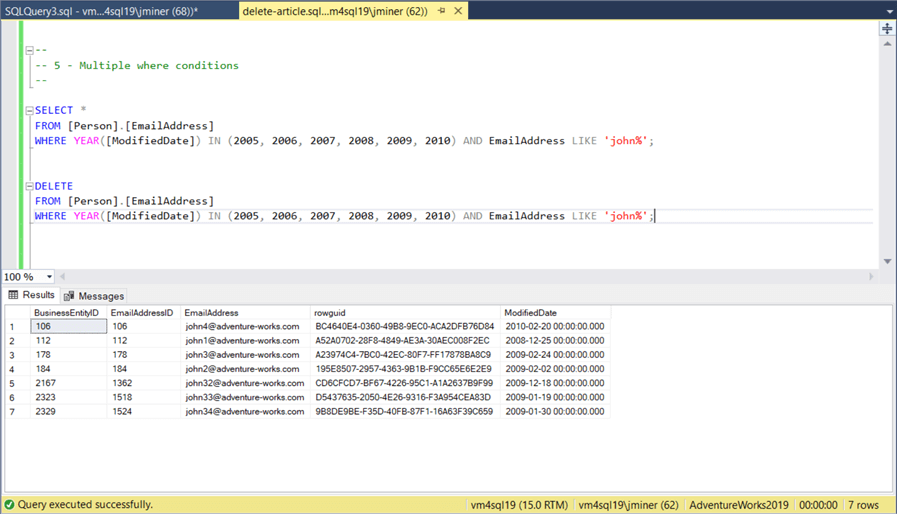
So far, we have been deleting a small amount of records using a specific search criteria. In the next few chapters, we will talk about deleting larger amounts of records.
Randomly Deleting Records
The TOP statement will limit the number of records returned from a given table. Unless an ORDER BY clause is used, the records are returned in a random fashion. The T-SQL code below has two statements. We can run the SELECT statement before and after the DELETE statement. The DELETE operation randomly deletes 10 records from the [Person].[EmailAddress] table.
-- Delete top 10 rows
DELETE TOP (10)
FROM Person.EmailAddress;
GO

-- Display record count
SELECT COUNT(*) AS Total
FROM Person.EmailAddress;
GO
From the table copy, we know that we started with 19,972 records. The previous statement deleted 7 existing records. These records reflect email addresses between the years of 2005 and 2010 that start with the name "john". If we delete 10 random rows, we end up with 19,955 remaining records. Our simple arithmetic is balanced. Please see the image below for the results.
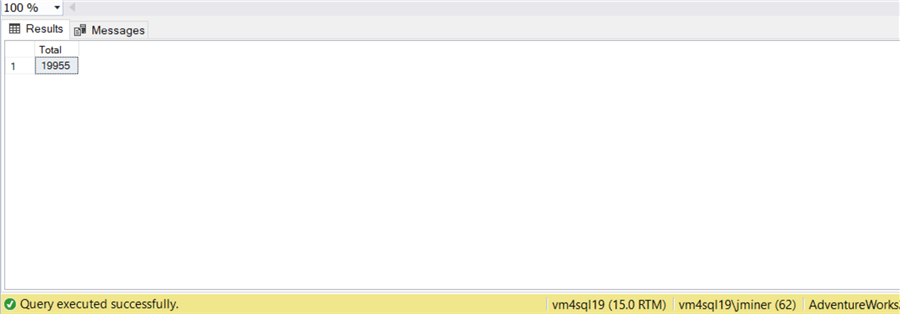
How can we repeat this pattern to end up with an empty table? The GO statement is not part of transaction SQL. It signals the end of a batch. Thus, a bunch of statements are submitted to the database engine as one block of code. A fact that might now be known to new SQL Server developers is a repeat count can be optionally added at the end of the statement. The T-SQL code randomly deletes 1000 records from the table. The transaction is repeated 20 times. Since we have less than 20K records, the result is an empty table.
-- Use TOP + GO
DELETE TOP (1000)
FROM Person.EmailAddress;
GO 20

-- How many records are left?
SELECT COUNT(*) AS Total
FROM Person.EmailAddress;
GO
The image below shows the table has no data.
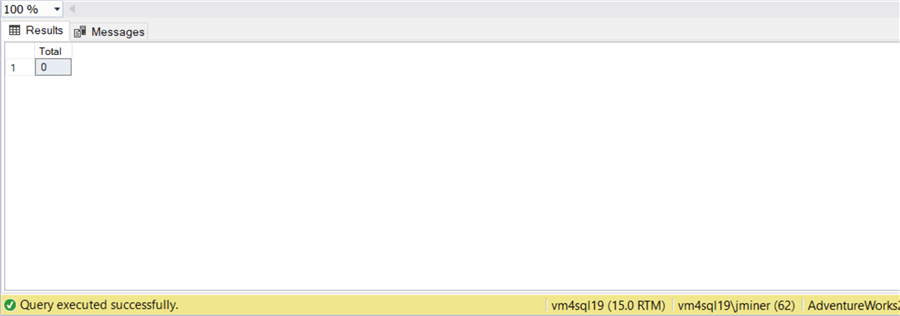
Many database engines use write ahead logging (WAL) to provide atomicity and durability properties. The Microsoft SQL Server DBMS engine is no different. Thus, data must be written to the log file before it is written to the data file. Managing the size of the log is a very important topic that is out of scope. However, you should know that the DELETE statement is a fully logged action.
Restore from table copy
In a prior section, we made a copy of the [EmailAddress] table in the [bac] schema. It is now time to restore the data since our table in the [Person] schema is empty. A simple INSERT INTO pattern can be used to accomplish this task. However, we must change the INDENTITY_INSERT property to allow specific values for the identity column to be used. The complete T-SQL code is shown below.
-- Allow inserts - identity column
SET IDENTITY_INSERT Person.EmailAddress ON;

-- Copy records
INSERT INTO Person.EmailAddress
(
[BusinessEntityID],
[EmailAddressID],
[EmailAddress],
[rowguid],
[ModifiedDate]
)
SELECT * FROM bac.EmailAddress

-- Don't allow inserts - identity column
SET IDENTITY_INSERT Person.EmailAddress OFF;
Now that we have a fresh copy of the data, let us talk about a statement that allows for minimally logged action.
Truncate Table
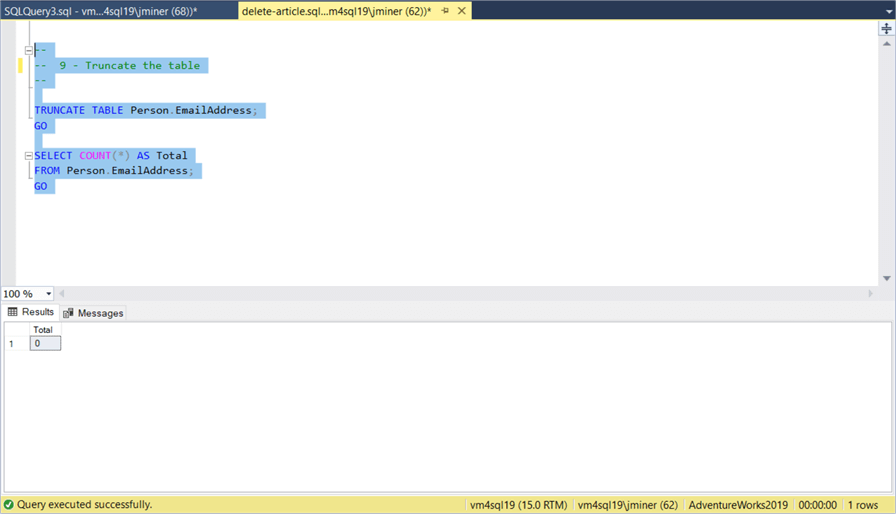
The DELETE statement is a fully logged action. On the other hand, the TRUNCATE TABLE statement is a minimally logged action. At the very end of this article, I will compare the number of log entries between these two statements. For now, the image below shows the execution and results of the following T-SQL code.
-- Remove all records
TRUNCATE TABLE Person.EmailAddress;
GO

-- Show record count
SELECT COUNT(*) AS Total
FROM Person.EmailAddress;
GO
Some Restrictions Apply
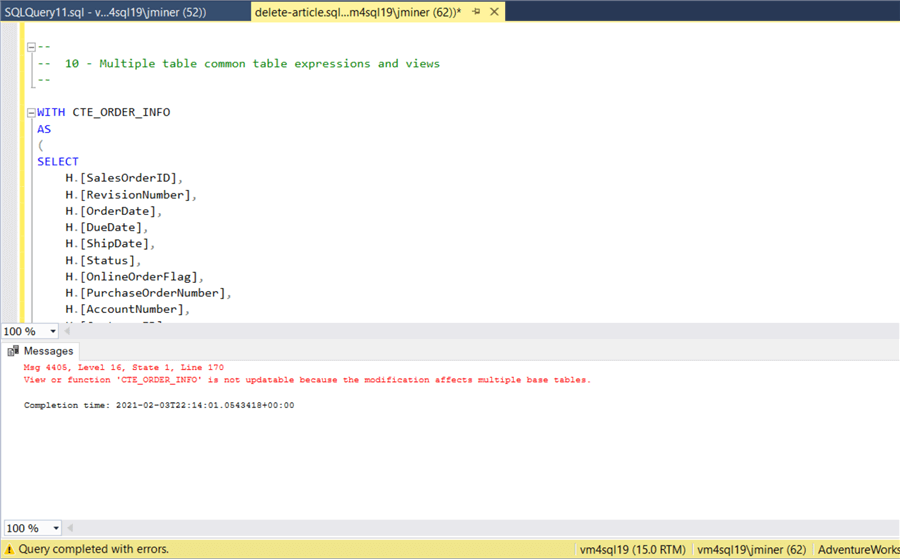
The DELETE statement removes records from a given TABLE. Since a view is just a filtered down version of a table, we should be able to DELETE records from a view. The same idea should apply to a common table expression (CTE). The main thing to remember is that the DELETE statement must apply to just one table. The code for this section (article) can be obtained here. The image below shows a CTE that combines the Sales Order and Sales Order Details table. The statement fails because multiple tables are involved in the CTE.
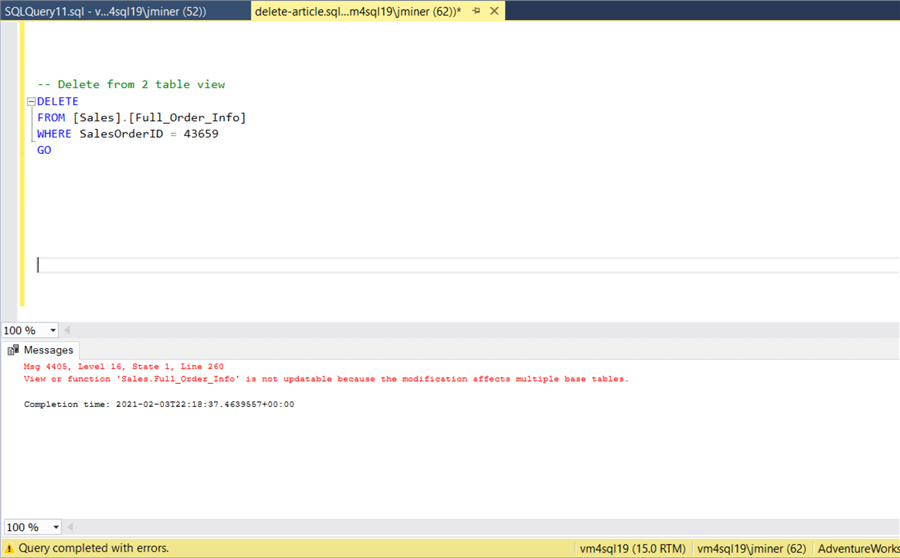
That same T-SQL statement can be converted into a view. However, the same restriction applies and results in a error.
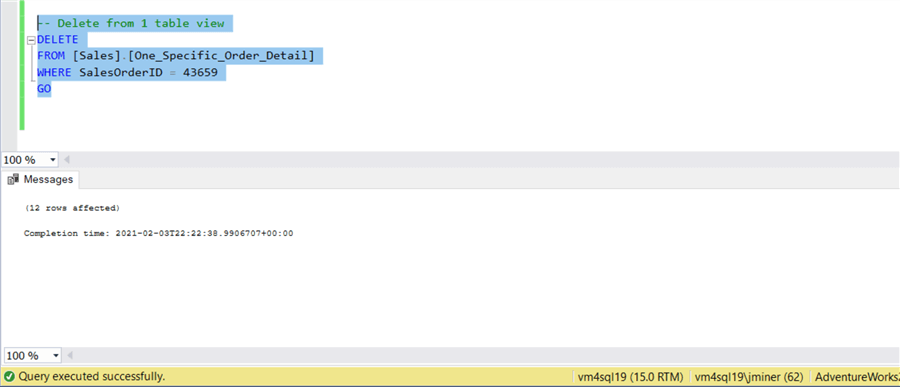
The last example is a VIEW that is based upon one table. The DELETE statement removes 12 records from the details tables.
Of course, there are always exceptions to any type of restriction. If you really want to delete records from a VIEW, you have to materialize the data and redefine the DELETE statement using an INSTEAD OF TRIGGER.
Left Join, Not Exists or Not In
There might be a business need to remove all sales order header records that do not have sales order detailed records. I will be reviewing the SELECT statement for each example. Converting the code to a DELETE statement is trivial.
The first T-SQL code uses a LEFT JOIN between the header table to the detail table. Any detail records that are NULL are the ones that we want to delete.
-- Ex 1 - Header record is missing details
SELECT *
FROM [Sales].[SalesOrderHeader] AS H
LEFT JOIN [Sales].[SalesOrderDetail] AS D ON H.SalesOrderID = D.SalesOrderID
WHERE D.SalesOrderDetailID IS NULL
GO
The second T-SQL code queries the details table for all sales order ids. This is the id in the parent/child relationship. If the header record id is NOT IN this list, then it has no matching detail records.
-- Ex 2 - Header record is missing details
SELECT *
FROM [Sales].[SalesOrderHeader] AS H
WHERE H.SalesOrderID NOT IN
(
   SELECT SalesOrderID
   FROM [Sales].[SalesOrderDetail]
)
The third set of T-SQL code uses a correlated subquery. The NOT EXISTS logical function shows all parent records that do not have a child record.
-- Ex 3 - Header record is missing details
SELECT * FROM [Sales].[SalesOrderHeader] AS H
WHERE NOT EXISTS
(
   SELECT SalesOrderID
   FROM [Sales].[SalesOrderDetail] AS D
   WHERE D.SalesOrderID = H.SalesOrderID
)
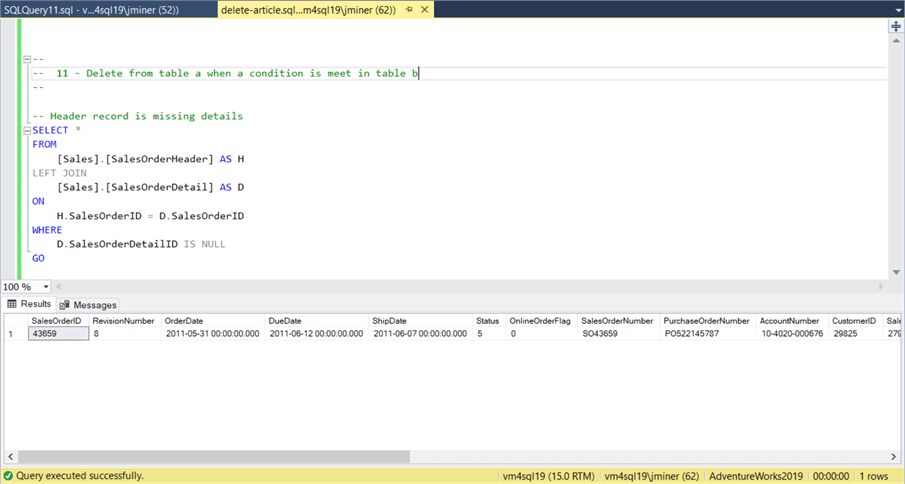
The above image shows the result set of the first T-SQL statement. The SELECT statement can easily be converted to a DELETE statement. When using a table ALIAS in a DELETE statement, don’t forget to use a double FROM clause.
Moving Data
Did you know that the DELETE statement can be used to move data from one table to another? Better yet, we can use the TOP clause to limit the amount of data we transfer during each loop. This design pattern can be used to move records from the primary table to a historical table. To get started, let's make an empty copy of our email addresses table and call it [bac].[MoveEmailAddresses].
The T-SQL code below has 3 statements. The first statement creates the new empty table. However, it has an identity column. We usually do not need a surrogate on a history table. Therefore, the second statement deletes the offending column. The third statement adds the column back as a simple integer field.
-- Duplicate Schema
SELECT * INTO bac.MoveEmailAddresses
FROM Person.EmailAddress
WHERE 1 = 0;
GO

-- Drop identity column
ALTER TABLE bac.MoveEmailAddresses
DROP COLUMN [EmailAddressID];
GO

-- Add column back
ALTER TABLE bac.MoveEmailAddresses
ADD [EmailAddressID] INT NULL;
GO
The OUTPUT clause allows the SQL Server developer to delete records from one table and insert them into another table. See the T-SQL code below for details.
-- While there are records
DECLARE @CNT INT = 1;
WHILE (@CNT > 0)
BEGIN
-- Delete / Insert Data = Move Data
DELETE TOP (1000)
FROM [Person].[EmailAddress]
OUTPUT
DELETED.[BusinessEntityID],
DELETED.[EmailAddressID],
DELETED.[EmailAddress],
DELETED.[rowguid],
DELETED.[ModifiedDate]
INTO
[bac].[MoveEmailAddresses]
(
  [BusinessEntityID],
  [EmailAddressID],
  [EmailAddress],
  [rowguid],
  [ModifiedDate]
);

-- Update counter
SET @CNT = @@ROWCOUNT;
END
GO

Since there is no WHERE clause on the DELETE statement, all records are moved from one table to another. Since both DELETE and INSERT are fully logged actions, we will be generating twice the number of log records.
Deleting from local data sources
Before the invention of the Azure Cloud, many corporate databases were located either on the same database server or on other database servers within the same network. Therefore, it is not uncommon to see older code that uses the techniques that I am about to explain.
First, if the one database process has to delete data from another database, then three dot notation can be used if the two databases exist on the same server. This notation is shown at the top of the CREATE TABLE syntax. In short, the database, schema, and table name fully define the location.
-- Three dot notation for local databases
SELECT *
FROM AdventureWorksDW.dbo.FactInternetSales as S
WHERE S.SalesOrderNumber < 'SO43700';
GO
The image below shows how the OPENROWSET and OPENDATASOURCE use OLE DB to execute CRUD actions for various providers.
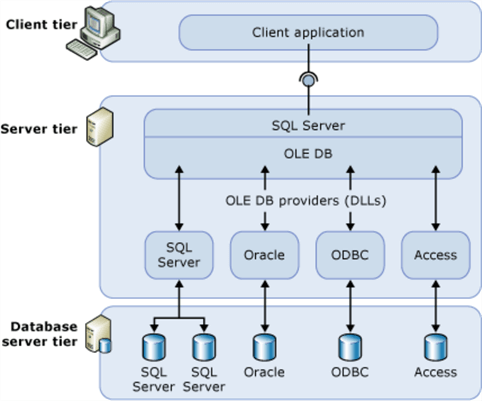
Second, the OPENROWSET row set function can be used to execute CRUD actions on any database/server that is seen on the local area network. I am cheating in this example since I did not want to spin up another Virtual Machine with SQL Server running on the same network. Therefore, the native SQL server driver is talking to vmsql19 virtual machine or itself.
-- Only supports IAAS or Managed Instance
SELECT *
FROM OPENROWSET('SQLNCLI', 'Server=vm4sql19;Trusted_Connection=yes;', AdventureWorksDW.dbo.FactInternetSales ) AS S
WHERE S.SalesOrderNumber < 'SO43700';
GO
Third, the OPENDATASOURCE row set function is similar to the previous function. However, the syntax is a little different. Again, both techniques use OLE DB data sources that can include any drivers that you are willing to install and support on your server. There are some interesting things you can do with OLE DB. I have seen technologist tightly bind SQL Server to Oracle so that ETL can be quickly developed. However, I do no suggest this technique for production grade ETL.
-- Only supports IAAS or Managed Instance
SELECT *
FROM OPENDATASOURCE('SQLNCLI', 'Server=vm4sql19;Trusted_Connection=yes;').AdventureWorksDW.dbo.FactInternetSales AS S
WHERE S.SalesOrderNumber < 'SO43700';
GO
The image below shows three records that have order numbers less than S043700

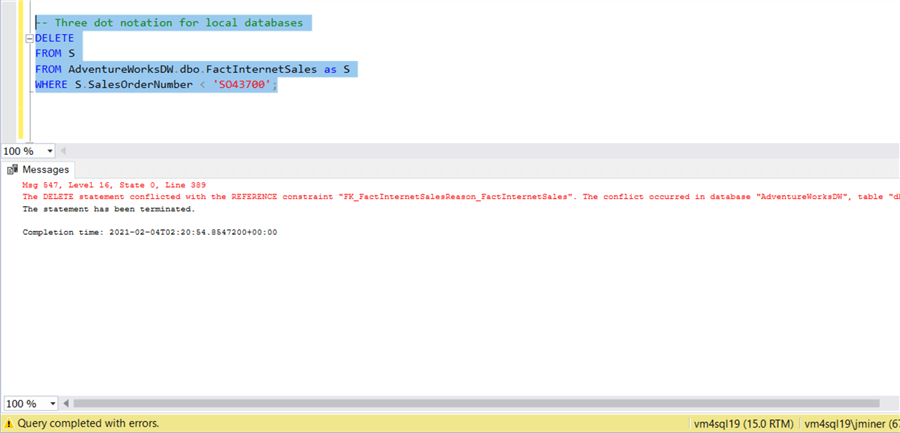
Regardless of the technique, a Foreign Key Reference Constraint will prevent the deletion. The offending records in the [FactInternetSalesReason] table must be deleted before this statement will be successful.
Deleting from remote data sources
I prefer to use a linked server when dealing with remote databases. Please follow my article on the subject to create a linked server to Azure SQL Database named dbs4advwrks that we created in the lab environment. There are two techniques that I will showcase using this linked server.
First, we can use a four-part notation to perform any CRUD action on our Azure SQL database.
-- Using 4 part notation with linked server
SELECT *
FROM MyAzureDb.dbs4advwrks.dbo.FactInternetSales AS S
WHERE S.SalesOrderNumber < 'SO43700';
GO
Second, we can use the OPENQUERY row set function as part of the FROM clause.
-- Using open query with linked server
SELECT *
FROM OPENQUERY (MyAzureDb, 'SELECT * FROM dbs4advwrks.dbo.FactInternetSales') AS S
WHERE S.SalesOrderNumber < 'SO43700';
GO
The image below shows three records that have order numbers less than S043700. This is the same result as on premise.

-- Using 4 part notation with linked server
DELETE
FROM S
FROM MyAzureDb.dbs4advwrks.dbo.FactInternetSales AS S
WHERE S.SalesOrderNumber < 'SO43700';
GO
Unlike the on-premises version of the Adventure Works Database, my version of the database in the cloud does not have a foreign key constraint. Therefore, the DELETE statement completes successfully.

Transaction Log – DELETE FROM
I have completely covered the syntax of the T-SQL DELETE statement. If you do not care about database administration, you can skip this topic. However, as a developer you should know how your coding will affect the database engine. Please drop the Adventure Works Database at this time. Then, restore the database from our BAK file. This will give you a clean version of the database with a relatively small log file.
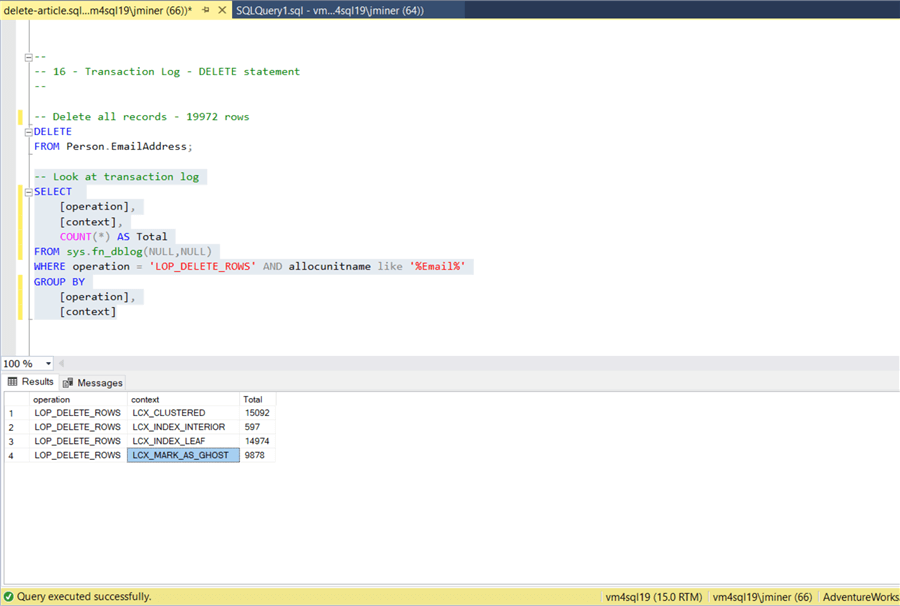
We are going to use an undocumented system function to read the transaction log. Please see this TechNet article that goes over the sys.fn_dblog() function. We are going to pass in two null values so that we can read up the whole log file as a table. Make sure you execute this code in the Adventure Works database. The T-SQL below deletes all records from the [Person].[EmailAddress] table. Since the DELETE action is fully logged, we expect to see a lot of entries in the returned table.
-- Delete all records - 19972 rows
DELETE
FROM Person.EmailAddress;

-- Look at transaction log
SELECT
   [operation],
   [context],
   COUNT(*) AS Total
FROM sys.fn_dblog(NULL,NULL)
WHERE operation = 'LOP_DELETE_ROWS' AND [AllocUnitName] like '%Email%'
GROUP BY
   [operation],
   [context];
GO
The image below shows the result for executing both statements. There are 40,541 entries generated from the deletion. There is a deletion for the actual record in the data page as well as a deletion in the non clustered index page. The context marked as LCX_MARK_AS_GHOST are data or index pages that are completely empty. Of course, there is some over head for the B-Tree Index nodes that are not leaves which are shown by the context marked as LCX_INDEX_INTERIOR.
Transaction Log – TRUNCATE TABLE
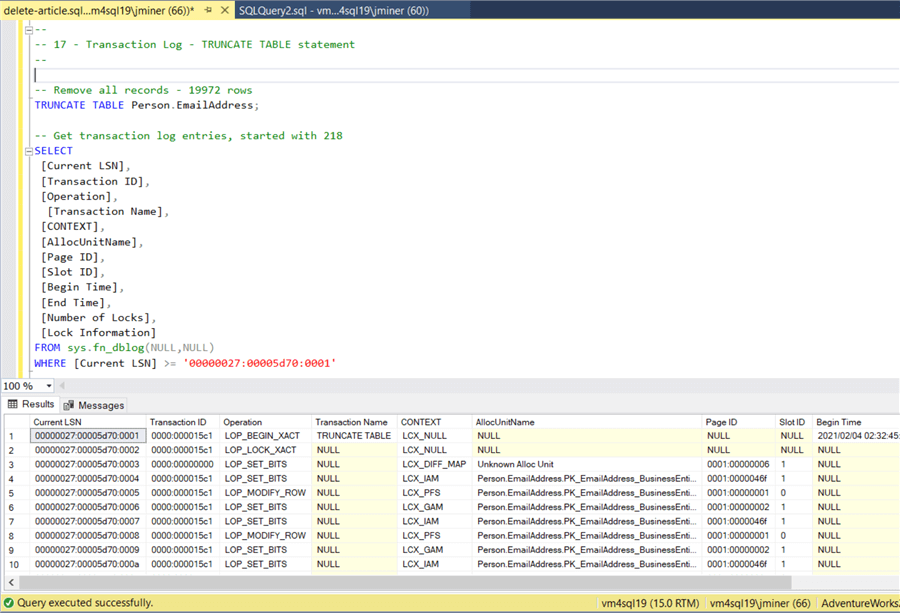
Like I said earlier, the TRUNCATE TABLE statement is minimally logged. Please drop the Adventure Works Database at this time. Then, restore the database from our backup file. This will give you a snapshot of the database with a relatively small log file. Find the maximum log sequence number by executing the sys.fn_dblog() function without any WHERE clause. Replace the string literal in the WHERE clause with this value.
-- Remove all records - 19972 rows
TRUNCATE TABLE Person.EmailAddress;

-- Get transaction log entries, started with 218
SELECT
  [Current LSN],
  [Transaction ID],
  [Operation],
  [Transaction Name],
  [CONTEXT],
  [AllocUnitName],
  [Page ID],
  [Slot ID],
  [Begin Time],
  [End Time],
  [Number of Locks],
  [Lock Information]
FROM sys.fn_dblog(NULL,NULL)
WHERE [Current LSN] >= '00000027:00005d70:0001';
GO
There is clearly a big difference in the number of entries added to the transaction log. The DELETE FROM statement generates over 200 times more records than the TRUNCATE TABLE. Therefore, one should use the later statement when clearing out all data from a table.
The following table conditions will cause the TRUNCATE TABLE statement to fail with an error.
- Referenced by FOREIGN KEY constraint
- Participates in an indexed view
- Published by using transactional or merge replication.
- Are system-versioned temporal
- Are referenced by an EDGE constraint
If you do not have these conditions and must empty a table during data processing, please use the TRUNCATE TABLE statement.
Summary
The DELETE statement is one of the 4 CRUD statements (SELECT, INSERT, UPDATE and DELETE) that are used to manipulate data within a TABLE. These statements are part of the data manipulation language (DML). The ANSI SQL standard was adoption by ISO and the latest version is dated 2016. This theoretical document is the basis for all modern day database systems. The DELETE statement is core to every DBMS.
In today’s tutorial, we started with a very simple DELETE statement and slowly worked our way up to more complex statements that might use multiple table joins and/or where clauses. One key restriction is the fact that the DELETE clause can only work with a single table. This might cause confusion with new developers who tried to delete data from a Common Table Expression or User Defined View that joins multiple tables.
A DELETE statement with an OUTPUT clause can be used to move data from one table to another. This design pattern is typically used when moving data from a primary to a history table. The TOP clause can be used to limit the amount of data that is being DELETED. This is very important when working with very large tables. In fact, scheduling a log backup to reclaim space within in the loop might be a wise choice.
Today, many database systems reside in a variety of locations. Therefore, it is important to know the row set functions that use OLE DB. These functions can be used to work with data that might not be on the same server. I recommend using a linked server when dealing with a local or remote connections on a long-term basics. This eliminates the hassle of supplying connection information for each statement. Regardless of where the data is located, the order in which the data is removed is important when referential integrity (constraints) are in play.
Finally, Microsoft SQL Server uses write ahead logging which is single threaded. Therefore, it is important to know which statements are fully logged. If you need to empty a table, consider using the TRUNCATE TABLE instead of DELETE FROM. I hope you enjoyed this tutorial on the DELETE statement.
Next Steps
- Enclosed is the full T-SQL script used during this tutorial.
- Next time, I will be talking about using the DISTINCT keyword with the SELECT statement.
About the author
 John Miner is a Data Architect at Insight Digital Innovation helping corporations solve their business needs with various data platform solutions.
This author pledges the content of this article is based on professional experience and not AI generated.
View all my tips
Article Last Updated: 2021-03-17


